The Bowen Rough Country rear sight is a well-known upgrade among revolver enthusiasts. Several months ago I reached out to Hamilton Bowen to request a set of these sights for review. He obliged, but through a mailing SNAFU (that was completely my fault) I didn’t receive them for several months.
When I finally received them, I wasted no time installing them on my 10mm GP100 – my ultimate “rough country” revolver. While providing similar function to factory rear sights, these sights are truly different. It didn’t take me long to see what all the fuss was about.
Bowen Rough Country Rear Sights
I first learned of the Bowen Rough Country rear sight from Chris at Lucky Gunner. Several years ago Chris detailed his perfect revolver, and this sight was among the very few aftermarket parts he added to his 3″ Model 66. What is so special about this sight?
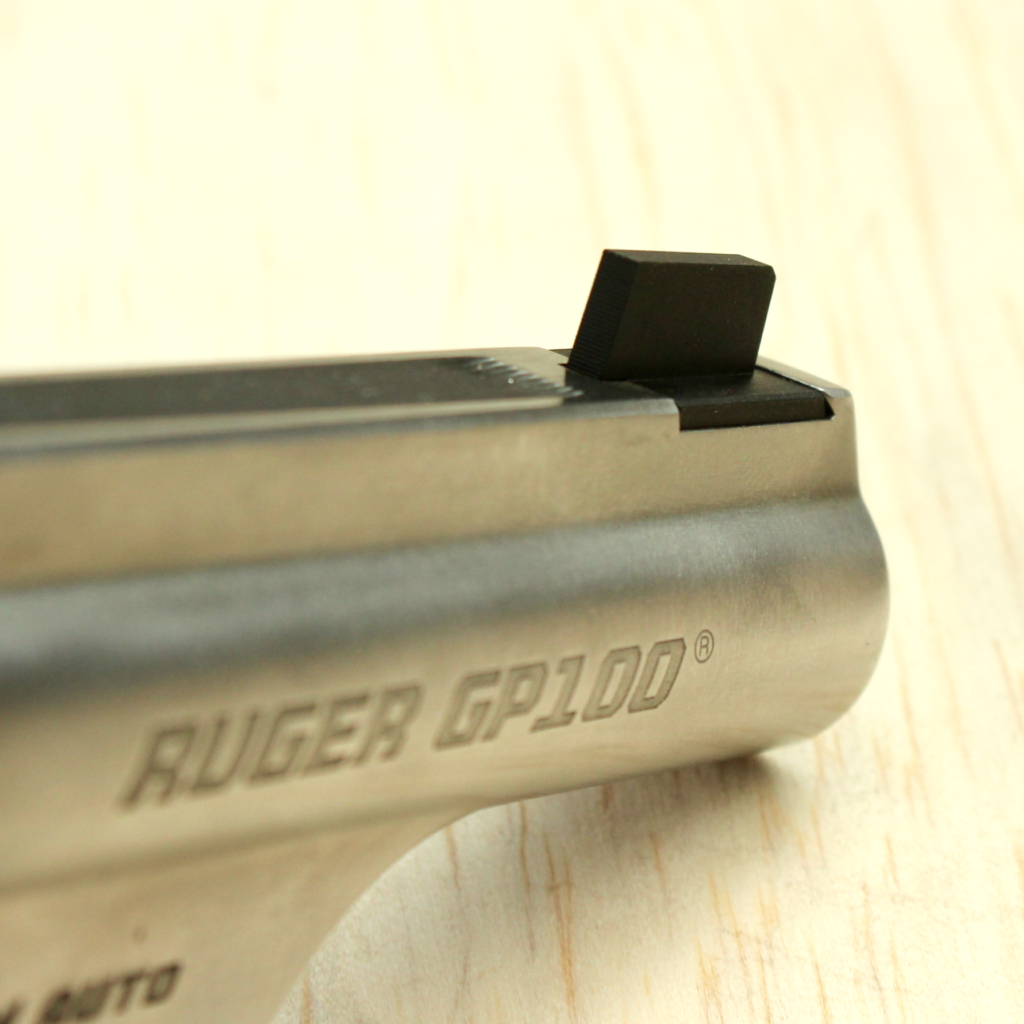
To start with, each Bowen Rough Country rear sight is hand-built in Louisville, TN. They are machined from bar stocks of alloy steel, and finished with a glare-reducing matte finish. When looking at this part, there is absolutely no doubt that it is made with care and precision. That’s all well and good, but the sight also has to function. . . and that is what the Bowen Rough Country is really known for.
The idea behind this rear sight is to offer the best of both worlds. Shooters have all the flexibility of adjustable sights and can modify point-of-impact for various loads. Where these differ from factory adjustable sights is in the name: these sights are built for hard use in rough country. The Bowen Rough Country rear provides an adjustable sight that is almost as rugged as a fixed sight. In addition to being machined from bar stock (rather than cast) each component of this sight is bigger, beefier, and stronger.
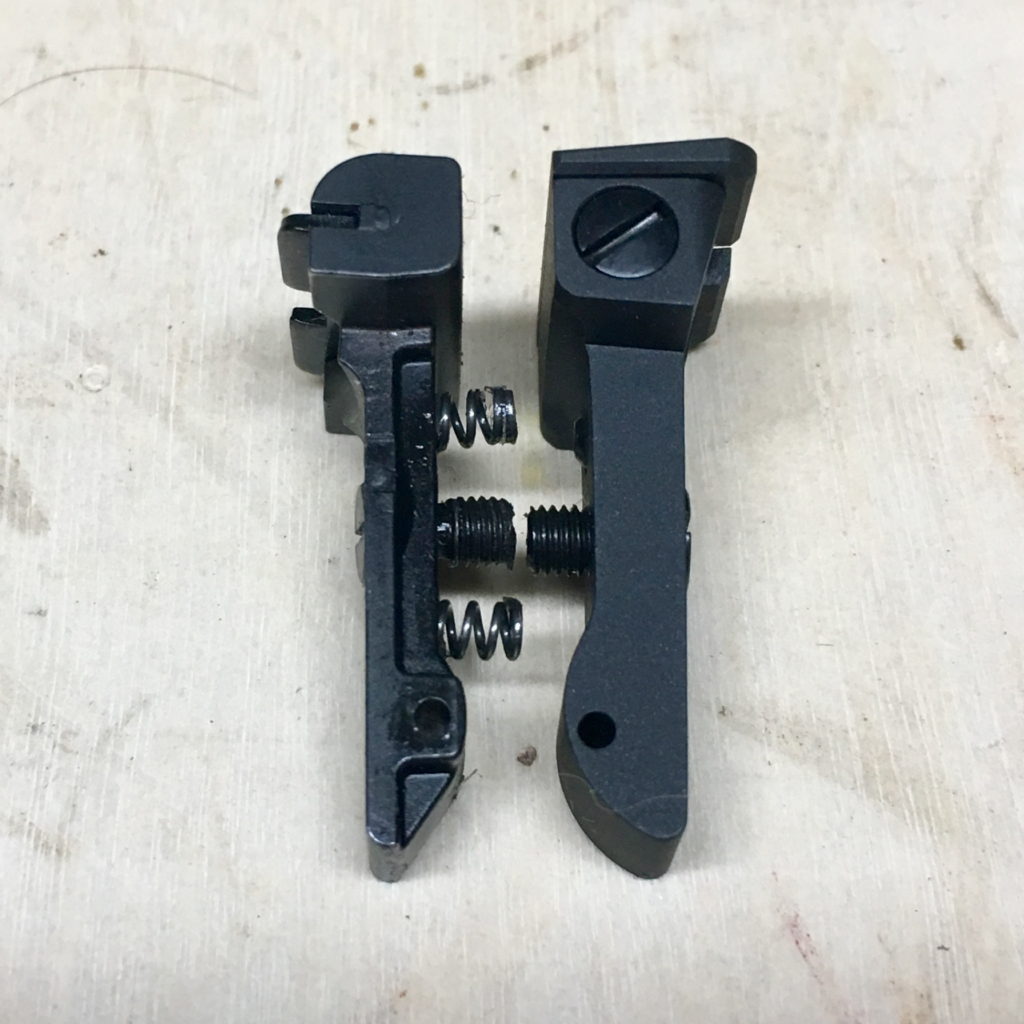
But the difference still doesn’t stop there. In the case of the Ruger rear sight, two springs are found in the OEM assembly. These provide upward tension away from the frame, while a single elevation screw raises and lowers the blade. The upgraded Bowen sight functions differently. Instead of merely relying on springs to oppose the elevation screw, a second, opposing grub screw (called the “lock screw”) is added. When the appropriate sight-height is found, the lock screw is tightened against the frame, providing opposing tension against the elevation screw. This makes for a much more secure arrangement.
The Bowen Rough Country protects windage adjustments similarly. First, the rear blade is massive in comparison to the factory blade, and is machined rather than stamped. Instead a single screw that moves the blade, the Bowen Rough Country again relies on the principle of opposing tension. A screw on the opposing side of the rear blade must be loosened to make adjustments to the other. Once adjustments are made, both screws are tightened, protecting the sight’s zero.
Installing the Rough Country
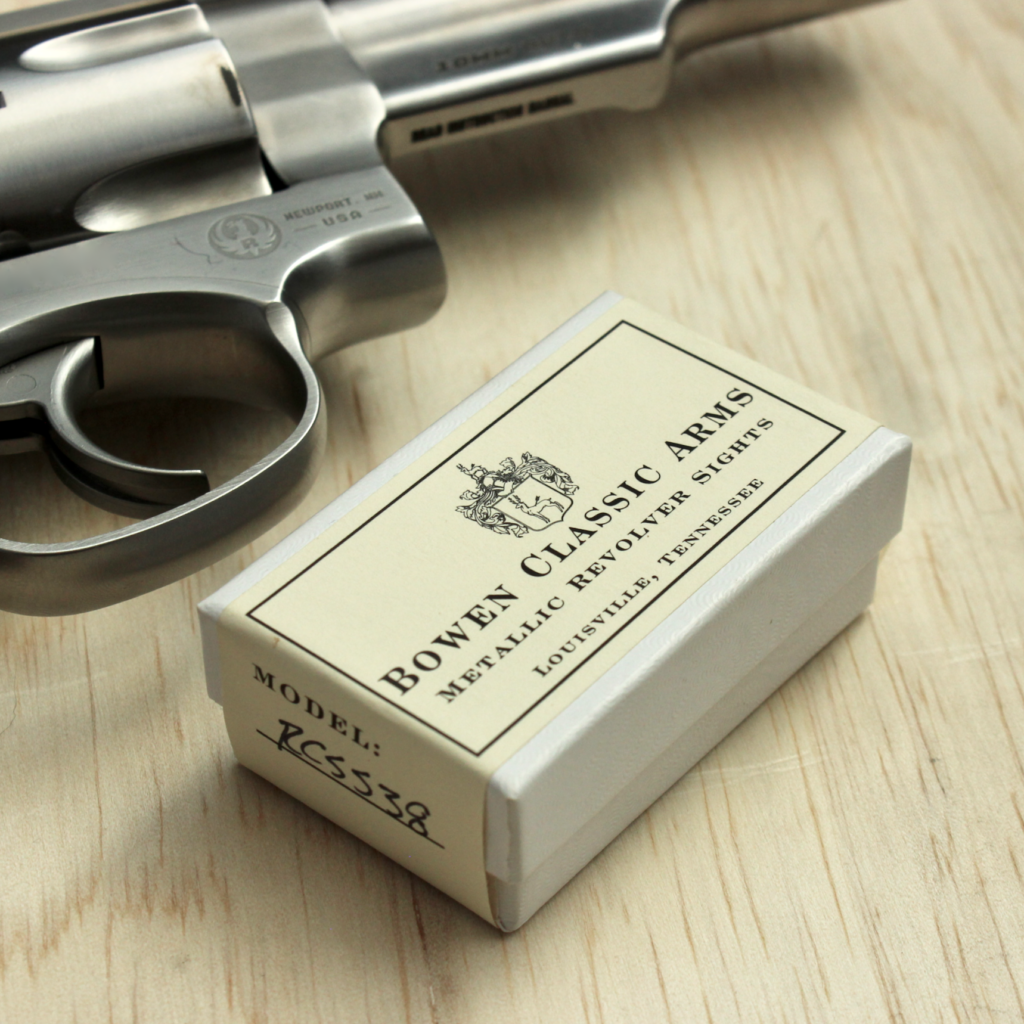
The Rough Country sight was shipped in a small, padded box that is reminiscent of a jeweler’s box. The box was sealed with a paper label from Bowen Classic Arms. This is possibly the classiest packaging I’ve ever seen for a firearm accessory. I immediately set about getting this sight onto my revolver.
Installation of this sight was a relatively painless process. The most difficult part was waiting for the appropriate punch to arrive from Brownell’s. Once the punch arrived, I gathered the other tools needed to swap out the blades and got to work. To install these sights (on a GP100) I found that I needed nothing more than a 1/16th” roll pin punch, a small hammer and a flat screwdriver. The literature included in the packaging does warn that in some extreme cases, hand-fitting may be required.
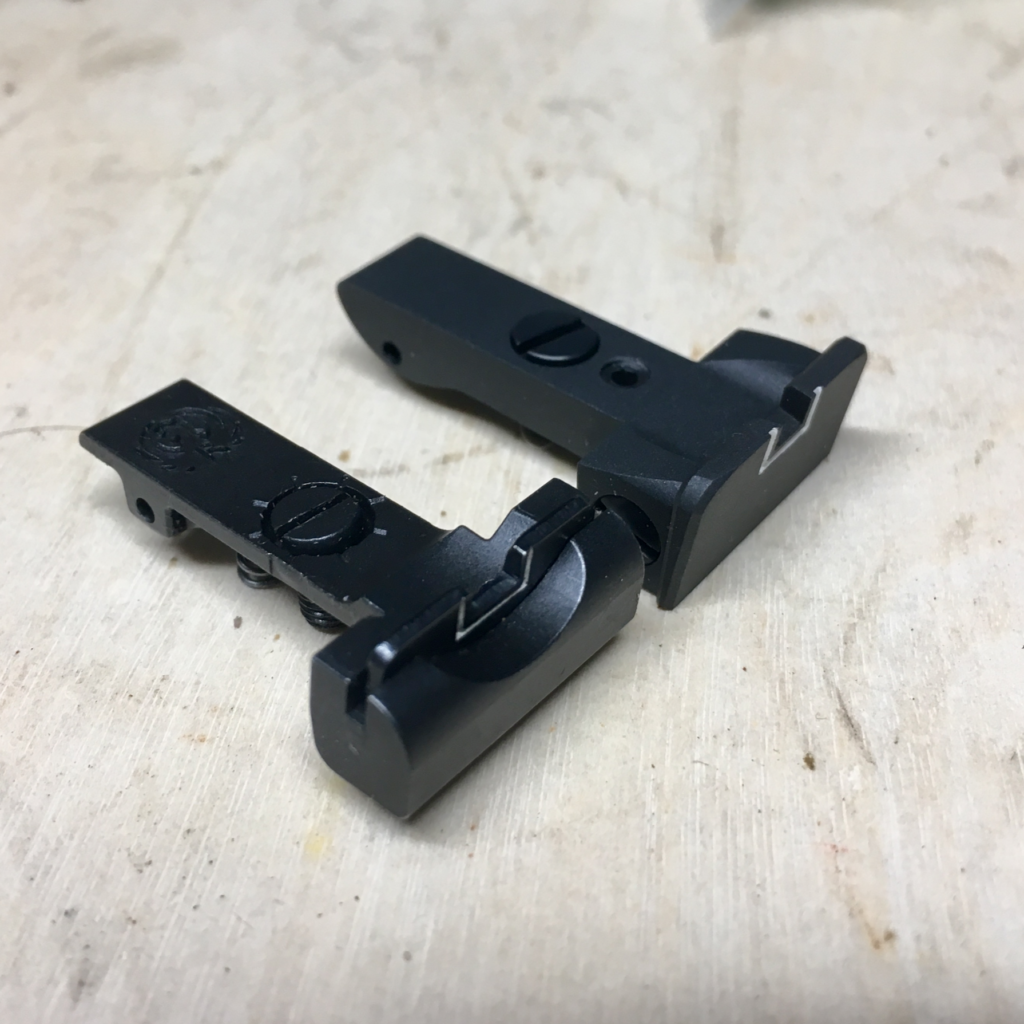
Step One: Ensure you have an unloaded revolver, and remove the factory sight. To do so, loosen the sight tension screw. Next, use the 1/16th” punch and drive the roll pin out; the OEM sight fell out easily. At this point I marveled at the two sights side-by-side. The difference in the Bowen part is stunning; the metal is machined with nary a blemish or tooling mark anywhere. The Rough Country sight is also much more solid, with no metal being spared. The OEM sight on the other hand appears cheap in comparison.
Step Two: remove one of the tension springs from the OEM sight. Using a dab of grease, place it into the corresponding hole at the leading portion of the Bowen sight.
Step Three: install the Rough Country onto the revolver. This involves two smaller steps. First, install a roll pin through the hole in the frame. I found it necessary to use my punch as a pilot to align the holes in the sight tang and the frame. Next, I carefully removed the punch while holding the sight in place and began inserting the pin.
I ordered replacement roll pins from Brownell’s but mistakenly ordered them too short. Fortunately, I was careful in the removal of the original roll pin, and was able to able to reuse it.
Next, simply tighten the elevation screw. Installation is now (mostly) complete. At this point you must zero your sights and fully complete the installation.
Sight Regulation
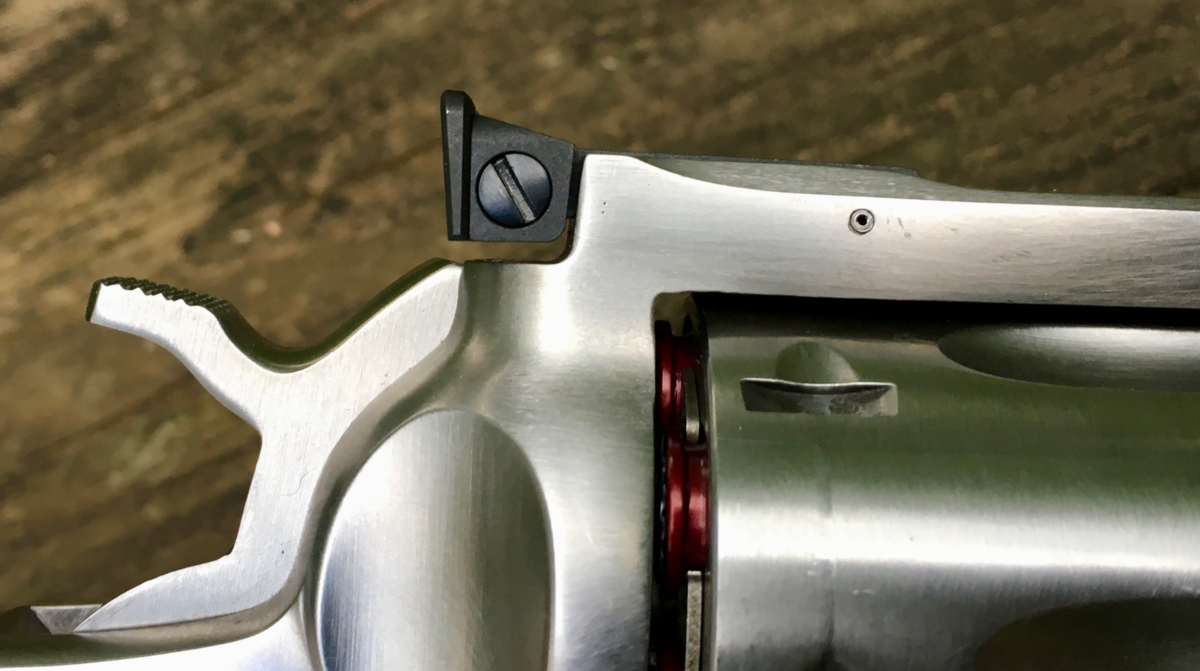
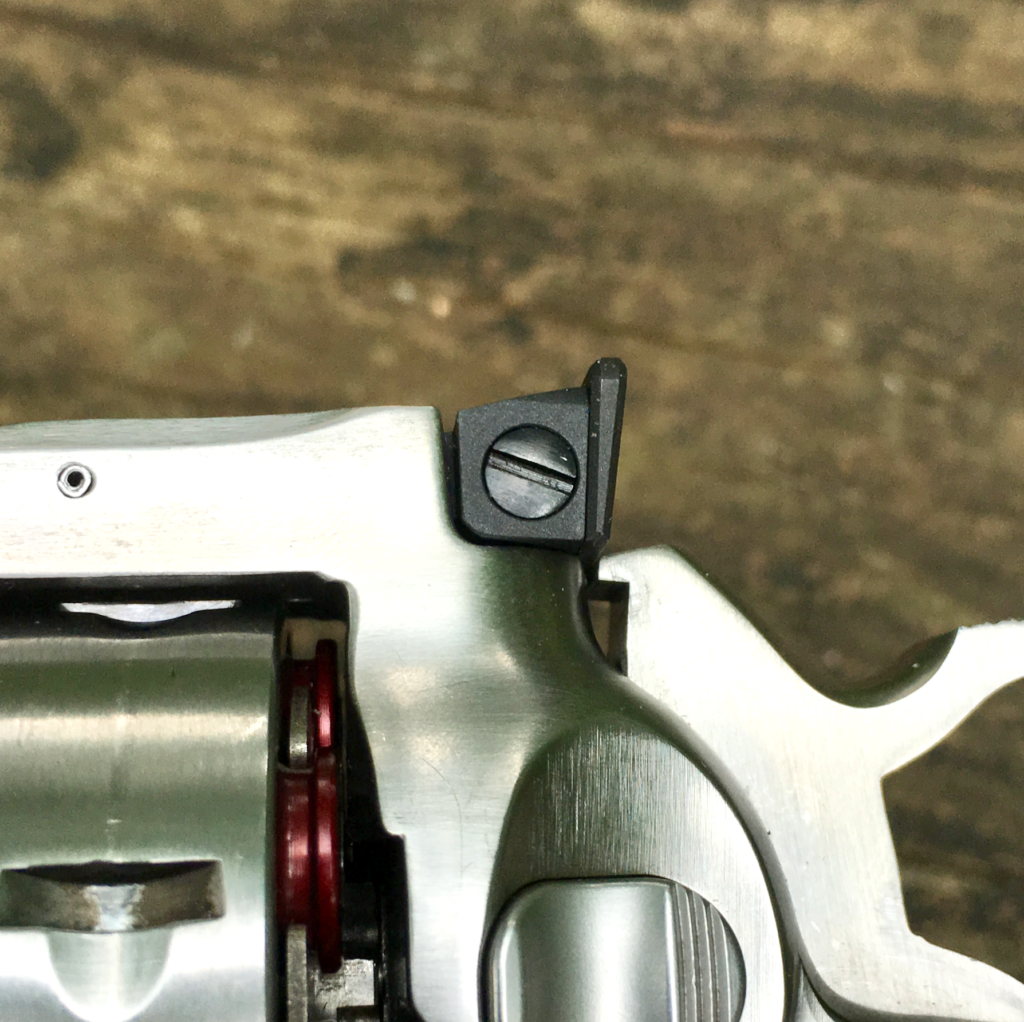
The instructions from Bowen indicate the “ideal installation” requires installing the sight with no elevation. In other words, tightening the elevation screw all the way down. This forces the sight tang tightly against the frame. Applying opposing tension with the lock screw will provide the strongest possible installation of the Rough Country sight. Obviously this would necessitate filing the front sight blade to regulate elevation. Though I didn’t necessarily plan to go this route, I found this wasn’t even possible on my GP100.
When the sight was fully tightened it interfered with the travel of the hammer. Note that the photo below was set up to illustrate this; when I fully lowered the rear sight with the hammer down, it could not travel at all. This may be peculiar to the 10mm GP100.
Three tools are required to fully zero a revolver with the Bowen Rough Country: a flathead screwdriver, a 1/16th” Allen wrench, and some Blue Loctite.
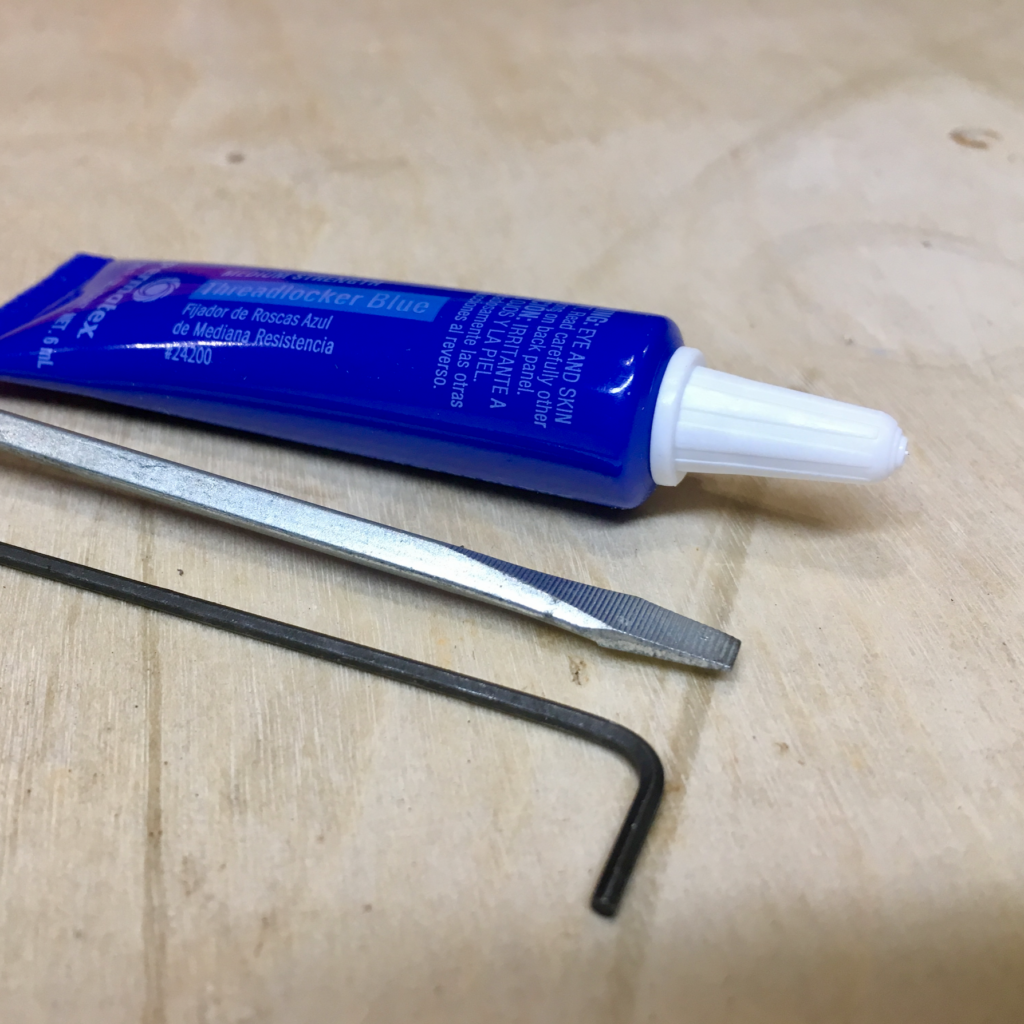
Begin with the lock screw loosened. Make standard elevation adjustments, turning the elevation screw counter-clockwise to raise the point-of-impact and clockwise to lower it. Once the appropriate point-of-impact has been achieved, apply Loctite to the lock screw and tighten it. Now, tighten the elevation screw. The height of the rear blade is fixed by the lock screw; tightening the elevation screw at this point should not alter your point-of-impact.
Important note on lock screws: two of these 6-40 screws are included in the package. The instructions recommend selecting the one that engages the most threads in the sight, but does not protrude above the body of the sight. This is another thoughtful inclusion on the part of Mr. Bowen to combine maximum utility, extreme ruggedness, and good looks.
Adjusting windage requires loosening one screw and tightening another. For example, if you wish to move your POI to the left, first loosen the right screw. Next, tighten the left screw to move the blade to the left. Then, re-tighten the right screw to provide opposing tension, and lock the blade into place.
Using The Rough Country
I knew I needed to give this sight an appropriate front post, and I wanted to replace the fiber-optic front anyhow. I went a relatively inexpensive route and chose a very clean, serrated black blade from Dawson Precision (.350″ height x .125″ width). I know a plain black blade is not everyone’s cup of tea. If you prefer a fiber optic that is more refined than the provided front sight, Dawson offers that option, as well.
Installing the front sight was incredibly easy. Again, ensure you are working with an unloaded revolver. Using a punch or small screwdriver, depress the spring-loaded plunger found in the hole just above the muzzle. Lift the front sight out. Drop your replacement sight into the dovetail, and remove tension from the plunger. That’s it.
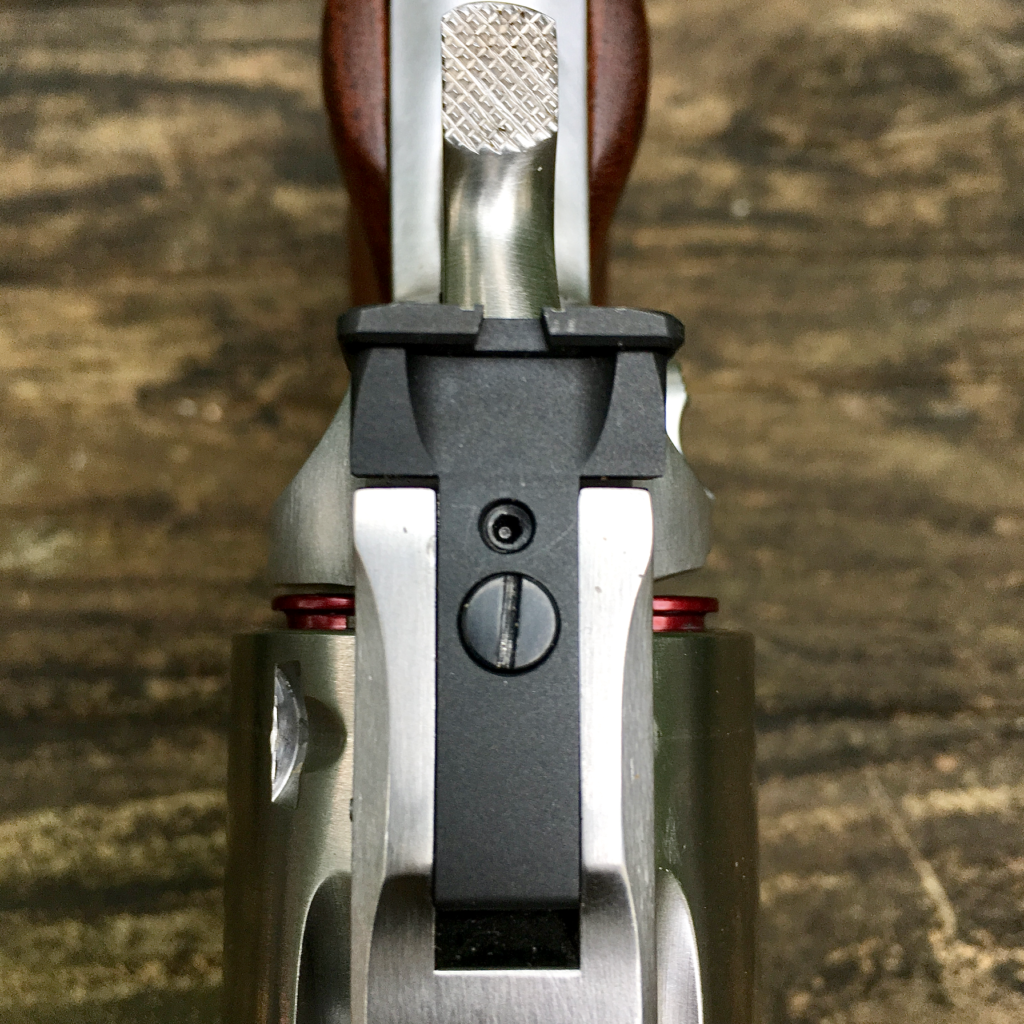
The sight that Mr. Bowen sent me is unserrated, with a square notch and white outline. Combined with the Dawson Precision front sight, this offers an incredibly clean, crisp sight picture. Although the front blade I ordered is the recommended height, I found that some filing was necessary. Otherwise the Bowen rear was elevated higher than I preferred.

Not only is this sight far more rugged and more likely to retain its zero than the factory rear, it’s also better looking. The Bowen Rough Country definitely stands out and adds a certain, sophisticated look to this hard-hitting revolver.
The Bottom Line
At $99.95, Bowen Rough Country sights are not an inexpensive upgrade. Oh, but what an upgrade they are! These sights are beautifully crafted, and far more rugged than the OEM adjustable rears. Bowen Rough Country sights are available for Ruger and S&W revolvers (new style, rounded tang only, unfortunately). They are also available in a number of configurations, including the square-notch/white outline seen here, a V-notch (similar to the XS Big Dot), and a serrated target notch.
If you’re looking for a hard-use revolver sight or simply demand the highest in quality, this is perhaps the very best option available.
Liked it? Support RevolverGuy on Patreon, and special thanks to our patrons!
Looks a lot like the Elliason rear sight used on the old Gold Cups.