I was working a shift at the gun club recently, and one of my friends was eager to show me his new revolver. As he was talking me through the details of the new gun, I noticed that the rear sight was pushed far over to one side, and my friend explained that the correction had been necessary to get the gun to shoot straight.
Being a RevolverGuy, I have to admit I was a little suspicious. My friend is a very good marksman, but his preferences in handguns trend towards single action and striker-fired autos, and this wouldn’t have been the first time that I saw a shooter who was accustomed to short-travel, autopistol triggers struggle with the long, double action trigger on a revolver. I’ve seen lots of pistol shooters who wound up pushing or pulling their revolver off target as they wrestled with the long trigger stroke on the gun, so that’s the first place my mind went when I saw the displaced rear sight.
My friend asked me to try the gun to see if it shot differently in my hands. “It would be nice to know if the problem is the gun, or if it’s me,” he said.
I dutifully loaded the revolver with six rounds and proceeded to give it a go. When I lowered the revolver to examine my target, I expected to see a nice, but displaced, group as a result of the radical sight correction on the gun. Instead, I was greeted by a nice group in the center of the Bull.
What gives?
Normally, a group like this would be a good thing to see, but I wasn’t relieved by this one. Instead, I was now convinced there was a problem with the gun. With the rear sight pushed all the way over to one side, this gun should have grouped wide, but the fact it didn’t indicated there was something wrong.
It only took a second to confirm my suspicion. A quick examination of the unloaded gun revealed the problem, and I had the sad responsibility of telling my friend that his brand new gun had a flaw—it’s barrel wasn’t properly installed, and it had a “clocking” error.
Clock-what?
When a barrel is installed on a revolver frame, the timing of the threads on the barrel extension and the frame itself has to be just right for everything to line up in the right place. A small difference in the thread pattern, or a frame or barrel shoulder that’s not properly dimensioned, can result in a barrel whose shoulder bottoms out against the frame too early or too late. This results in a front sight that’s angled off to one side, instead of being perfectly centered and perpendicular to the topstrap of the frame, at top dead center (TDC).

If you’ve ever had to do any kind of home plumbing repairs, you’ve probably encountered something like this. In example, I recently had to replace a hose spigot in the backyard, and when I got the new one threaded onto the pipe, it was no longer oriented straight up and down like the old one was, but was instead about 10 degrees off true vertical. Grrrr.
There may be a different term that’s preferred for this situation (maybe “timing” or “indexing”), but we’ll call it a “clocking error” here, because the part isn’t oriented at 12 O’ Clock, like we want it to be, but instead is pointing at some other clock position on either side of center.
Go wide
The problem, from the shooter’s perspective, is that a clocking error leaves the front sight angled to one side or the other, and this has a negative influence on accuracy.
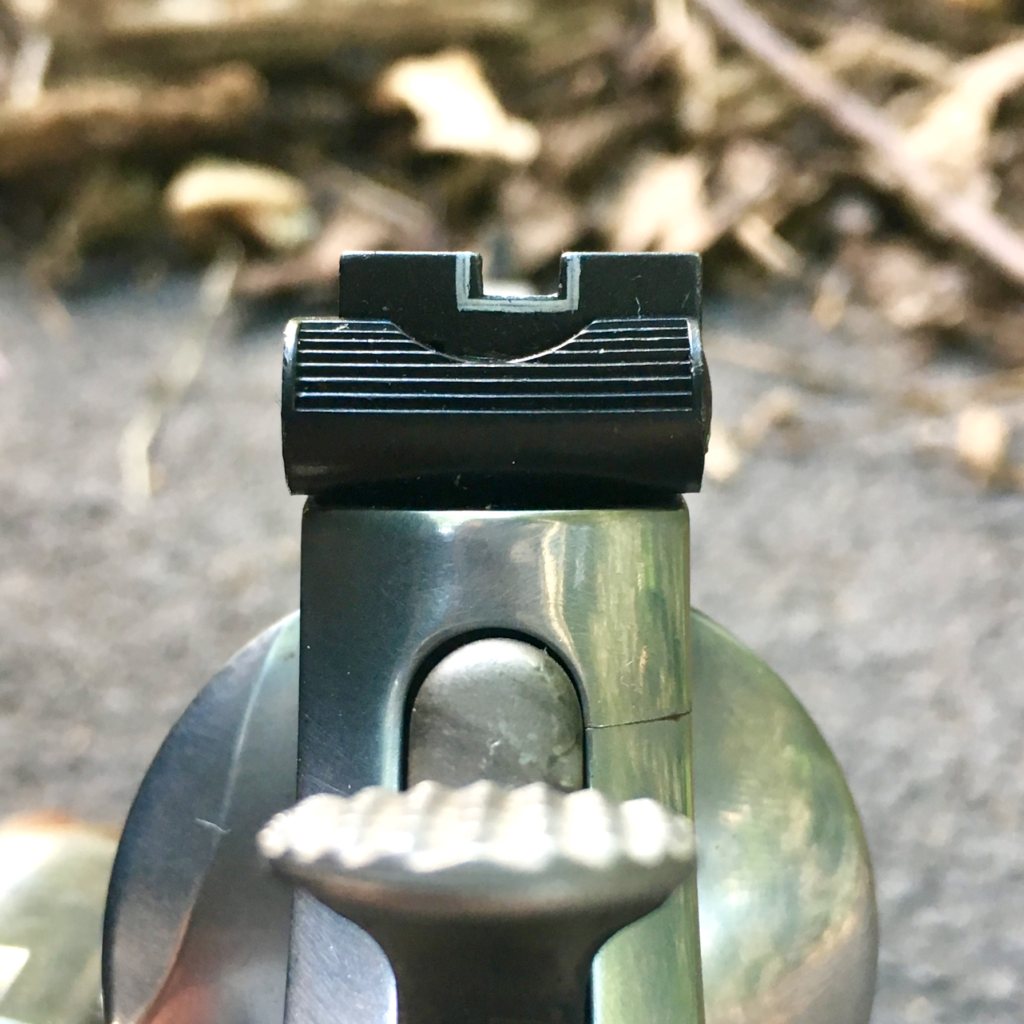
If the front sight is angled too far to the right (from the shooter’s perspective), for example, the shooter will likely see it crowding the right side of the rear notch when he aims the gun, and will “correct” the problem by angling the barrel towards the left, to “center” the front sight in the rear notch. This results in the bullet striking to the left of where the shooter wanted it to go. RevolverGuy readers may recall that Justin encountered this very issue on a 4” Smith & Wesson Model 610 that he evaluated here in these pages.
The reverse happens if the front sight is angled too far to the left. The shooter will move the barrel to the right, to “center” the front sight in the rear notch, and the rounds will impact to the right of center.
Since most revolvers are threaded so that a barrel is turned clockwise (when viewed from the muzzle end) to screw it into the frame, a barrel shoulder that bottoms out on the frame too early will leave the front sight angled towards the right, from the shooter’s perspective (towards 11 O’ Clock, from the muzzle end). This results in bullets impacting left of center, for the reasons described above.
Similarly, a barrel shoulder that bottoms out on the frame too late will leave the front sight angled towards the left, from the shooter’s perspective (towards 1 O’ Clock, when viewed from the muzzle end). This will result in bullets striking to the right of center, after the shooter makes his “corrections.”
Identifying the problem
Because a barrel clocking error can be subtle, it’s not always easy to tell if your barrel is off center. A gross misalignment is pretty easy to see, but most of the time a problem like that won’t be allowed to leave the factory. Usually, the problem is much more subtle, and it takes a hard look to determine what you’re dealing with.
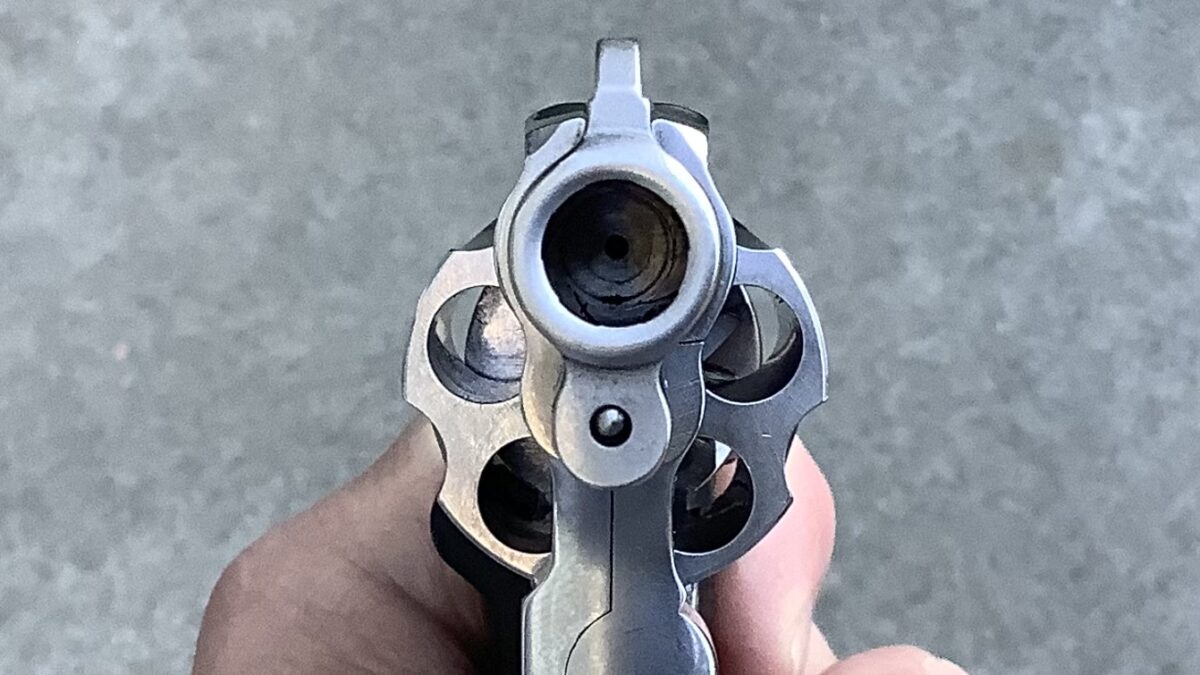
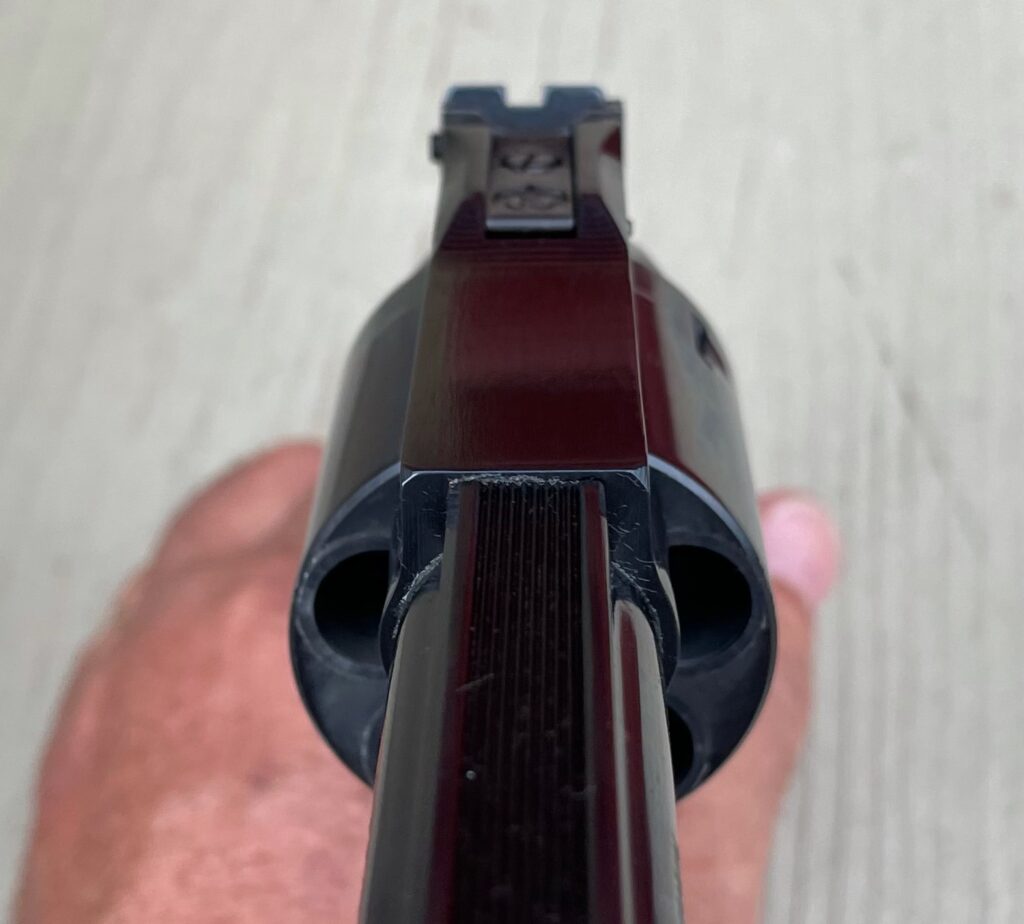
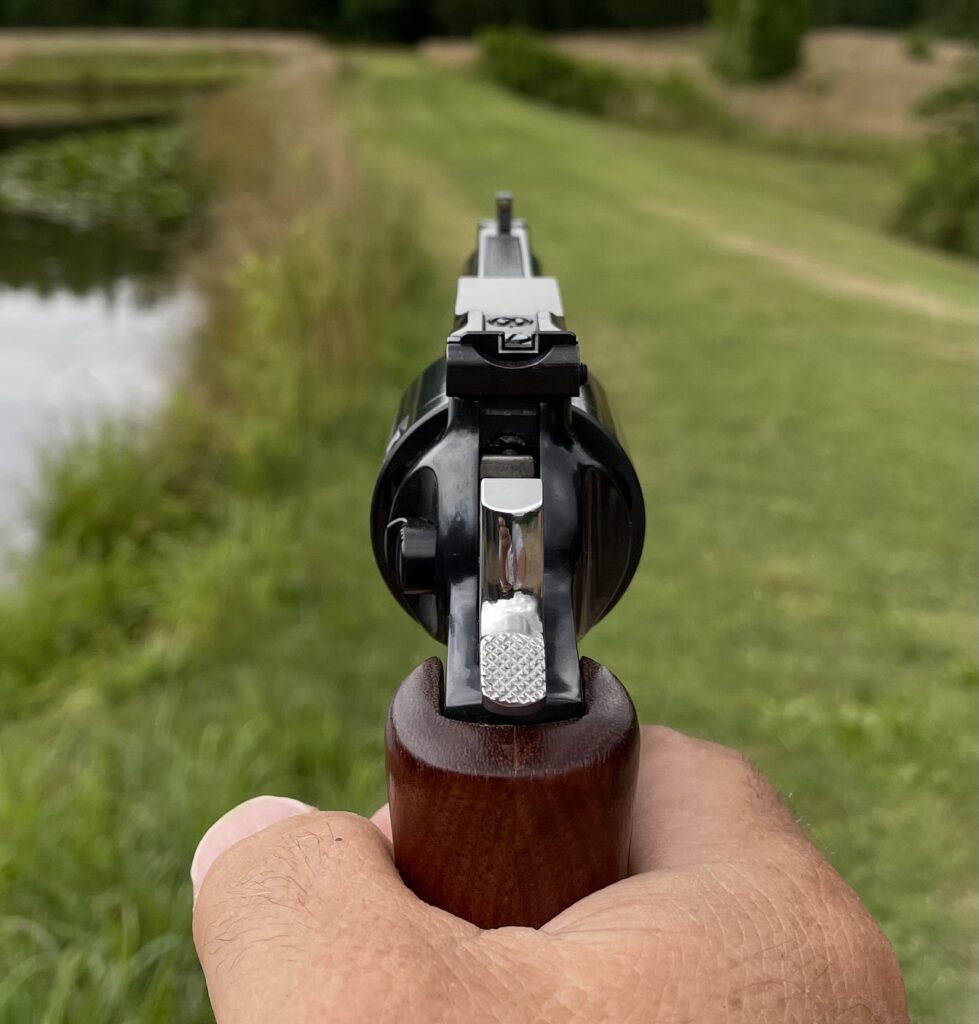
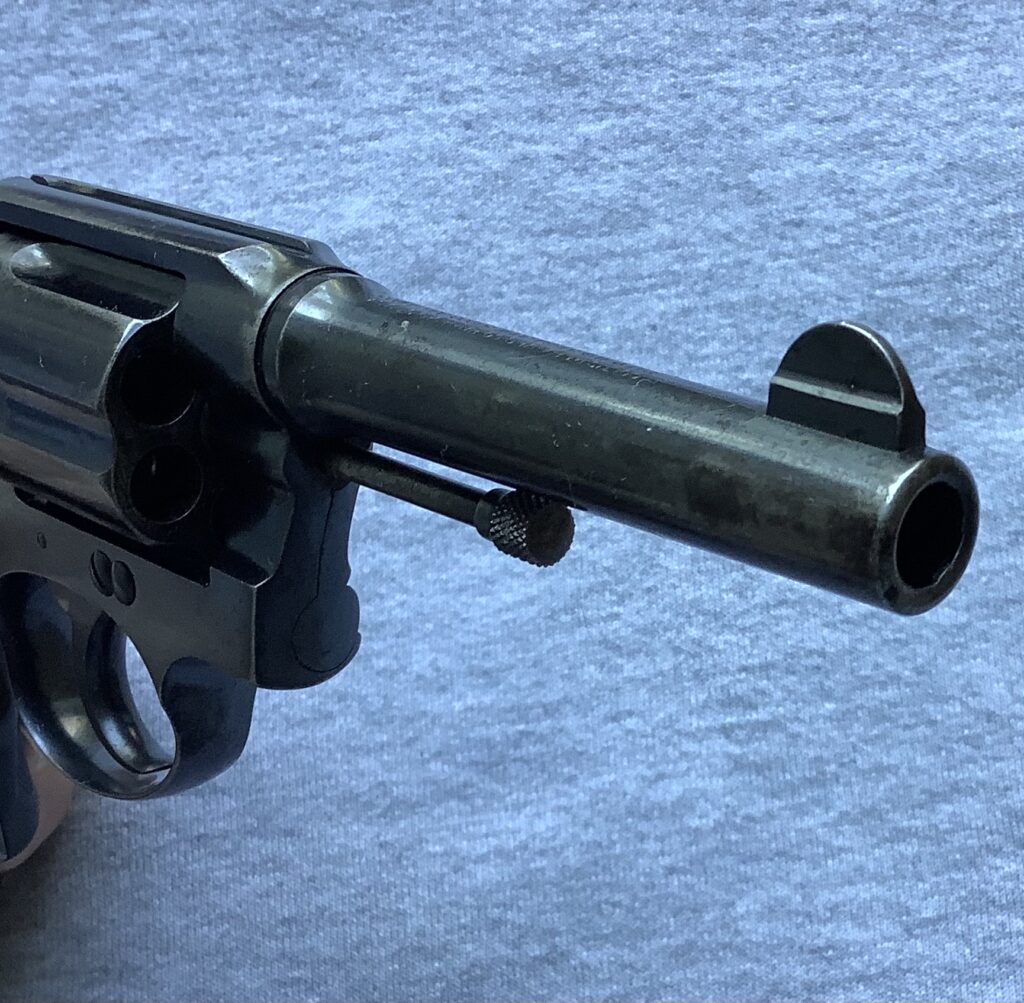
The first place to start is to look at the revolver from the muzzle end. After unloading the revolver, leave the cylinder open, and examine the gun from the front to see if you can detect a clocking error. Does it look like the front sight is cocked off to one side or the other, with respect to the frame?
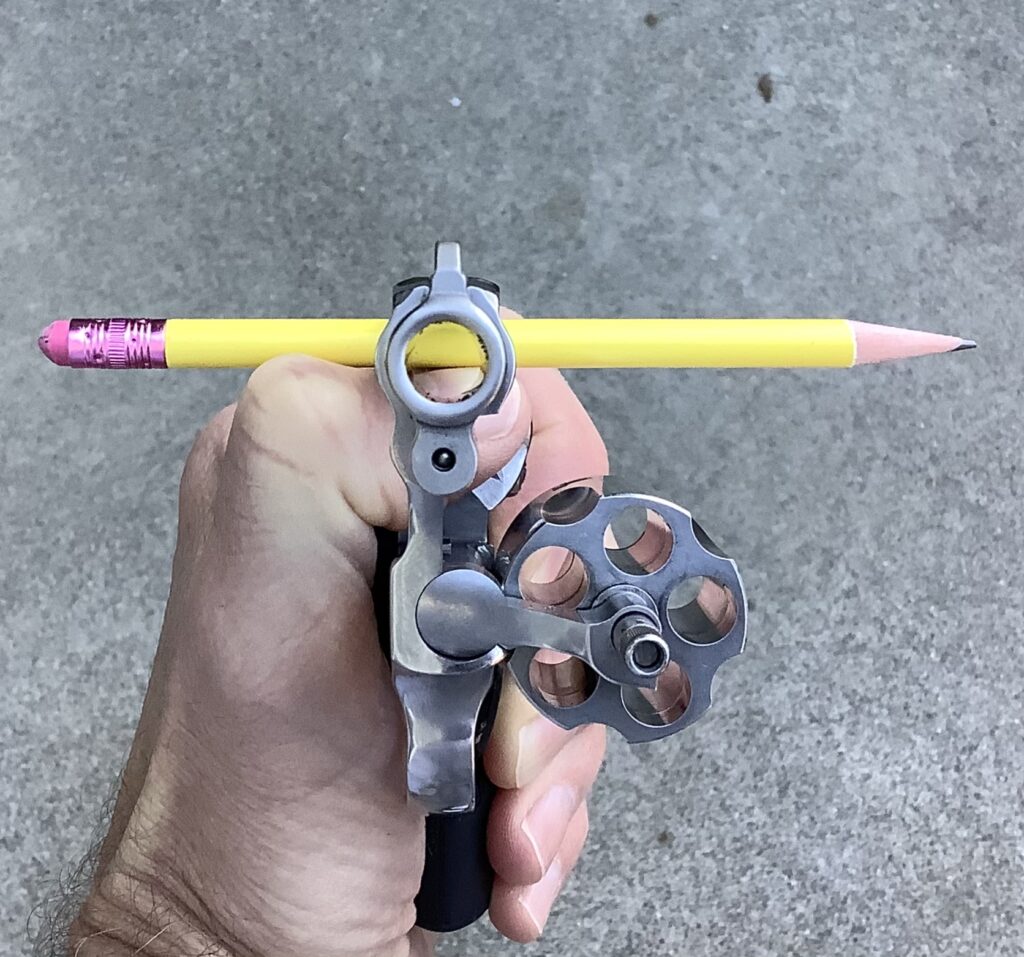
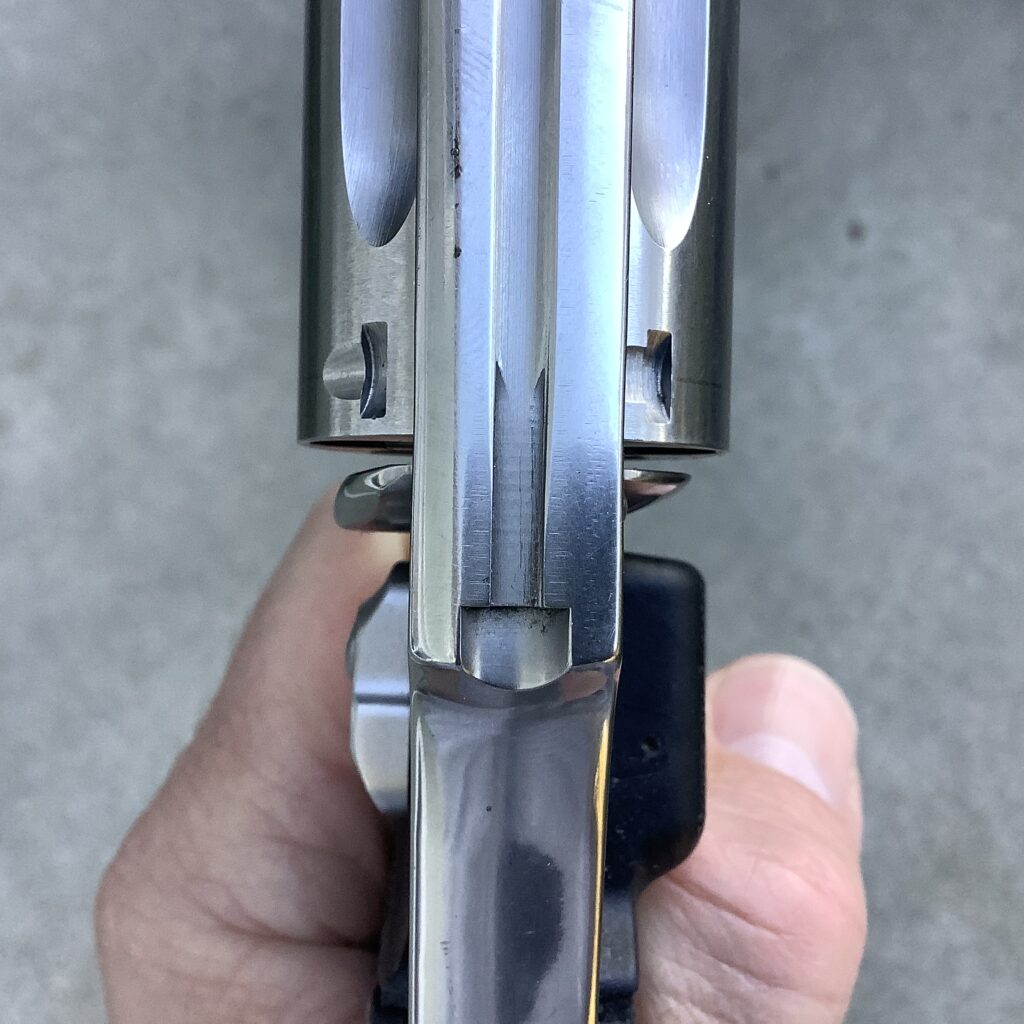
RevolverGuy friend Dean Caputo showed me a trick that can help with answering this question. If you take a straight instrument, like a ruler or a pencil, and hold it up against the underside of the topstrap inside the cylinder window so that it’s evenly centered, you can use it as a reference line to see if the front sight is cocked. A nicely-centered front sight will make a right angle with the pencil, but one that’s cocked off to the side will form an angle that is more than 90 degrees on one side, and less than 90 degrees on the other.
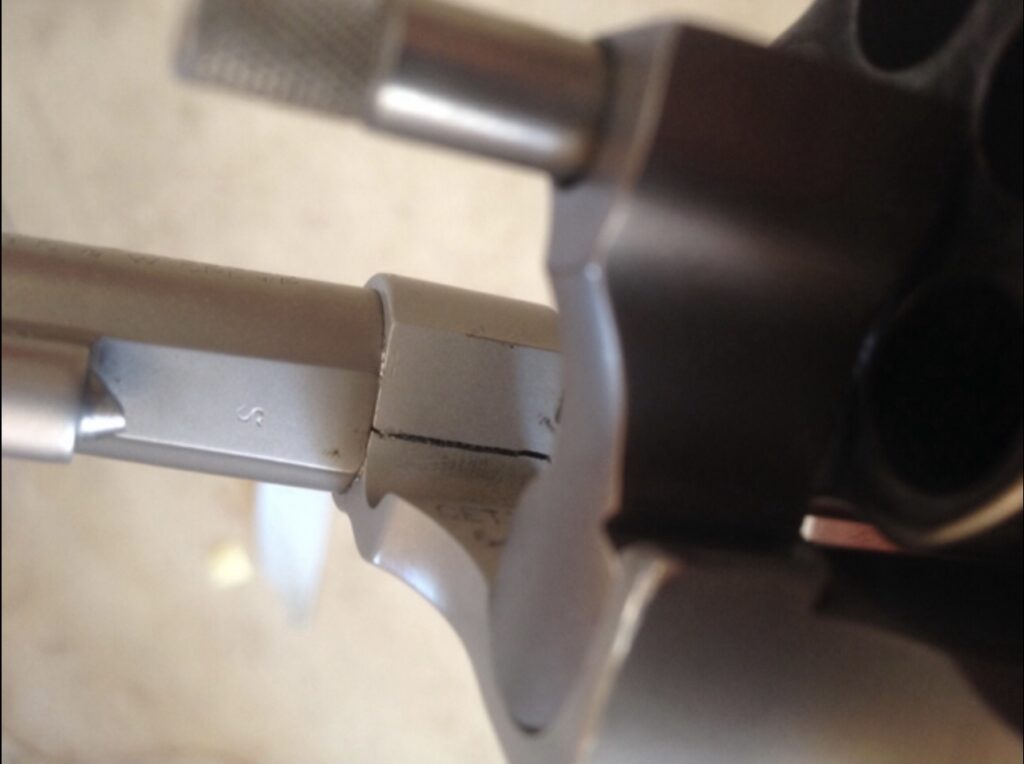
Another place you can look is the juncture between the barrel and the frame. If the barrel has any kind of grooves, sight ramp, or square profile on its top surface, you might be able to detect a misalignment where the barrel’s shoulder meets with the frame. A square shoulder that is too high on one side, and too low on the other, indicates that the barrel isn’t screwed into the frame properly, for example.
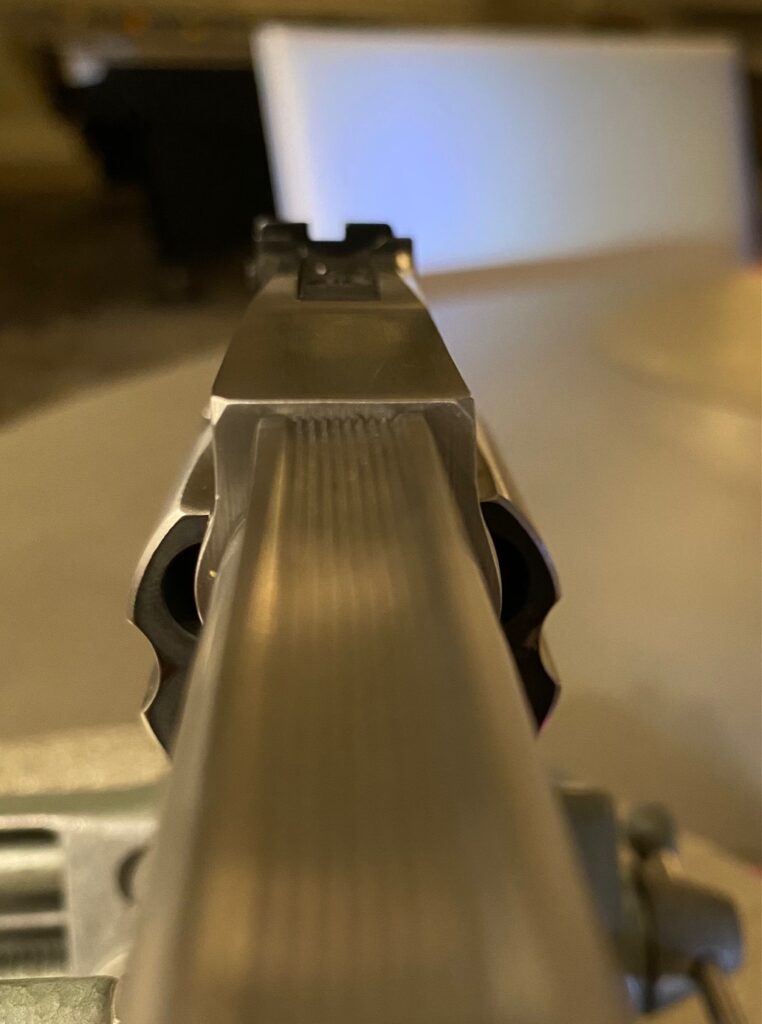
I’ve found that sometimes these subtle differences can be hard to tell with the naked eye, but they become more obvious when you see them in a picture, so it can also be helpful to prop your gun up, or place it in a vise, then snap a few pictures to help with your analysis. If you print the pictures out, you could even use a protractor to measure the angles, if you needed to.
Fixing the problem
The clocking error on the hose spigot that I mentioned previously was easy enough to fix, with a little bit of Teflon tape. Just a few extra wraps is all it took for me to eat up a little space on the threads and provide a tight fit, while still allowing me to put the part on straight.
Unfortunately, it’s not always that easy when we’re talking about a revolver.
If you have a revolver with an adjustable rear sight, then things aren’t too bad. You can simply run the rear sight to the left or right to fix your problem. If the clocking error is minor, then you should have more than enough travel in the rear sight blade to get the gun shooting straight. Personally, it would drive me nuts to see the rear sight pushed over to one side, but if you can live with it, then you can do good work with the gun set up like that.
Things become more difficult with a fixed sight revolver, however. Here, your fixes aren’t as simple as turning a screw, and involve some procedures that are fraught with the potential for making a very costly error.
The first you thing could try is to bend the front sight over, back towards the center. This was a relatively common fix on guns like the Colt Single Action Army revolvers, or the older Smith & Wesson revolvers with integrally-forged front sight blades, from what I understand. I remember a number of the Old Guard of writers—and some new ones, like John Taffin–describing how front sights were bent to fix windage problems. Taffin, as I recall, was pleased with the outcome on his samples.
But there are significant risks with this procedure. With guns like the older Colts, it’s very easy to break a front sight off completely at the joint in the sight’s key slot on the barrel. This would require you to silver braze the sight back on and reblue the gun—an expensive fix, for sure.
On the other guns, it’s just easy to screw up the job and wind up with a front sight that’s gouged or twisted (which will do you no good at all—you really don’t want to see the side of your front blade when you’re trying to aim), or leave a good scratch on your barrel.
Bending the sight is also contraindicated in some cases. It requires a relatively tall and thin sight blade, like the one found on the SAA, to get enough purchase on the blade to bend it. A gun with a short post (like a J-Frame), or a thick blade (like a modern ramp sight), could be very hard to bend without damaging the gun.
All said, there are much better methods of fixing the problem.
Doing some filing
One of these is to file your sights (usually the rear) to correct the windage error. This is probably easier to accomplish, and comes with less risk of breaking the gun, but it still has its own risks.
First, you have to understand which side to open up! The rule is that you want to open up the same side of the rear notch that the front sight is pointing towards. For example, if the front sight is angled towards the shooter’s right (towards 11 O’ Clock, when viewed from the muzzle end), then you’ll want to open up the right side of the rear notch to help “center” the angled front sight. Picking the wrong side will only make your problems worse, so make sure you get this part right.
Second, you have to remember the first rule of filing—it’s easy to take material off, but very hard to put it back on! Go slow with your file, keep it square, don’t take too much metal off, and check your progress frequently. Just a pass or two is all that’s usually required to relieve the notch enough to fix your windage issue.
If you have a blued gun, you’ll need to touch up the file work with a little cold blue to hide the shiny part, but a stainless gun shouldn’t need anything. If you do get a shiny edge that bugs you on a stainless gun, you could probably just smoke it with a match to dull it.
RevolverGuy Dean Caputo was kind enough to fix my S&W 640 in this manner, and I’ve been very pleased with the results. Dean used a file with a safe edge to avoid scarring up the bottom of the rear sight notch, and with a few small passes, he removed enough material from the right side of the sight notch to account for a barrel that wasn’t screwed in far enough by the factory (a common occurrence in J-Frames, in particular, it seems). As a bonus, my aging eyes have enjoyed having a little more light around the front sight, too!
The front sight can also be filed to correct a windage problem, if the misalignment isn’t too gross. If the front sight leans to the right, from the shooter’s perspective, then you can thin the starboard side of the front blade to make the sight picture look more balanced.
Go to the bar
Industry veteran Ed Harris suggests another popular method for correcting the problem is to strike the barrel shroud with a babbit bar, to turn the barrel ever-so-slightly in the frame. This is the method that’s taught at Smith & Wesson’s Police Armorer School, and it has also been used for corrections at Ruger.
A skilled person could probably make the necessary corrections with this method, but it’s probably not wise to give it a go on your prized heirloom the first time around. You’d also want to skip this method if you were dealing with a Scandium or Aluminum-framed gun, as they would be easy to damage.
As an alternative to whacking the gun with a lead bar, Ed says that some places have used a frame wrench and a barrel vise to allow the barrel to be turned with a little more finesse and precision. This was apparently the favored solution to fix tapered Colt barrels, back at the factory, using precision frame and barrel inserts that were specially-machined by Colt for the job.
Amateurs need not apply
The last method for fixing a clocking error is to remove the barrel and solve the issue that created the problem in the first place.
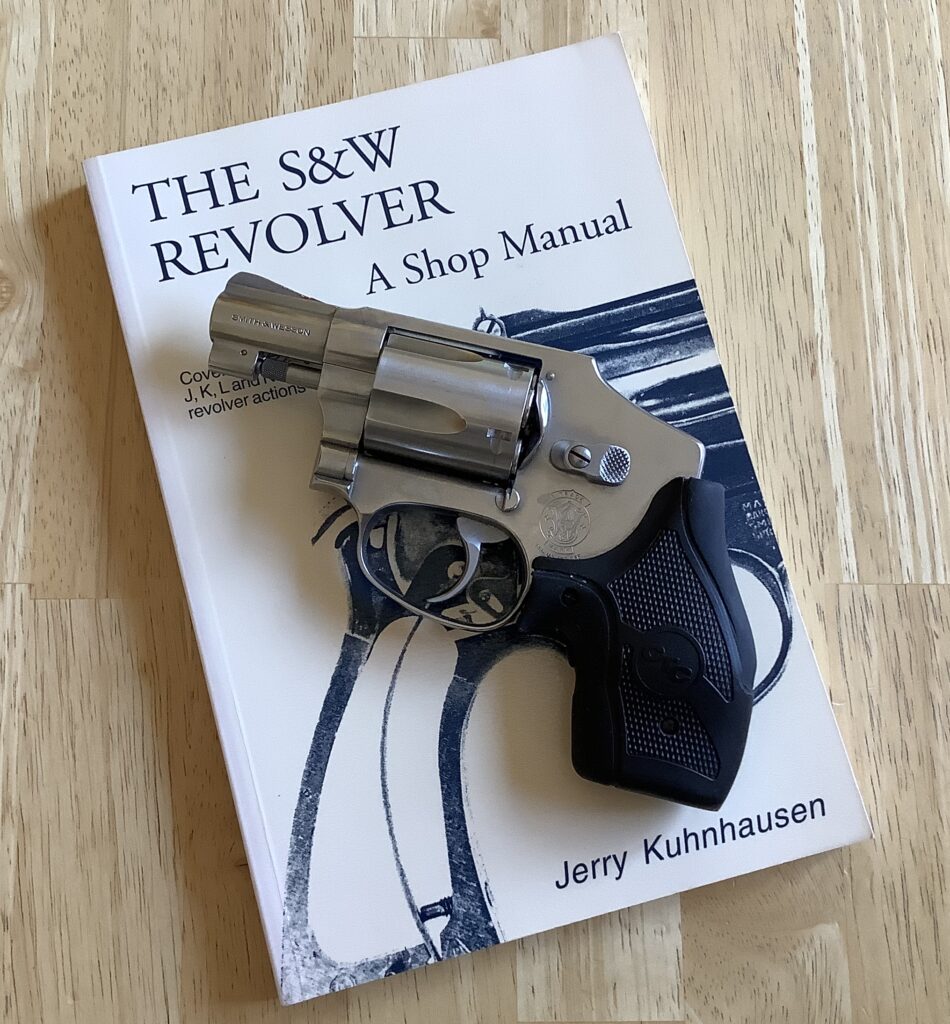
The reason that our barrel isn’t screwed in far enough is because the thread patterns aren’t timed properly, and the barrel’s shoulder hits the frame too soon for the front sight to be properly oriented. Gunsmith Jerry Kuhnhausen, author of the “Shop Manuals” which have become industry standards, describes how the frame and barrel surfaces will need to be cleaned up and trued to fix this interference issue and get the barrel timing right. Sometimes a ridge of material will build up on the front of the frame when the barrel is torqued into place, and this may need to be knocked down. Similarly, some material at the barrel’s shoulder may need to be removed to fix the issue and allow you to index the barrel properly. Both operations require some careful machine work to change the fit between these parts so that the barrel is both snug and perfectly timed, although Ed Harris suggests it could also be done with an India stone, some honing oil, and some patience.
Ed advises that during manufacture, some companies (like Ruger) use a special timing gage to check the barrel threads, which ensures the barrel threads are within tolerance. This usually eliminates the barrel as the source of a clocking error, leaving the frame itself as the culprit. If the front of the frame is a little too proud, then the properly-timed barrel will bottom out, and the barrel assembly fixture will reach its maximum torque value, before the front sight reaches TDC. This mismatch can be detected when the barrel is being hand-fitted to the frame as part of a pre-assembly test (a barrel that is screwed in until it is hand-tight should clock to approximately 15 degrees short of TDC, since the machine will torque it the rest of the way, so anything more than 15 degrees indicates a problem that needs to be addressed), and if it’s caught at this stage, then a few passes with a surface grinder can take enough material off the front of the frame to resolve the issue before final assembly. However, if an operator isn’t paying attention to tolerances, then the barrel will simply come up short of TDC at the maximum installation torque value, and your front sight will be cocked off to the right when you look through the sights.
It’s possible, but less common, that your barrel could be screwed in too tightly, as well. This can happen if the thread timing is off, or if the frame and/or barrel shoulders are not properly dimensioned. It can also happen if too much torque is applied during barrel installation, and the barrel is turned too far into the frame. In this latter case, Ed Harris advises that the barrel can suffer from “thread choke,” where material gets displaced in the bore underneath the threads, causing a constriction of the bore. Ed advises that over-torquing during installation can also cause stress cracks at the root of the barrel threads, which can be exacerbated over time and cause a barrel to crack completely off the frame—especially if the cracks are corroded by the use of chlorinated oils or solvents during manufacture or maintenance.
A barrel that has been turned too far onto a frame may have crushed or damaged the frame or barrel enough that it needs to be replaced. In some cases, a gunsmith could possibly repair the mating surfaces and reinstall the barrel properly, leaving the sight at TDC.
Experienced police armorer Dean Caputo notes that when clocking issues are corrected, it can result in barrel-cylinder gap (B/C gap) issues that need to be fixed as well. If a barrel is fully turned into the frame, this could narrow the B/C gap enough that the barrel extension would have to be relieved to restore the proper clearance, for reliability. If an over-torqued barrel is backed off, it could widen the B/C gap to the point that it’s beyond spec, and result in the need for a new barrel.
Fixing all of these problems is probably beyond the ability of the average gun tinkerer, and requires some real machining talent and a host of proper tools. Just getting the barrel off the frame without twisting or breaking the frame is a specialty job in itself, which requires special tools and techniques, so most of us are better off leaving this kind of work to a professional gunsmith or a factory warranty service.
This is actually the path that I advised my friend to take. Since his gun was brand new, and the misalignment of the barrel was substantial, I encouraged him to contact the Customer Service department at the manufacturer and ask them to repair the gun under warranty. Reputable manufacturers will make the process relatively painless for you, and will usually pay for the shipping as well (a good thing, since carriers like UPS will require the firearm to be sent via overnight service—an internal policy, sadly generated by issues with employee theft, in the past). They can easily install a new barrel or make the appropriate adjustments to your frame and/or barrel to get everything straight.
Progress
We should note that the increased use of two-piece barrel assemblies—once popularized by Dan Wesson–by manufacturers like Smith & Wesson and Ruger has simplified the installation of barrels at the factory, and reduced the probability of clocking errors.
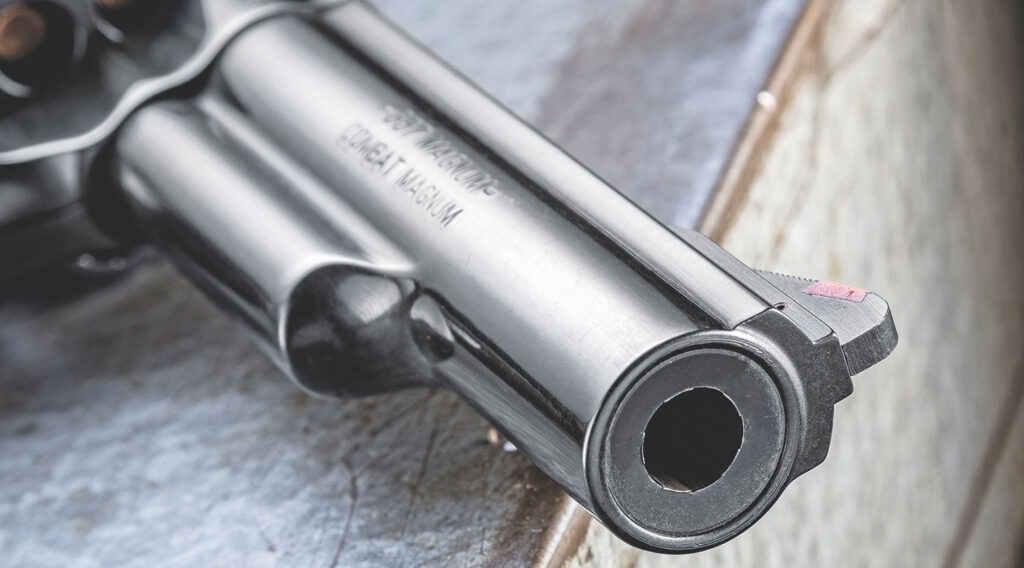
In these setups, the exterior shroud is easily “timed” to ensure that the front sight rests at TDC, and the liner or sleeve that actually makes up the true “barrel” can be easily installed to set a proper B/C gap. RevolverGuy purists (like myself) may not appreciate these tensioned barrels for their cosmetics, but there’s no arguing that they simplify manufacture and largely eliminate clocking errors. There’s a good argument that they might enhance accuracy, too—something that we hope to investigate someday here in these pages.
Get it straight
There’s a lot of reasons why a new gun might not shoot straight, and not every windage problem in a revolver is due to barrel clocking. However, if you’re sure that your trigger press is good, the sights and/or barrel haven’t been bent, and the crown is in good shape, you might have a barrel clocking issue to investigate.
Azimuth errors are usually a result of the screwball behind the trigger, instead of the barrel not being screwed in properly, but the guys who make guns have bad days too! If you understand the problem though, you can get it fixed without too much drama, and have your revolver shooting straight in no time.
Have fun and be safe out there!
Correcting barrel timing is a giant P I T A !! Even with frame and barrel vises, it is very touch and go, and if the metal surfaces don’t mate precisely, you have your work cut out for you. Jo-Jo The Gun Plumber need not apply.
The original Dan Wesson had a set with several user replaceable, multi length barrel/shroud assemblies – a snub, a 4″ service and a 6″ target. The asthetics of the barrel nut was something of a put off, but it was frightful accurate. Atop that, you could screw in the 4″ barrel for a duty gun (where allowed), the 6″ barrel for shooting matches, and the 2.5″ barrel for off duty – all using the single frame and lockwork.
To the credit of Ruger and S&W, the concept has been dragged out of the closet and into production. It allows for precise cylinder gap calibration, shroud alignment, and securing the package together with the bushing. Properly done, it ain’t goin’ nowear (that’s Suthun’ for it ain’t goin’ nowhere)
I won’t argue the technical merits of the system, but they do lack the aesthetics of the traditional barrels. The two-piece assemblies are definitely easier to install and headspace, correctly, and I’ve heard a considerable amount of chatter about how the tensioned barrels shoot more accurately, because of the dampening effect on barrel harmonics. I’ll be interested to experiment with the latter someday, and see if we can get some good data on that. I think the Dan Wessons had excellent reputations for accuracy (especially in metallic silhouette shooting), so that definitely is a good sign that the system has merit.
But it’s ugly and it leaves me cold! ; ^ )
Not as ugly and cold as that Hillary Hole in Smith & Wessons
You got that right!
Great article and topic. Correcting an “off-shooter” for windage can be tricky, but the filing method described by Dean Caputo is within the means of a skilled hobbyist. So if adjusting point of impact for elevation, if you are skillful and can use that file with “finesse.”
When I worked for Ruger in the 1980s fixed sight revolvers for government contract orders were commonly zeroed using specified ammunition provided as government furnished material. While targeting requirements varied in accordance with contract specifics .38 Special or .357 revolvers were generally shot by hand off sandbags at 20 yards, aiming at a 2-inch bull. At other ranges the aiming point was scaled to one inch per ten yards. At the 20 yard distance commonly used, a 3″ circle was printed on the target, surrounding the 2-inch blacked aiming point, tangent to it at 6:00. Five out of six rounds were usually required to strike within the 3″ circle.
Correct front sight height for the contract ammunition was determined by firing a ten-board sample of revolvers, using different height front sights to determine the correct elevation, sights being exchanged on the non-conforming revolvers, then the entire ten-board fired again. Upon confirmati0n that height of sgith would be installed on all revolvers for that batch. As stated in Mike’s article, windage adjustments were made, when necessary by rotating the barrel in the frame using directed strikes with a babbit bar against the ejector rod shroud forged integrally into the barrel.
In revolvers elevation point of impact is determined more by bullet weight than velocity. In .38 Special either standard pressure or +P loads of the same bullet weight generally shoot close to the same point of aim. As a general rule heavy bullets shoot higher, whereas lighter bullets shoot lower. In ordinary production intended for civilian retail sale it was common to use .38 Special 148-grain wadcutter ammunition in .357s also because doing so provides a useful point of impact for the greatest variety of commonly-used ammunition in fixed sight service guns. Lead wadcutters also provide a better functional check to detect “spitters” in which a new fit-up might over-rotate the cylinder (Up to 5 degrees being intended by design to compensate for in-service wear).
To determine how much to adjust fixed sights use the formula X=RE/D where:
X is the amount of correction needed, such as shortening the front sight to move the impact up, or installing a higher front sight to lower point of impact, or rotating the barrel tighter in the frame, moving the front sight left to move impact to the right, etc.
R is the sight Radius in inches.
E is the error correction needed between point of aim and point of impact, and
D is the target distance.
Again ALL dimensions are in inches.
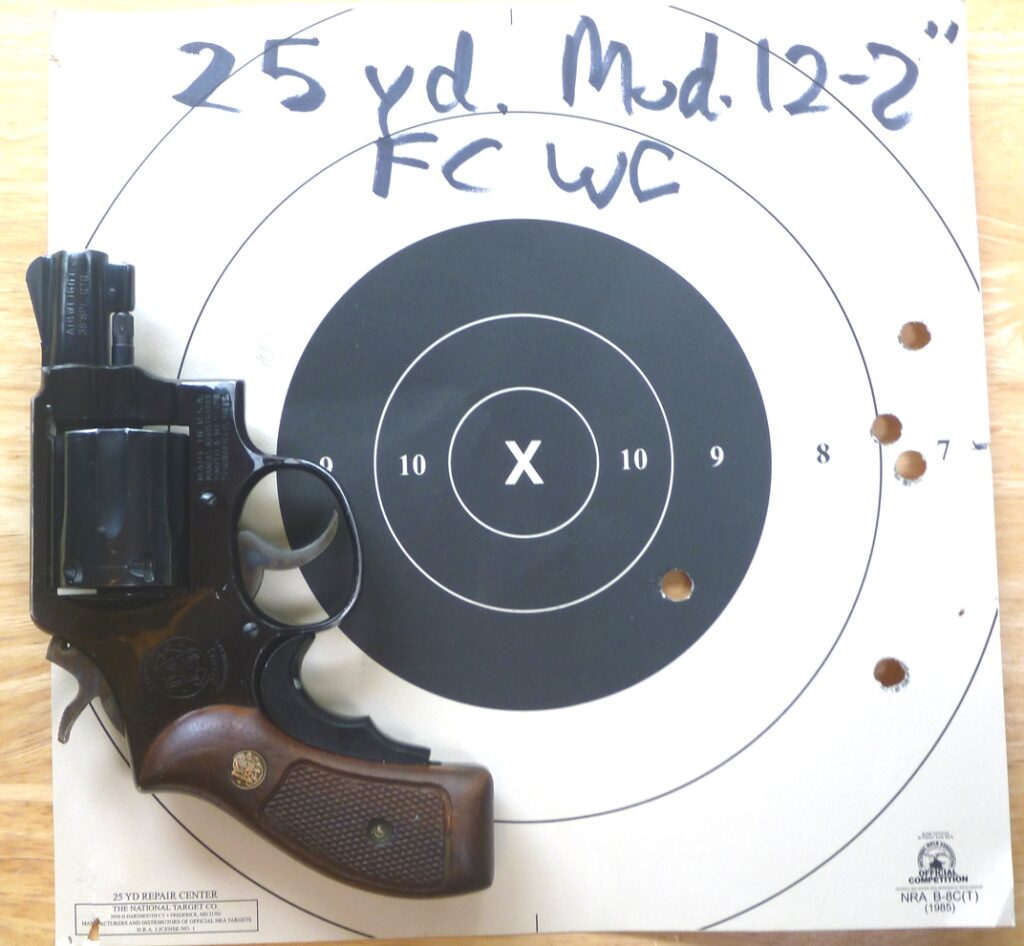
In extreme cases an old cop gun may have a bent frame from it being used as an impact weapon, and/or the crane may be bent out of alignment. A competent gunsmith can fix these. There is absolutely no reason why a 2-inch .38 snubby cannot be zeroed precisely and shoot accurately, shooting ten-ring 25-yard groups in a mechanically correct gun.
Sir, thank you, as always, for the OUTSTANDING information! We really appreciate you sharing it with us here, and appreciate your contributions to the article!
Thanks Mike
Interesting article. I do not like the two piece system and believe it was adopted so less skilled people could be used. How ever I could be wrong
I don’t think you are, Dave. I think it was a money saver. Cheaper to make, easier to install. There may be some technical advantages to the system–a topic worth exploring–but it leaves me cold, as a traditionalist.
The thought of hitting a barrel with a babbit bar makes the hair on my neck stand up. I guess my neck hair just isn’t on par with those of generations past.
Just another example of how we’ve “lost something” in the era of polymer and drop in parts. I don’t imagine whacking a &lock with a lead bar would yield quite the same results…
It might improve its looks, though, eh buddy? ; ^ )
Your friend was probably so used to Glocks that he thought it was normal to have to adjust the rear sight like that 😁
A friend at work jumped into the revolver world with a 3” 686 (the one with the wood stocks that have “357” on them). The barrel was notably off center, so he had the shop send it back to S&W. They returned it with a note saying it was within spec. It’s otherwise a nice gun, but once you know the problem is there it can’t be unseen. Sort of like a scratch on a new car. Anyway, great article. BTW, unless it’s on a Dan Wesson I too hate shrouded barrels. If S&W migrates them to steel N-frames I think it’s a sign of the end of days.
Brent, if S&W didn’t fix that gun, but merely told the customer, “tough luck, deal with it,” then that’s a really bad omen for the company. Ruger fixed the one my friend returned with no issues, as it should be.
I agree, Mike. We bought our daughter a Model 10 Classic for Christmas that is as nice looking as any S&W I’ve seen, so they are certainly capable. Failing to correct my friend’s 686 was disappointing. The 2020 Python I ordered arrived in February of 2021 and has a barrel/cylinder gap of .003, is flawlessly assembled, and to be honest has a DA trigger from the factory that shames both my daughter’s Model 10 and my friend’s 686. I love S&W, but hope they’re not looking to cut corners in revolver assembly methods. The M&P pistols sell like crazy so they can afford to keep their revolvers upmarket.
I’m impressed with that new Python. When I get the time, I’ll be working up an article on it. Stay tuned!
Great! I can’t wait to read your article. I’ve been shooting the daylights out of mine. I even tried the ICORE Classic division with it, as well as a Steel Challenge match. So far I really can’t say enough positive about this revolver. Now if I could just find some Small Pistol Primers…
I got rid of several otherwise nice surplus rifles–mainly Mosin-Nagants and Steyr Mannlichers–because of this issue. As was pointed out above, once you see it, it’s hard to unsee, and it was especially annoying on the flat-topped “hex” receivers of the old MNs. Haven’t had too many problems with it in revolvers, thank goodness, but I have an early Police Positive .32 that has an almost paper-thin front sight from somebody filing it down. Oddly enough, I have another Police Positive, a 1910s “Franken-PP” .22 Target with the 6″ barrel and target sights, assembled from non-matching parts–that has a barrel installed visibly crooked (but correctly clocked), and it shoots right to POA with the rear sight centered.
This whole issue is a great reminder of what incredibly precise industrial creations revolvers are. I’m always amazed at the craftsmanship of early 20th-century S&Ws and Colts, made well before the time of CNC tooling.
Great article–thanks!
Indeed! They sure had some skilled craftsmen working on those guns, back then. Much of the hand fitting was a necessity, not a luxury, but the guns certainly benefitted from having skilled hands work them over. I just shot my first Registered Magnum, and was able to see just how far we’ve fallen from that standard!
Thank you for the great article, Mike. Good comments from the crew, too. Reading Outpost’s comments made me miss Ruger’s Medium framed DA’s of the era that he worked at Ruger. The Security Six, Speed Six, and Service Six. Who would have thought the day would come when those excellent six-guns would disappear? I rarely see them, and when seen they are going for collector’s prices.
I have also heard of and seen too many S&W’s with non-shrouded barrels leaving Springfield with front sights visibly canted-even on Performance Center Guns. That shouldn’t be happening.
Amen to all, brother. I miss the Sixes, and I’m disappointed to hear/see so many new guns coming out with crooked horns. Where’s the pride in workmanship?
I have this issue with a S&W 37 J-Frame that was made back in 1987. The front sight is over-clocked/canted to the the shooter’s left (when aiming down the sights). It was likely over-torqued at the factory.
Didn’t think it was something that could be fixed, and frankly, I’d rather not waste the money. I bought the Model 37 as a display piece (the finish on it is fantastic). I only noticed the front sight issue when I took out for a function test.
If it were me, I couldn’t live with knowing it was off! I’d have to fix it!
Turning the barrel on an Airweight S&W Model 12 or 37, or the Colt D-frame Cobra, Courier or Agent to correct zero is problematic, because light alloy frames are easily damaged. The photo of Dean Caputo’s showing the cracked frame at 6:00 below the barrel threads in the yoke clearance cut being a classic example. I corrected point of impact on my 1963 Colt Cobra by carefully thinning the front sight, as Dean also illustrated, and also carefully by widening the rear sight notch, both tweaks in combination being just enough to bring POI into the black of a B8 repair center at 25 yards. Carefully cleaning and degreasing the filed area in the topstrap rear sight cut with acetone, heating with a hair drier, darkening and lightly frosting the filed surface with Birchwood Casey Aluminum black and finally touching up with black brushing lacquer it takes a skilled observer to distinguish the cleaned up frame from factory finish.
The Birchwood Casey aluminum black also works well to touch up the gently-filed front sight to produce a utilitarian flat-black finish, which does not smell of cold blue.
Great info Sir, thanks again!
Congratulations! Very technical and detailed article!
I experienced this problem with Rossi model 13 “Princess”(a low quality copy of S&W Ladysmith). This gun was made with a cheap alloy frame, and its topstrap suffered with hot gases from the gap, almost melted in that point. The barrel was visibly pointing up and left.
Alloy-framed revolvers, even of best quality, suffers of “bimetallic” problem: difference between heat expansion coeficcient of steel barrel and alloy frame. It can also causes barrel disalignement.
I had a S&W 22 revlover – The shroud was clocked enough so that the read sight had to be moved all the way to one side. Whan I called S&W they said; “Well. can you still sight it in?” – Huh? Thier standard was that if the gun could be sihted they did not feel the seed to correct it. I lied and said no – Sent it back and a few weeks later it was returnrd corrected.
I’ve had a few other warrany issues with S&W and in all fairness they were resolved much betterthan this one was.
Good article and I hope the QC Manager at Ruger SP101 line is reading this!
I’ll keep it classy and not drop names, but this was an on going issue with a Wiley Clapp SP101 last summer, 3 trips back to Ruger, they ultimately sent me a gun with the frame front right top step filed un evenly to match the canted barrel. It looked awful, I refused to accept the gun, my FFL took pity on me and gave me a GLOCK 17 MOS and took up dealing with Ruger.
Ugh. That’s not a happy story, Tim. I hope they eventually made good on it for the FFL.
Yes, two GP100s pictured in this article with the problem, and two S&Ws—they all do it from time to time, nobody’s immune. We would just expect them to do a good job of fixing it, when a gun is returned. Sounds like we’re about 50-50 on that, so far. Ruger did a great job fixing my friend’s GP100, so let’s hope that’s the standard, and you just ran into the unfortunate exception to the rule.
Yeah unfortunately, QC has severally declined with them.
I will no longer order guns made by them, it’s too much of a gamble. (there is a reason everyone on the internet raves about their “great customer service”.)
I’ll send you pictures of my GP100’s oval muzzle crown if you ever need material for an article on those issues…
Glad they got your friends fixed.
The QC problems always increase in times like these, when they’re burning the midnight oil to try and keep up with record-breaking demand. If you’re buying a new gun these days, it definitely pays to do a close inspection and a very thorough reliability test before you count on it to save your hide!
Another factor in the revolver quality issue is that they are manufacturing for the civilian mass market rather than to fill government orders in which the contractor’s engineering and quality assurance representative is the chair of the Material Review Board and is watching the store. When nobody is watching and demand is high the marketing guys rule and the prevailing attitude is that, “it doesn’t need to be any better than that for farm boys who shoot at cans.”
I wouldn’t doubt that a bit, but it’s still disappointing to hear.
What a timely article. I purchased a used, but very slightly used Ruger GP100 3 inch revolver with a fixed sight. I inquired why the previous owner had traded it back for another pistol. I understand why it was traded since there is no means to adjust for windage.
It feels great, but I ran into an issue in which it prints just to the right of a 1 inch bullseye target at 5 yards. Looking at the front sight it looks almost correct. I spoke with my local gunsmith, and he will be performing a trigger job to see if perhaps I am not focused on my trigger pull. If the trigger job does not resolve the issue, this will be an excellent article to forward to him.
It will be interesting to see if the issue is me or if I have a slight, but still imperfect barrel alignment.
Outstanding article!
Glad you enjoyed it! I’d recommend having a friend who’s a good shot test the gun first, to see if it prints the same way for him. Eliminate yourself as the variable, that way.
Also, sometimes you can change errors in azimuth with different ammo, too. We normally think about ammo changing things in the vertical plane, but it often has an effect in the horizontal plane as well. Good luck! Report back on how it goes.
When S&W began “crush fitting” barrels I started inspecting every new one I intended to buy. Airweights had cracked frame issues long before they stopped “pinning” barrels. I used to carry a small magnifier with me…
With poor QC and poor follow up customer service with revolvers (and months of waiting), I wonder how much longer they’ll stay in the revolver market.
The top notch revolver armorers are backed up so far, you’d be lucky if they get to your gun in a year.
The police S&W factory trained armorers that retired don’t want the hassle of dealing with customers or the feds. It’s impossible in my area to find a competent smith.
BTW, I hear a new Python calling my name 🙂
Jerry, I share your frustrations, but I don’t see S&W getting out of the revolver market anytime soon. Despite our annoyance and dissatisfaction with aspects of the current operation and product line, they still own the DA revolver market. Other companies are improving their game, while S&W mostly maintains the status quo, so they will eventually fall further behind the competition if they don’t put more effort into it, but I don’t see them bowing out anytime soon—too much money involved.
WRT gunsmiths, I think you’re going to enjoy a new series that launches next week. Stay tuned!
The new Python is really super. There’s a few small things I’d like to change, but Colt’s gets a HUGE thumbs up from me on what they accomplished there. Someday I’ll get enough time to write it up, like I’ve been planning to.
Mike
Mike,
Yes, it’s a crying shame S&W is declining. Although I have a 617-6 and my son a 648 that are very well fitted and finished…very accurate as well. His 648 does have the occasional misfire with .22 Mag ammo, regardless of brand. My suspicion is the firing pin is a bit too short.
The 617’s of late are a pig in a poke, some are great some need a lot of attention. Buy with caution and have someone with you that knows what to check before starting that 4473.
My son has the new Python, a very impressive revolver and I’m not a Colt’s fan.
His had the side to side rear sight play. Sent it back to Colt’s, they repaired it and had it back in his hands in a couple of weeks. My one and only complaint is the serrated trigger, the serrations are waaay too sharp. A trip to smooth it out is on the list. The fit and finish is far superior to anything new in the price range.
A Jerry Moran Python is smoother, but good luck finding vintage Python parts these days.
My wish is that a stainless Diamondback is introduced in .22 LR, just don’t squash that trigger guard Colt’s !!
Thanks for the great postings!
One of colts points of pride since the early 1900s is that they center every barrel at 12 olock. I have Colt revolvers from the 1900s, 1910s, 1940s, 1950s, 1960s, 1970s, and the new 2020 Python and every single one the front sight points straight up and down.
I’ve got 2 smiths with noticeable tilt, and a third you really have to look to notice and it is well within the range of the rear sight.
I’ve seen a number of Rugers like this, lately
People requested specifics of the brushing lacquer I use to touch up anodized aluminum frames to match factory finish. Best I have found is ALCLAD II Lacquer, “Gunmetal” Part No. ALC 120, Complies with ASTM D-4236-68, Made in USA, from Alclad Laboratories, 127 Leach Lane, Clinton, TN 37716, Telephone 615-216-0940, http://www.alclad2.com Good results require patience and finesse. 8 to 10 thin coats are better than trying to do 2-3 heavy ones.
Thank you Sir!
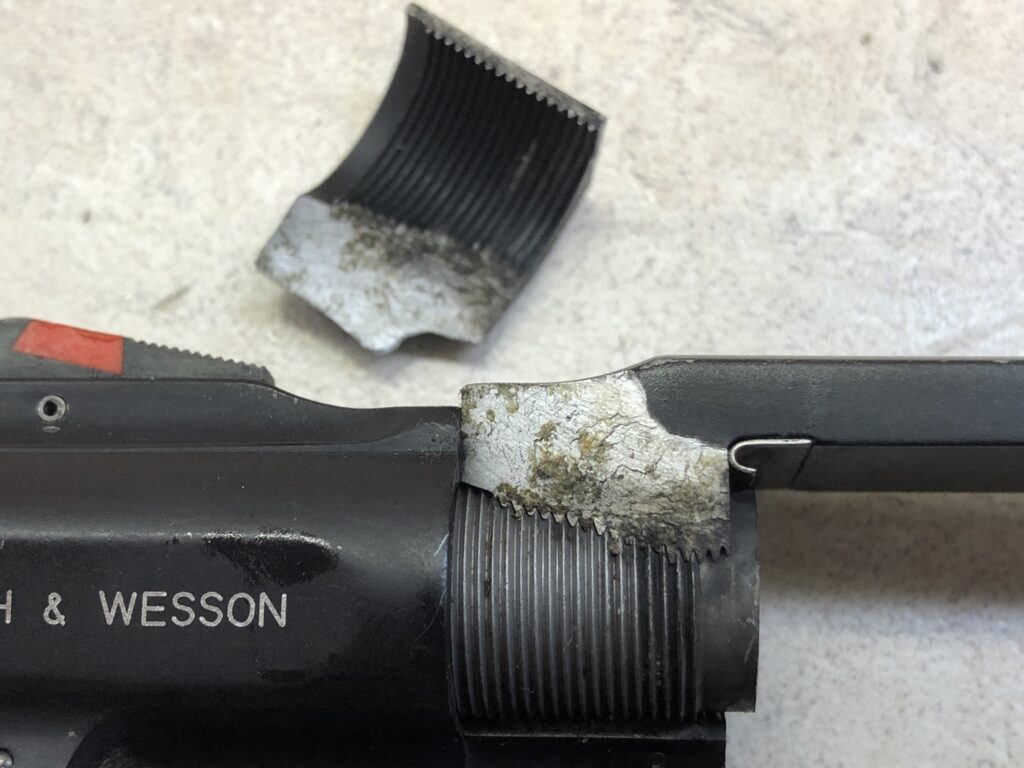
There is one mistake in that article. The S&W “two piece barrel” photo that says it is a barrel, shroud, and barrel “locking nut”. The “locking nut” is actually a flange that has broke off the barrel.
Thank you for the correction, Danny! Not owning any of these redesigned guns, I was unfamiliar with the new barrel assembly. I’ve changed the image and caption to correct it.
Good write up. We are seeing this all too often with manufacturing techniques employed today. Not only are the barrels getting clocked wrong (I had a 686+ that was over clocked) but the same guns are seeing asymmetrical machining on the frames. My copy looked like they indexed all the machining off of the left side of the gun and let the right side run wild. Everything was off centered to the left. The frame was thicker from the centerline on the right by as much as 1/16″ in places. The gun was a real abomination to look at for a guy with OCD. I studied the frame for hours until I came to the realization that the left side was used to index everything off of. The higher up on the frame and the more you looked forward on the frame the worse it got. The top strap center lines were off by one line, the frame was wider on the right side where the barrel meets the frame, and the front sight had been bent back to the right. The top strap lines were also off by one line where the rear sight was cut into the top strap.
This gun also had issues with wear on the ejector star that I discussed here before that threw it out of time. Needless to say my OCD and that gun soon parted ways!
I’ve got a California Highway Patrol marked model 67 that I have no idea how it could have left the factory with it’s barrel so untrue let alone be issued to a le department that was. I got it on the cheap from an estate sale of a retired lapd officer. Looks like he must have been in admin. Gun is gorgeous, inside and out and a great, smooth action. Barrel is very visibly off at almost 1000 if looking through the site.
Must have been a Lieutenant’s gun! ; ^ )
Inspect your gun before purchase; new or used; revolver or bottom feeder.
Hello, (I tried sending an email via contact us and it appears it isnt working)
This is on the subject of a smith revolver shooting left, now a lot of details are out there about clocked barrels being the cause of this. I have read the article here regarding this and have done measurements of my own that indicates my barrel and frame are aligned.
Here is the revolver in question, it is S&W’s newest mountain gun in 357mag.
On paper, I am shooting consistently left, now many would jump at this point to question the shooter and rightfully so. However, I have a 686 6′ here with no such shooting left pattern, and so this leaves me confused. Additionally, I have bore sighted this mountain gun using two methods, the first which I find to be the truest as I have seen it directly translate to hits on paper where it points is when I place the laser sighter inside of one of the cylinder charge holes. When done this way I observe that the laser indeed hits to the left, now the other method involves placing a bore sighter down the barrel, when done this way the sights and laser are true which leaves me even more confused. I have used the same laser system on my 686 6′ and the cylinder laser sight method is true to the sights. Now I have gone and sent this to the factory once before for both this issue and it being out of time on one cylinder notch, I had to send it back again because both issues were not remedied which resulted in it still shooting left and an out of time revolver. I am very curious to know what your thoughts are, I have linked some additional media below of the gun in question, any insights will be appreciated.
Thanks,
-D
Hi S/D. Unfortunately, I can’t tell what’s going on with your gun without seeing it, but I would suggest the following.
First, have a friend who is a good shooter see if it prints to the left for him, to make sure you aren’t the problem. I know you shoot your 6″ 686 straight, but sometimes the different grips, sights, or action can create a problem for us, and cause us to do things on one gun that we don’t on another.
Second, it sounds like S&W Customer Service has not satisfied your concern, so I would send the gun back again and request a replacement if they’re not going to fix it properly. If the gun is out of time, as you indicate, it is probably deforming the bullet as it enters the forcing cone (you’ll see a buildup of lead and copper on one side of the forcing cone), and that bullet is not flying straight when it exits the barrel. This can make your gun print off to one side.
I don’t know if I would put much faith in your laser test, but let me ask this–does the cylinder appear to be mounted square to the barrel? When it turns, do you see the gap between the forcing cone and the front of the cylinder remain the same, or is there a wobble, where it gets bigger and smaller as the cylinder turns? This may also indicate a problem thst needs to be corrected at the factory.
I wish you better luck with the gun and with S&W. At this point, with the gun having been sent back twice already, I’m not confident that you will be happy with the third result. You’d be better off asking them about a replacement.