
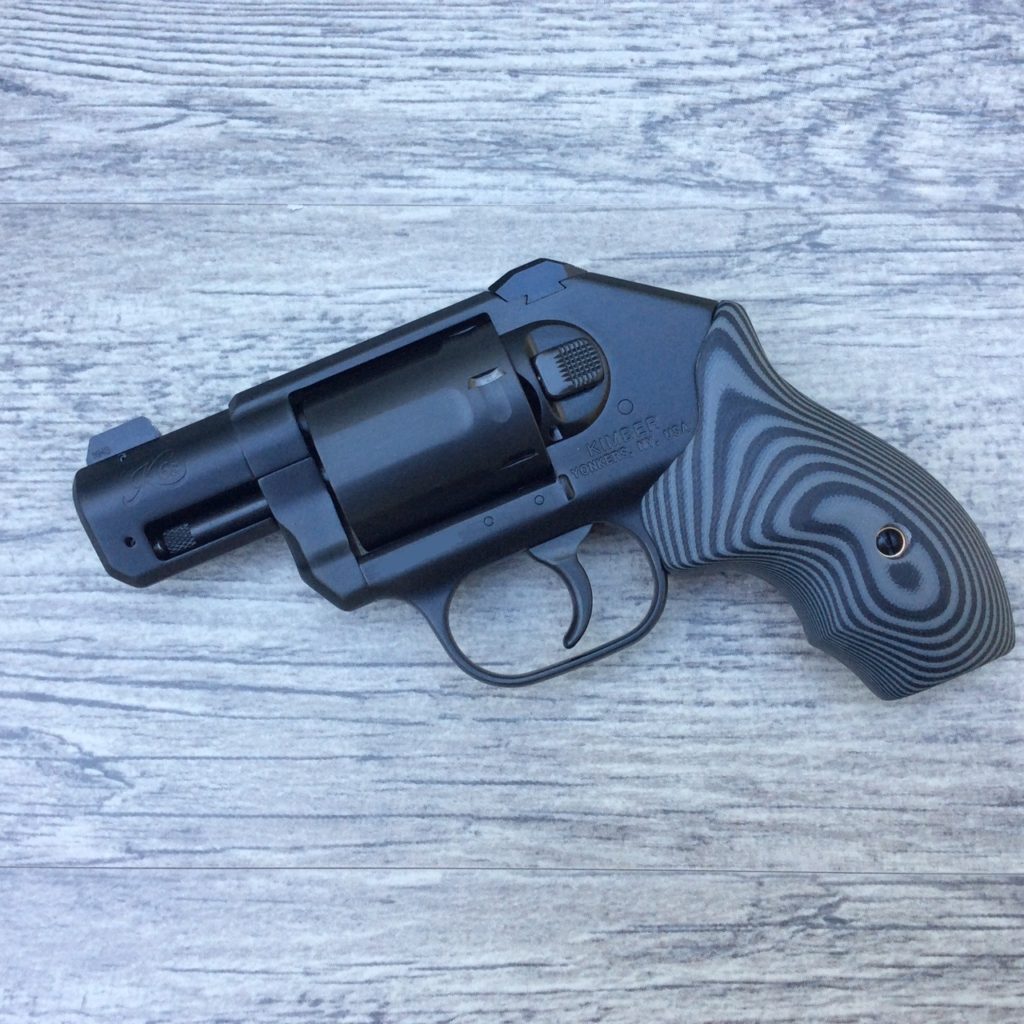
Those of you who have read my review of the Kimber K6s are aware that I gave the gun high marks with just a few exceptions. One of those gripes was that the grips didn’t give enough clearance for a speedloader.
This is not just a Kimber problem–unfortunately, it’s a common complaint with many grips these days. It shouldn’t be, because shooters have been complaining about this bugaboo since speedloaders first became popular accessories in the 1960s, but I guess some folks in the industry haven’t been paying attention for half a century.
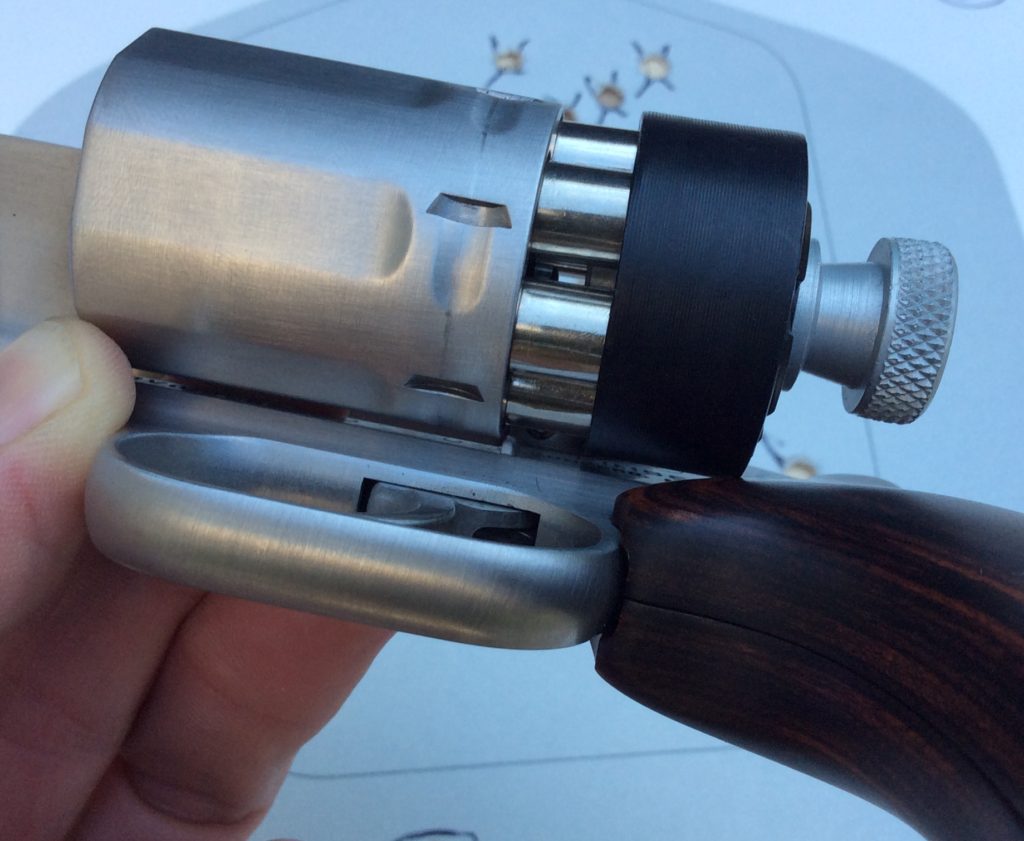
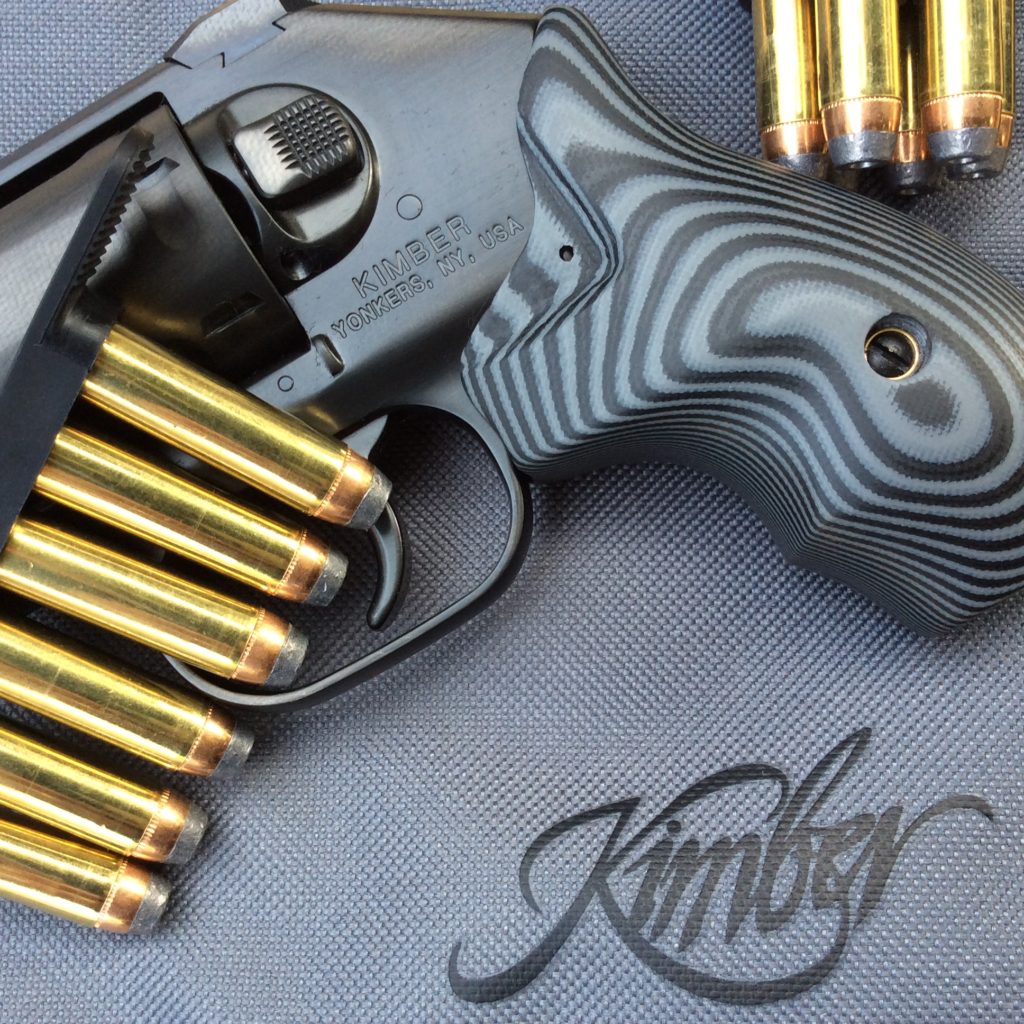
Interestingly, many manufacturers make an attempt to relieve their port side grip panels, but they just don’t go far enough. Some relief cuts are just token efforts, while others are almost there, but not quite. This was the case with the K6s. The walnut stocks on my 3” stainless version and the G10 grips on my 2” DC model were both relieved, but the cutaway wasn’t aggressive enough to provide adequate clearance for most loaders. A member of the RevolverGuy test team reported the same thing about the black rubber grips found on his 2” stainless model.
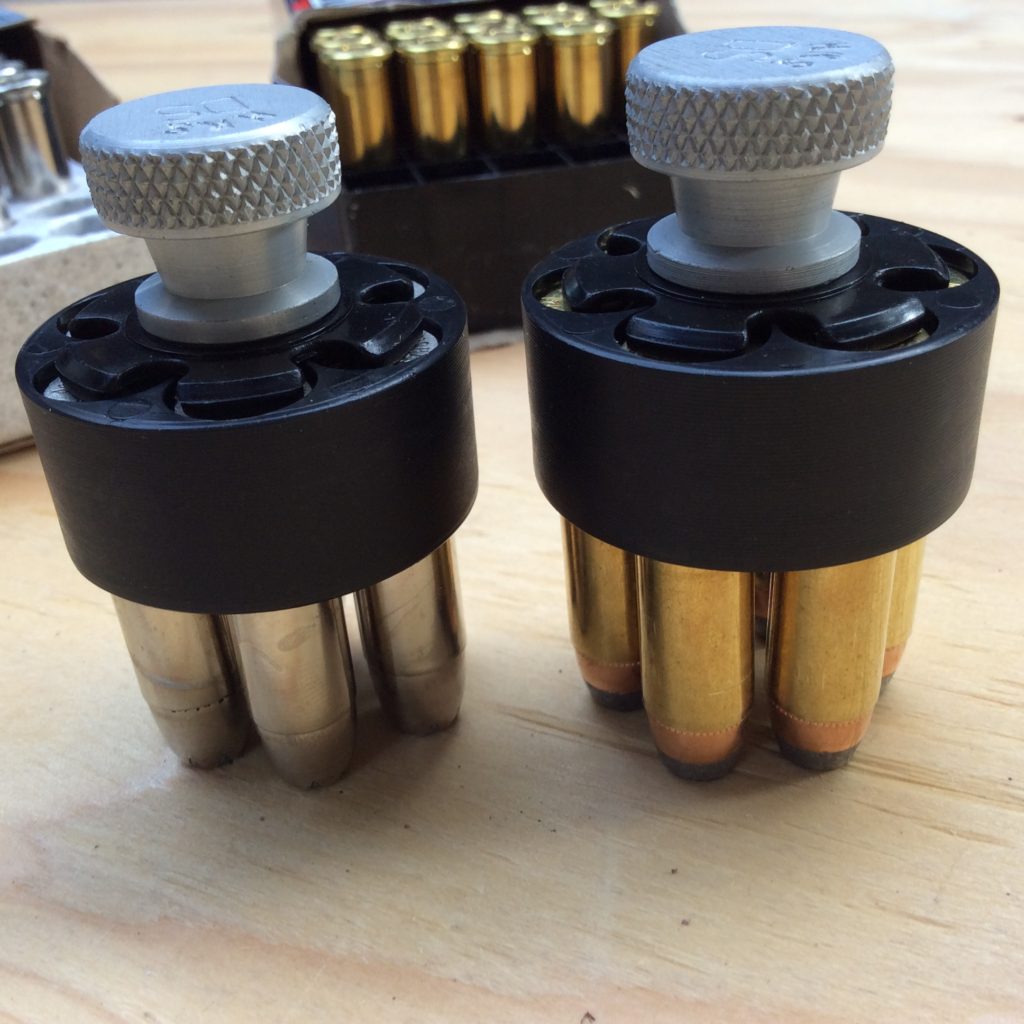
Because speedloaders come in various shapes and sizes, you can sometimes rectify this by choosing a different loader, but I was unsuccessful with this tactic for the K6s. The Kimber-branded loader–which appears to be made by 5-Star Firearms–works with the K6s factory grips, but I didn’t have one available and don’t care for the design anyhow, due to it’s counter-clockwise release. A collection of various S&W K-Frame loaders didn’t fit, and the HKS DS-A loader (designed for the D-Frame Colts, which makes it a proper size for the Kimber) didn’t work either. It didn’t take long before I started to suspect why Kimber supplied a DeSantis Swift Strip with each gun.
Loading from the strip-style loaders is fine, but I’d much rather use a speedloader, so there were only two ways I could go: First, I could replace the grips; Second, I could modify them.
GETTING A GRIP
Since Justin was done experimenting with his set of stippled G10 VZ Grips for the K6s, I tried that first. Unfortunately, while the interference with the HKS DS-A loader was reduced, there was still enough material in the wrong place to allow a good fit.
I thought about giving one of the beautiful looking Altamont Altai grips a try, but I couldn’t tell from the photos if the speedloader relief was good enough, and I didn’t want to spend that kind of money without knowing.
NARROWING IT DOWN
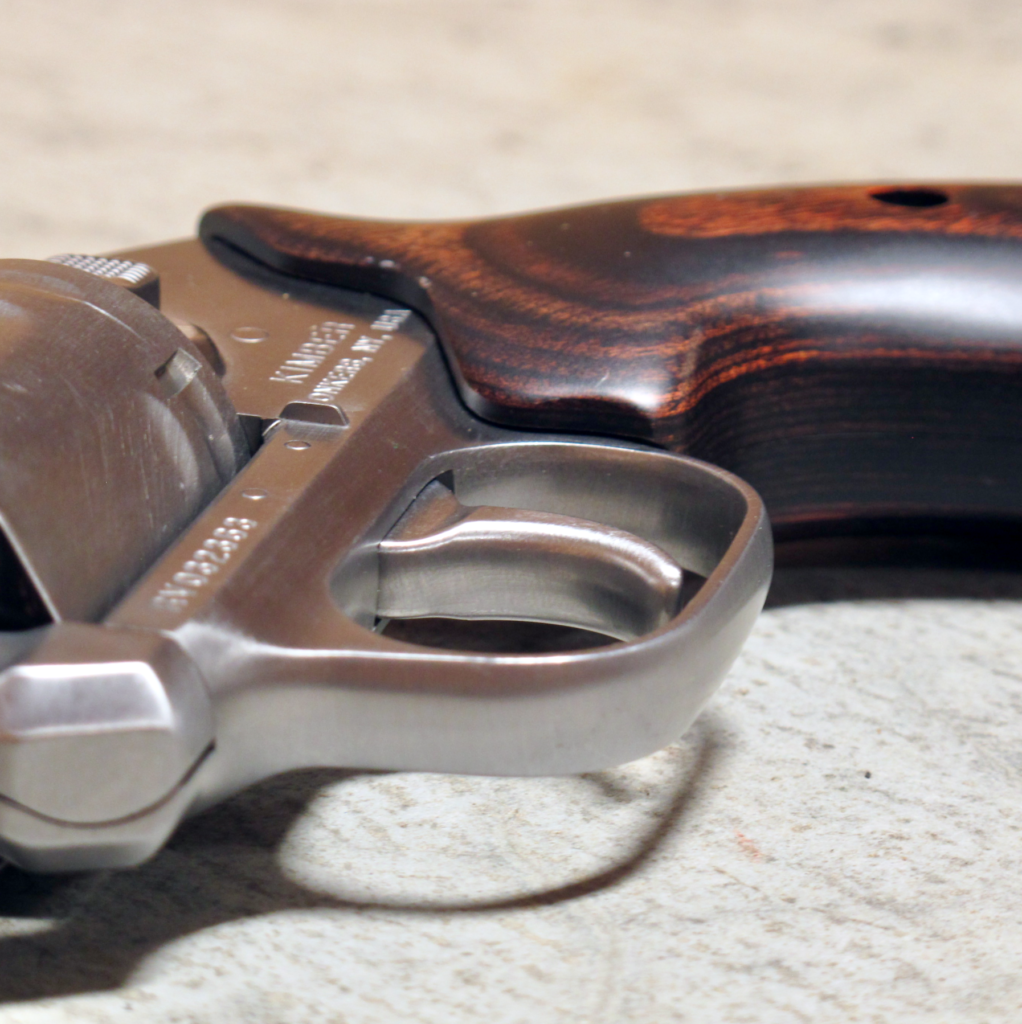
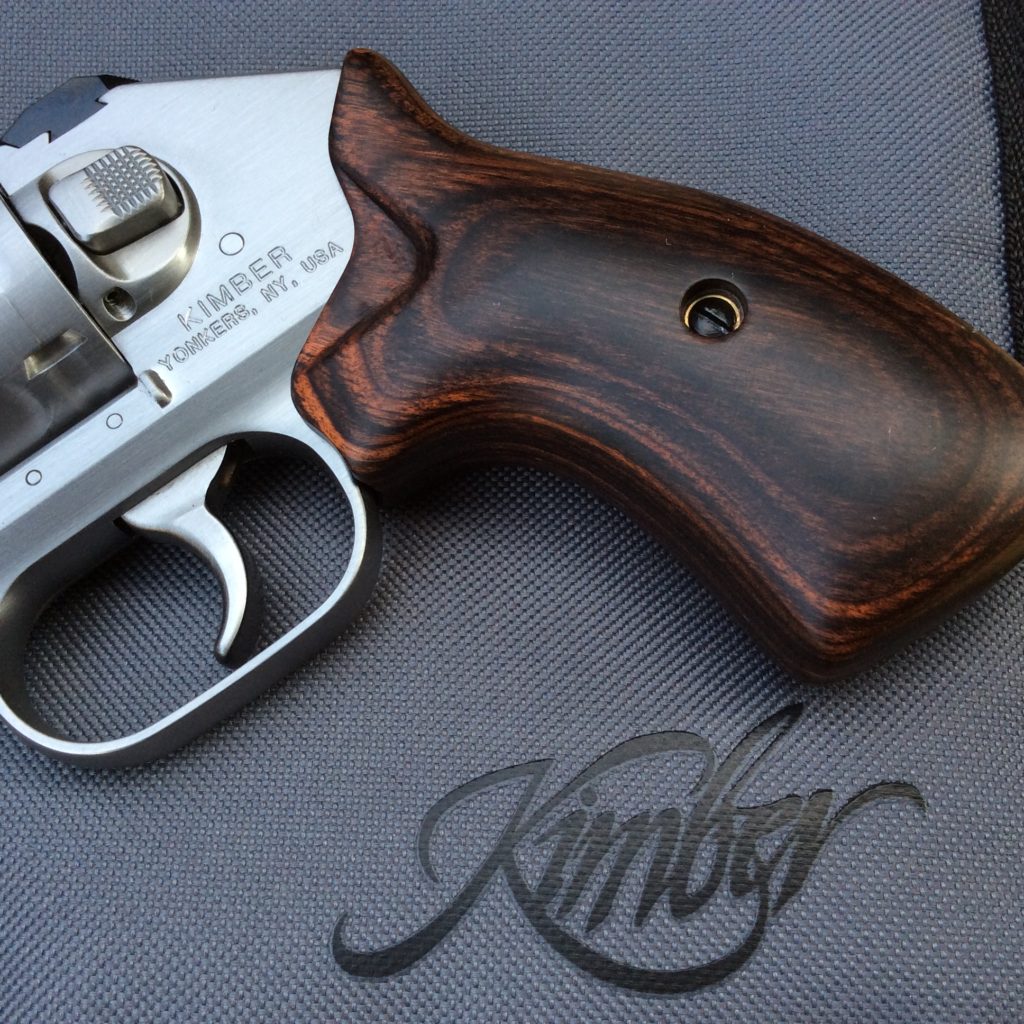
So, I decided that I would take the second route, and try to modify the walnut and G10 grips so that they would work. I did this with a little trepidation, because the factory panels were beautiful specimens and – despite the family name – I’m not a talented woodworker. However, in the end I believe function trumps fashion, so I got out the tools.
Now, those of you who are skilled in the woodworking arts might cringe at the process I’m about to describe because you know a better way, and I won’t take issue with you at all. I make no claims about this method other than to say that it worked for me and gave me a reasonable result. If you have any suggestions for the RevolverGuy audience on how to improve things, please don’t be bashful in the comments below. I’d be happy to hear and learn from you.
Step by Step: Revolver Grip Modification
As for the rest of you, here’s what you can do if you want to follow my lead on a set of grips that are giving you problems:
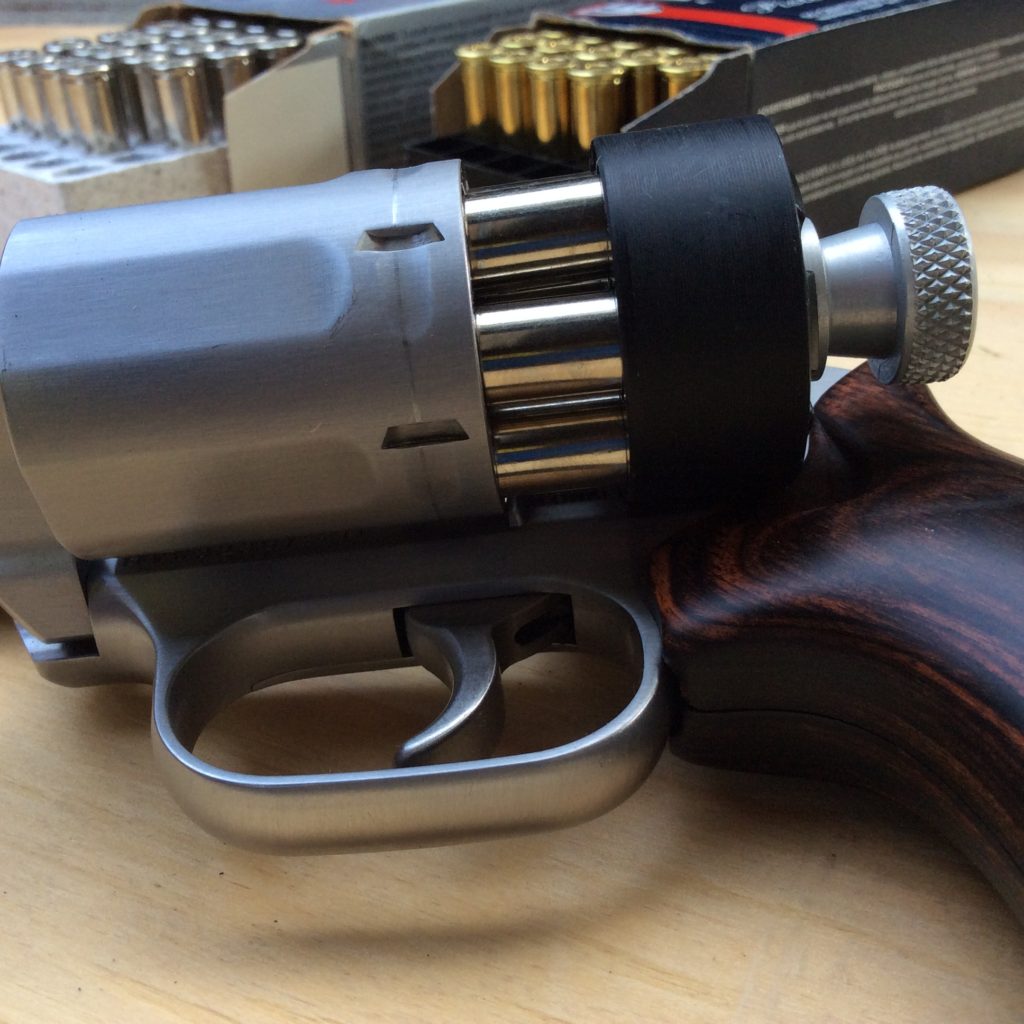
1. Load a speedloader with the longest cartridges suitable for the gun. For instance, if you have a .357 Magnum like the Kimber, load up with those instead of .38 Specials. Also, consider loading cartridges with a longer ogive (i.e., heavy bullets with long noses, instead of lighter ones with short, blunt tips);
2. Mate the loader to the cylinder and insert it until it starts to bind. With a pencil, trace a “backwards L-shape” on the grip panel to mark the aft and bottom edges of the loader;
3. With the loader still in place, take a look from the side to get a feel for how much material needs to be removed to attain a good fit. You’ll probably need to remove more material on the aft end of the grip due to its taper;
4. Remove the grip panel from the gun (remember to use the proper size screwdriver!) and mask off the areas outside of your marking with painter’s tape (since it leaves no residue). Don’t go right up to the edge of your marks—leave a space about ¼” wide around it. Also, don’t wrap the tape over the edges and onto the backside of the panel, since that will interfere with your ability to reinstall the panel flush later on, and check for fit. I’ll be honest enough to say that I considered masking the grips but got lazy and skipped this part. My reward was a few extra scratches that I had to take care of later, so take the time to do it right;
5. Using a Dremel tool with an appropriate tip (you could use a sanding barrel I suppose, but I used a diamond-coated, burr-style cutter) start making your cuts along the pencil lines and hog out some of the extra material in the high spots that you noted during your fit test and inspection. Don’t get too aggressive at first—you can always go back and do more, but you can’t put the material back!

6. Switch out the Dremel for a file. Use the file to even things out and get a flat surface without any big gouges, valleys, or peaks. Also, use the file to bevel the edges of your cutout, so that you don’t have an abrupt shoulder along the sides;
7. With some sandpaper, clean up the area to make it relatively smooth. I used some 500 and 1000 grit here;
8. Reinstall the grip panel and check your progress with the charged speedloader. Use your pencil to mark high spots, or expand the border of your cutout;
9. Repeat steps 5 through 8 as necessary, checking fit more frequently as you go along. The goal is to have a “90% solution” with the Dremel and file, so you can clean up the last bit with sandpaper;
10. When you’ve got that “90% solution,” clean up the area and sand it to a smooth surface with increasingly finer grades of sandpaper. I started with just a bit of 500 grit, but quickly switched to 1000 grit for most of the work and finished things off with 1200 grit. It might help to wrap a flat piece of wood or a dowel with the sandpaper to get a flat and even surface;
11. Once you’ve got a good fit and a smooth surface, remove the tape and wipe the panel clean with a cloth to get all the residue off it;
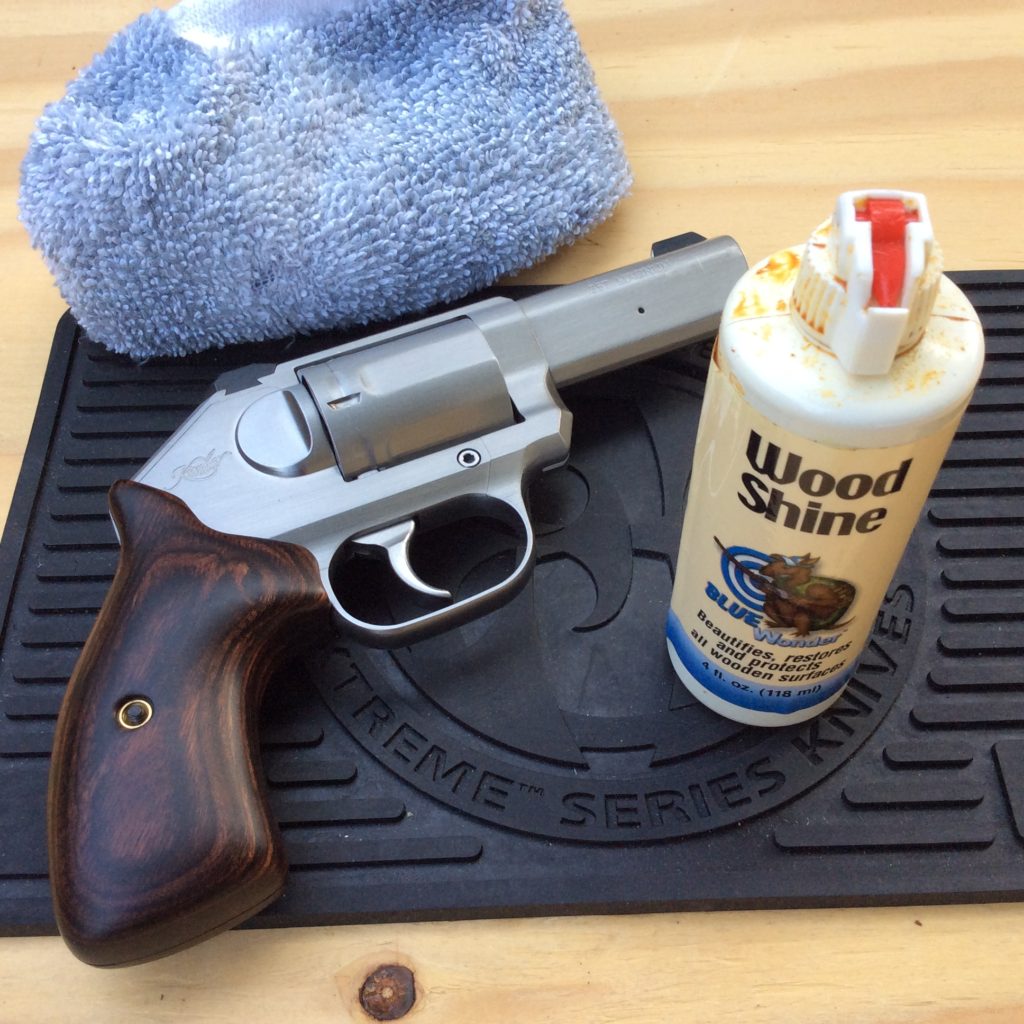
12. Put some Blue Wonder Wood Shine on a clean piece of cotton cloth and rub it into the wood, using a few coats to treat it well. While you’re at it, treat the unmolested twin from the other side, too. Buff them to a shine with a clean piece of cotton cloth. Note: I used this product on the sanded area of the G10 grip as well, but didn’t apply it to the remainder of the grip—it worked great, even though it was designed for wood, not G10;
13. Reinstall your panels, and enjoy!
LESSONS LEARNED
This process worked well for me and gave me a good result. I did have one small disappointment with the G10 panel though—I rubbed through the material in a small spot where the underside of the panel had been relieved and the material was thinner. This resulted in a small pinhole in the panel. It might have been unavoidable, because I needed to thin out that area for the speedloader to fit, but I would have preferred this not to happen. If I was interested, I could probably fill it with epoxy and sand it back down again, but I’m not that worried about it.
I hadn’t worked with G10 before, but found out very quickly that it disappears much quicker than the wood, so go easy with that Dremel, file, and sandpaper. The G10 dust is probably not a great thing for you to be inhaling, so a dust mask a good idea.
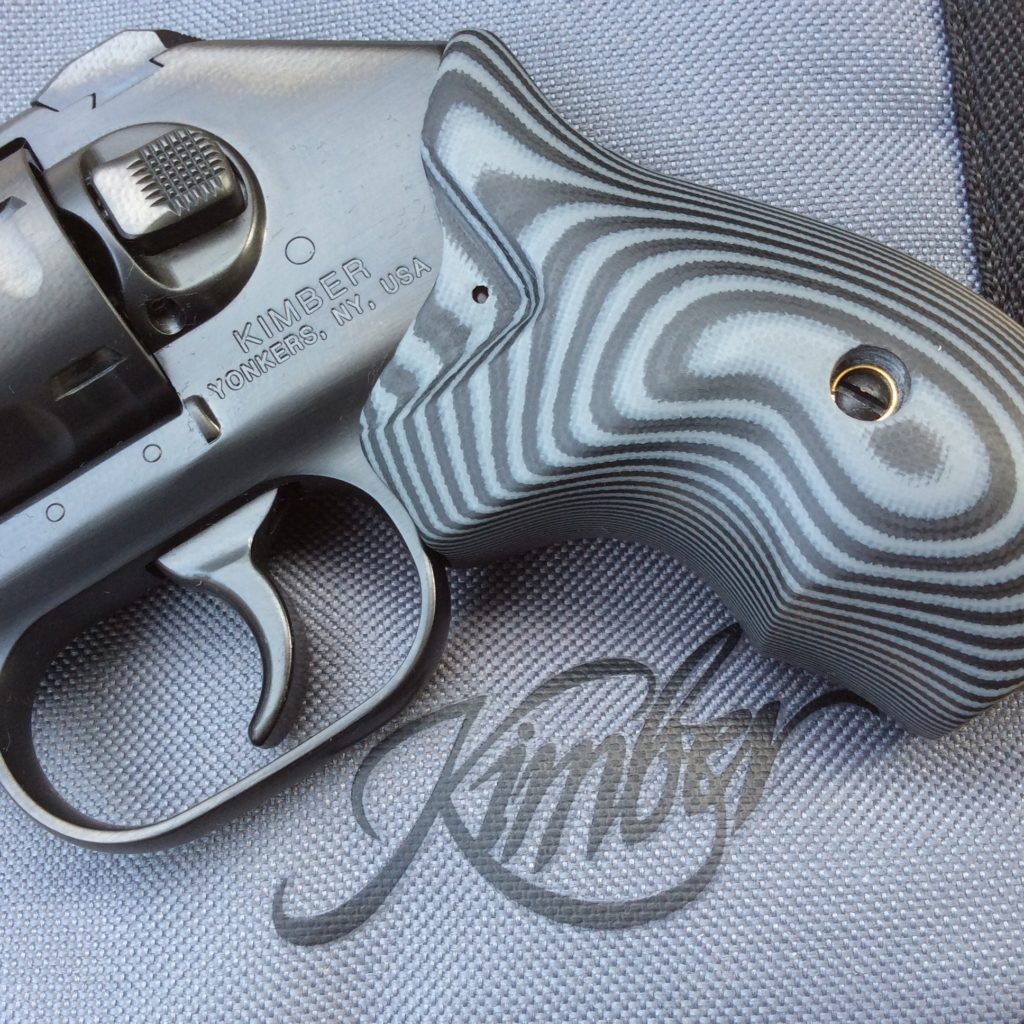
If I’d wanted to, I could have completely cut away the offending areas of these grip panels instead of thinning them, but I thought I’d try to preserve as much of them as possible. The K6s frame has some angular lines in that area, and I thought it would look nicer and be more comfortable if I kept some coverage there. I think the end result looks nicer than just cutting away that spot completely, but the latter would certainly have been less work.
If you had to do this kind of operation on a rubber grip, I’m not sure how it would go. I suppose it’s possible that you could sand the rubber and get a reasonably smooth surface, but I suspect it would be a lot easier (and less messy) to just trim the area away completely with a heated X-Acto knife, held carefully at an angle to create a beveled edge. If you’ve had to do this kind of work before, let us know about it in the comments.
IN THE END
I was pretty happy with how things turned out on my grip modifications. A more skilled person could have done a better job, but the result was good enough for me.
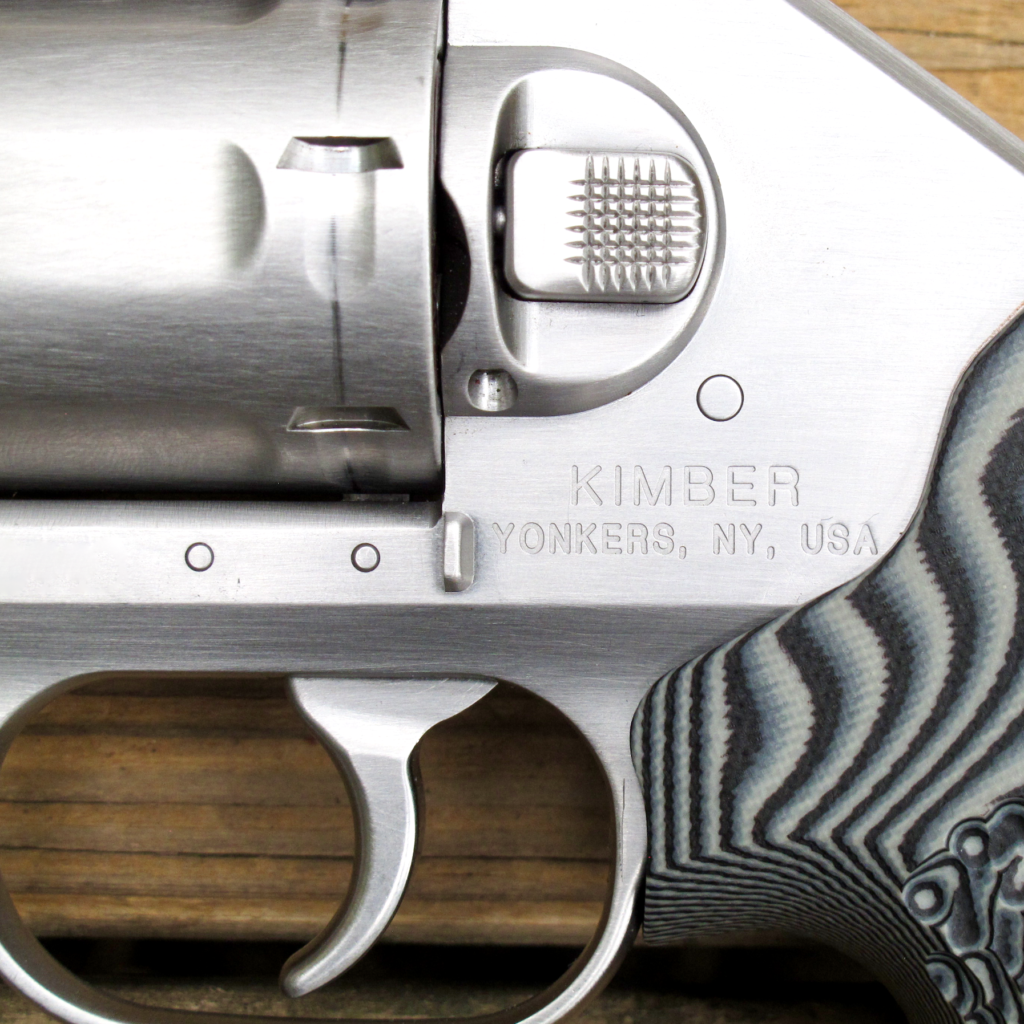
The grips look pretty good and they feel good as well, with no sharp edges to bite. In fact, the recess acts a bit like a thumb rest, and conceivably gives me a bit more control of the gun during recoil.
Most importantly, I can now use my ready supply of HKS loaders to feed the K6s. The various K-Frame loaders fit much better than before, but the spread of the cartridges is just a little too far apart for reliability in the K6s, so they’re still a no-go. I really wish Safariland would dust off their old molds for the Colt-sized Comp II loaders! If you agree, drop them an email and tell them so.
I insist on being able to use a speedloader to recharge my revolvers, and now that I have these modifications complete, my brace of Kimbers is good to go. If you have a revolver in your collection that gives you fits with loaders, you might consider giving this a try. I was glad I did.
If I get wooden grips for my K6S, Mike, I’ll try this. I do a good bit of woodwork, too. The results look really good!
The problem I have is the original (early-issue blue) rubber grips are so nice for pocket carry (I know, that’s counterintuitive). Kimber’s rubber grips are short and do not cover the backstrap. They also don’t come below the bottom of the grip frame. I want wooden grips that have that same really trim, short footprint. All the wooden ones I see are a lot longer. Any advice?
Thanks for the compliment! Much appreciated. For wood, take a look at the Altamont Boot Grip for the Kimber. I think it’s what you’re looking for.
Mike, that saves the day. Thank you. I train with a Tuff Strip 8 round, with 3 pairs of rounds separated by a empty.
Sounds like a great setup!
Looks great Mike! I even like the pinhole, just kind of makes it more unique I guess. I had not thought of doing this but I think I just might try it. Thanks for pioneering this method.
Thanks Riley! Send me a picture of the result, and I’ll post it in the article!
Nice work Mike! The profile of the cut looks factory. I bet a bit of JB Weld pushed in from the backside of the grip would match about perfect (gray) and prevent a stress crack from developing of the material is really thin in that area.
Grips on revolvers are the equivolent to mag releases and safeties on “those other pistols”…something akin to the Grail quest. I just ordered up some Altamont rubber compacts for my GP100. Trying to find that perfect balance.
I love that JB weld idea! Think I’ll try that!
Nice work. I am not a great wood worker, but would have used the same process (sans the tape because I’m lazy, but that step really aught not be skipped). My father is a better wood worker than I, but he is a machinist first, so he probably would have used his mill (not something I, or most people probably, have) rather than a Dremel. If someone is willing to be VERY careful, this same process can be done using a chisel instead of the Dremel, but it is really easy to gouge out too much wood.
Good tip on the Blue Wonder Wood shine. Matching the modified area to the original grip is the part I struggle with the most. I’ll have to give some of this stuff a try. It beats completely stripping and refinishing the whole grip as I’ve had to do a couple times.
Rubber grips are a little tricky because not all rubber is the same. I have only Dremeled the finger grooves off of Hogue grips and reshaped the but of SP101 grips. Pachmayr traditional grips are not the same texture and the newer Pachmayr Diamond Pro grips use yet another texture of rubber. Likewise Smith & Wesson factory grips have a different texture and density.
With rubber, the basic idea is to use a fresh sanding drum or a sharp cutter and do not apply too much pressure (if you use a light touch, you cut away material; if you push, it starts to melt the rubber), then use a file or sandpaper to match the surrounding material’s texture as best you can. With stiffer rubber like that on most of the grips I mentioned this shouldn’t be too bad, but I’m not sure I could actually match the texture of the Pachy Diamond Pro grips without a lot of work. A fine sand paper has worked for me, but you might need emery cloth for the smoother, shinier Pachmayr grips. In my experience, rubber has a tendency to kind of “pill” up like an old sweater. This can usually be dealt with by rubbing it vigorously with your hands, but I have had to use a knife to cut it away as well.
I have also found that it can be hard to tell if you have really matched the appearance of the surrounding rubber because the sanded area looks drier. To help with that, you can rub a little oil on the area to get a better feel for what it looks like once it is back to normal. General handling will accomplish this over time, but for checking my work I have used motor oil, olive oil, or the natural skin oils from the side of my nose. There are probably a lot of other options out there that I haven’t considered/tried. Of those, I would be most hesitant to suggest olive oil for extensive use, since it can potentially go rancid, but I haven’t encountered that problem when I am only using a drop or two at a time and thoroughly wiping off any excess.
Another consideration with rubber, that I don’t have a solution for, is that many rubber grips use a plastic frame with a rubber coating or shell. On two-part grips, you can usually see how much rubber there is easily and plan for that, but the Hogue Monogrips and similar entries make that kind of hard. If you do end up hitting the plastic, I have not figured out a good way to blend that to the surrounding rubber. My one comfort there is that, given the obvious piece of plastic on LCR grips where the speed loader relief is, it looks like Hogue may not have a perfect solution, either (though, theirs does look noticable nicer than my efforts).
My results with rubber are not perfect, so hopefully someone else has some additional tips, but this process has worked for me and a couple different people haven’t realized that my SP101 grips were modified (the Hogues are harder to disguise because of the area I modified).
Outstanding info! Thank you for sharing it! Maybe we can talk you into a companion article for rubber stocks?
The work you did looks like it came from the factory; I’d say you did a fine job. As to the little hole, why not plug it with your birth stone? Give it a really customized look, and since it’s a Kimber, having a jewel in the grip wouldn’t be out of line. Maybe you could turn the idea into a side job–‘custom pretty grips for a pretty gun’ sort of thing. If so, I want royalties for the idea.
BITD, I carried a Ruger Speed Six in the coat pocket and off duty. The original wood grips were just a bit too thick for HKS and Safariland loaders, so I ‘relieved’ some of the wood off the port-side panel. As I recall, I used a pocket knife, then a little wood rasp. Certainly didn’t look pretty, but utility was more important at the time. Worked really well, combined with a Tyler adapter. Still got that set of panels down in my ‘stuff’ room somewhere.
Currently, the same gun wears a set of Pachmayrs, and they let me use both brands of loaders. Not pretty, but they work. Ace
Gotta love Pachmayrs….never had an issue with loader clearance using those! I’m happy to hear you still have that Speed Six!
That is some superb workmanship. Something tells me that Mr. ‘Wood’ knows more about working with wood that we ‘wood’ otherwise suspect.
Since finding a T-grip for a square butt K-frame doesn’t really solve all the grip issues, this has got me a thinkin’ on taking an old and well beat up set of S&W K-frame Sq-butt target stocks and working them down into a slim boot grip configuration, with a really ample speed loader access for a 4″ S&W M13. I have to be careful since the last time I tried that, I took an old set of N-frame square butt grips and got a tad carried away leaving me with J-frame size slabs.
Thanks Sir! I’m happy with the result—not bad for a beginner. Take lots of photos if you tackle your project—would love to share those here!
Nice work (on both the grips and the article)! A quick word of caution: the sanding dust from many woods, especially exotic rain forest woods, can contain resins that could lead to sensitivities, allergic reactions, and downright toxic exposure. Wearing a particle mask as you did with the G10 grips is a good idea as is wearing nitrile gloves, depending on the particular wood. Here is a handy chart showing what woods can cause which reactions: https://www.wood-database.com/wood-articles/wood-allergies-and-toxicity/
If one already has compromised breathing due to asthma, COPD, and the like, an exposure that might cause a runny nose for most people could result in a trip to the urgent care center for those folks.
As to working with rubber grips, revolver guru, Michael deBethencourt suggests putting the grips in a cold freezer for a few days. This makes the rubber/polymer much easier to carve/sand/whittle. In my limited experience, the results don’t look factory or anything, but at least it doesn’t look like a rabid chipmunk had a go at my grips. Obviously, you will have to work quickly, but you can refreeze the grips without any evident problems.
Rod, thank you VERY much for the great advice and information! It’s really appreciated!