It’s been said plenty of times before, but there are a lot of pretty experienced shooters out there that don’t know how to shoot a revolver. This number seems to grow every year, as more and more people pick up the shooting sports and fewer and fewer pick up wheelgunning. In fact, a friend (who is really into revolvers) recently told me that he believes revolver mastery is truly a dying art. I mostly agree, were it not for a small handful of people keeping the skillset alive.
This post is intended to be the first in an ongoing “Revolver Guy 101” series – occasional articles covering some of the basics of revolver use. This installment is a quick reference for the two commonly-accepted revolver grasp techniques. I’m not saying this is how you have to hold a rotator, but if you’re starting from square-one these offer a pretty good starting point.
Grasp Vs. Grip
Most of our regular readers here probably know, but I have begun to distinguish the terms “grasp” (the act of holding the revolver) from “grip” (the portion of the revolver being grasped). This is to cut down on the confusion generated by using the more common “grip” to talk about both. I didn’t originate this; this distinction came to me by way of Grant Cunningham’s excellent Protect Yourself With Your Snubnose Revolver. And since we’ve mentioned grips…
For both of the techniques I’m going to cover here, a good set of grips is pretty important. I’ve previously written about several different grips for revolvers, including the ones I use: the VZ Grips Tactical Diamonds for K/L-Frames and J-Frames. Grips such as these are pretty important because they fill the area behind the trigger guard. Even the old Hogue finger-grooves in the photo below will do.
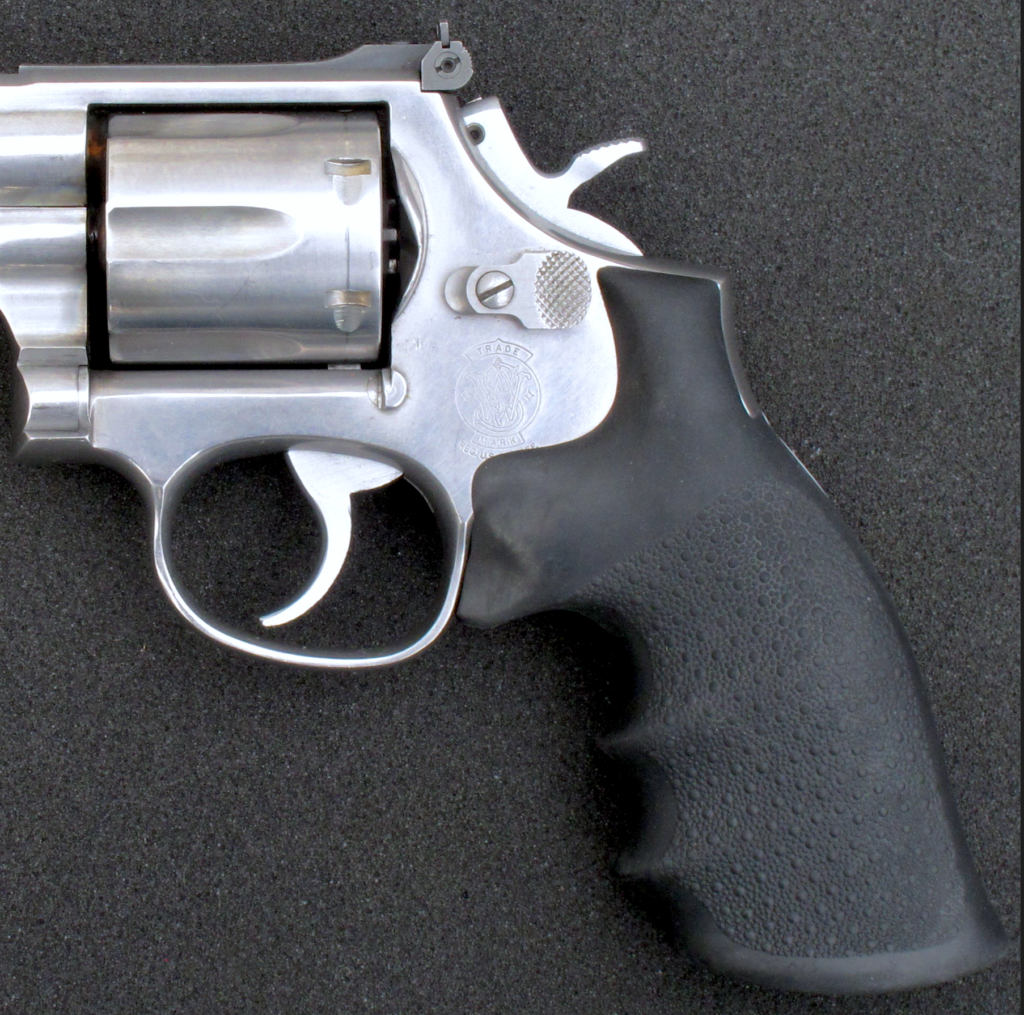
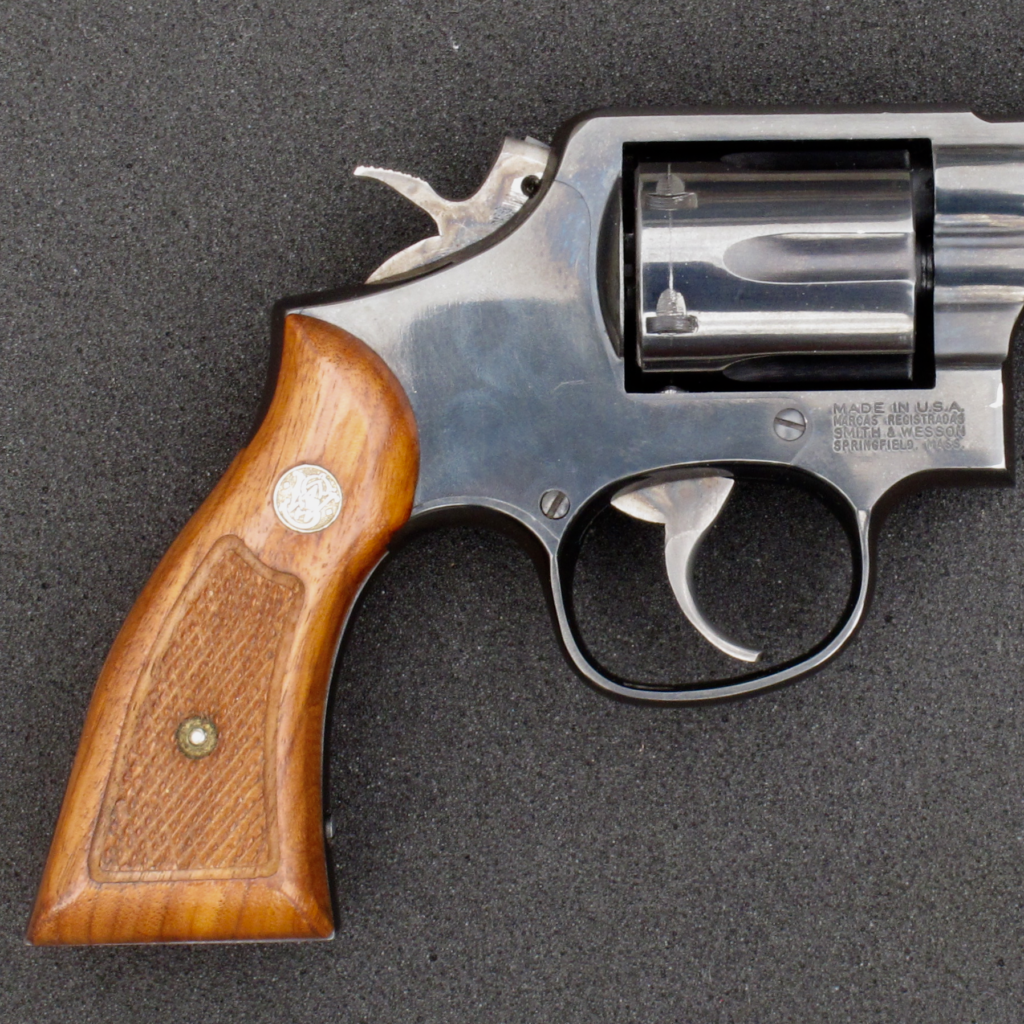
With old-style factory S&W “splinters” the neck of the grip is too narrow, and the middle finger(s) end up behind the trigger guard. It is my understanding that this style of grip was popularized when revolvers got shot a lot more in single-action than double. I know for a fact grips like these are ill-suited to serious double-action work. If you own a revolver with grips like these, and you intend to use it for defensive purposes, upgrade the grips as soon as you can afford to.
The Importance of a Good Grasp
A solid purchase on the gun is important. Holding the gun correctly will optimize the positioning of fingers and thumbs in relation to the firearm’s controls. A proper grasp (in combination with a good grip) can optimize trigger reach and travel. All of these make the use of the firearm more efficient. No less important is the ability to control recoil that is conveyed through a strong, properly-applied grasp.
An improper grasp on the revolver can cause a multitude of problems. It can cause the gun to shift within one’s grasp after every shot resulting in either a. a repositioning of the hands between shots or b. shots that are successively less controlled because of a successively poorer grip. Either of the two aforementioned problems can impact accuracy, recoil management, and speed negatively. Of course other factors (like ammunition selection and the revolver itself) also effect this stuff, grasp is extremely important. Let’s look at a couple of the most widely accepted revolver grasp techniqes: the “thumbs-tucked” grasped and the “thumbs wrapped” grasps
Thumbs-Tucked Revolver Grasp
The thumbs-tucked technique is perhaps the most commonly used revolver grasp technique these days. This is the technique recommended in a ton of instructional media. Grant’s Protect Yourself and Lucky Gunner’s excellent “How to Use a Revolver” video are two such examples.
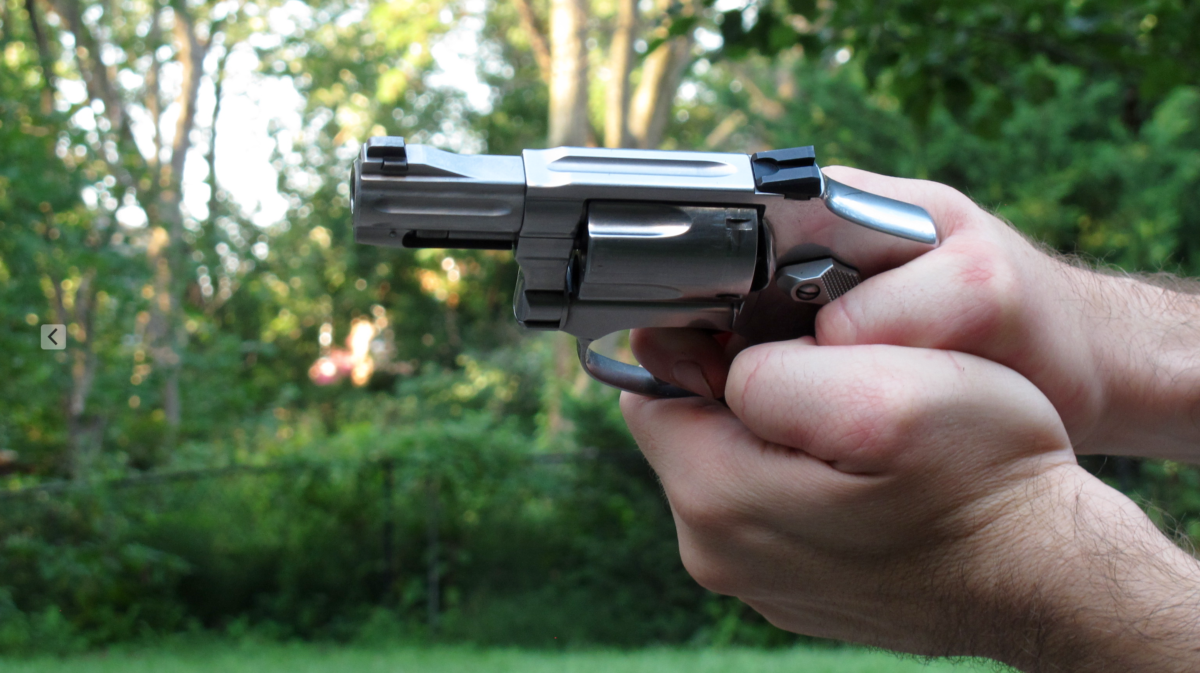
To use this technique, grasp the revolver as high up on the stocks as possible. The thumb of the dominant hand should be curled and end up pointed in a generally downard direction. The web of the hand should be as high up on the shoulder of the grip as possible without going over it, or interfering with the motion of the hammer. The middle finger should be as close to the trigger guard as possible. Squeeze the revolver tightly, but not so tightly that you begin to shake.
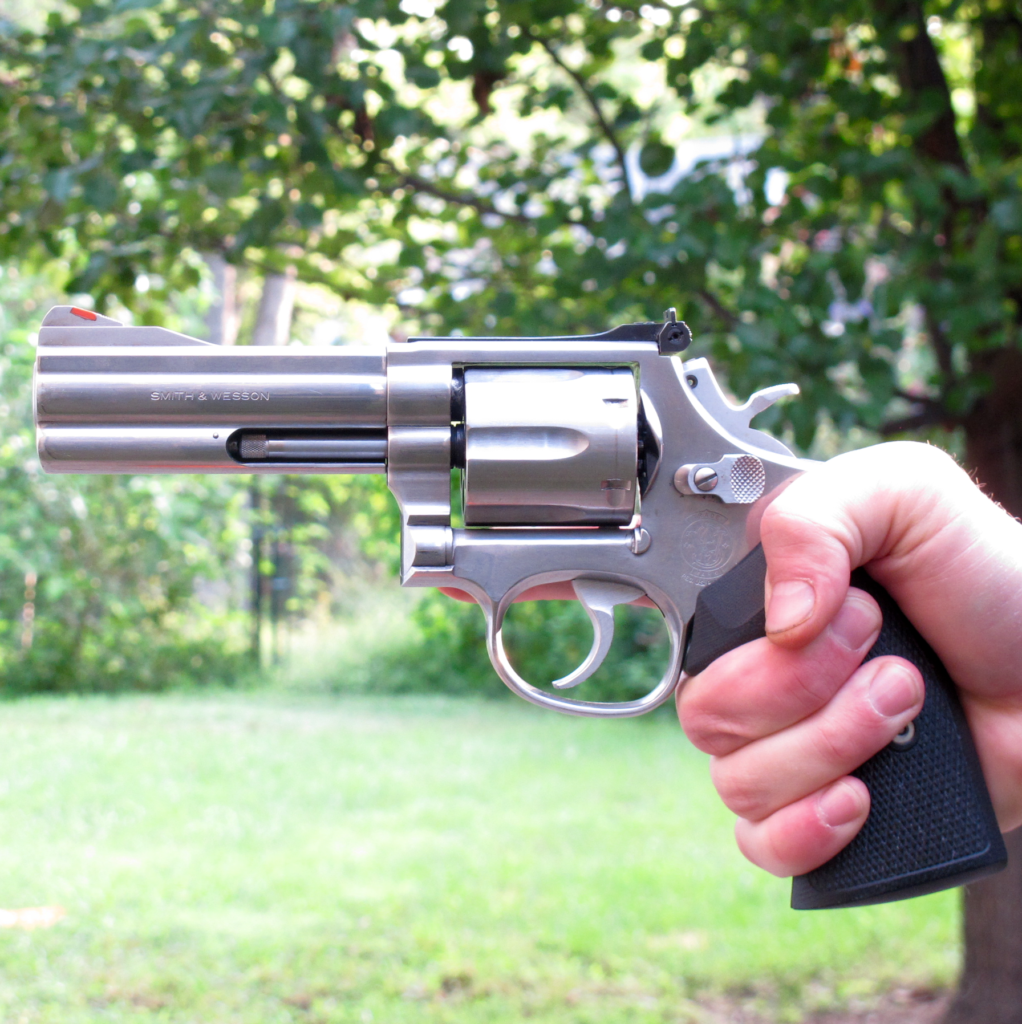
Next, wrap the support hand fingers over the fingers of the dominant hand. Place the heel of the support hand against the heel of the dominant hand, and curl the support thumb over the dominant thumb. The goal here is to get as much “meat” on the grips as possible, while keeping the thumbs out of the way to avoid injury (a topic we’ll touch on in a follow-up article), interefering with the cylinder, or getting in the way of the trigger finger.
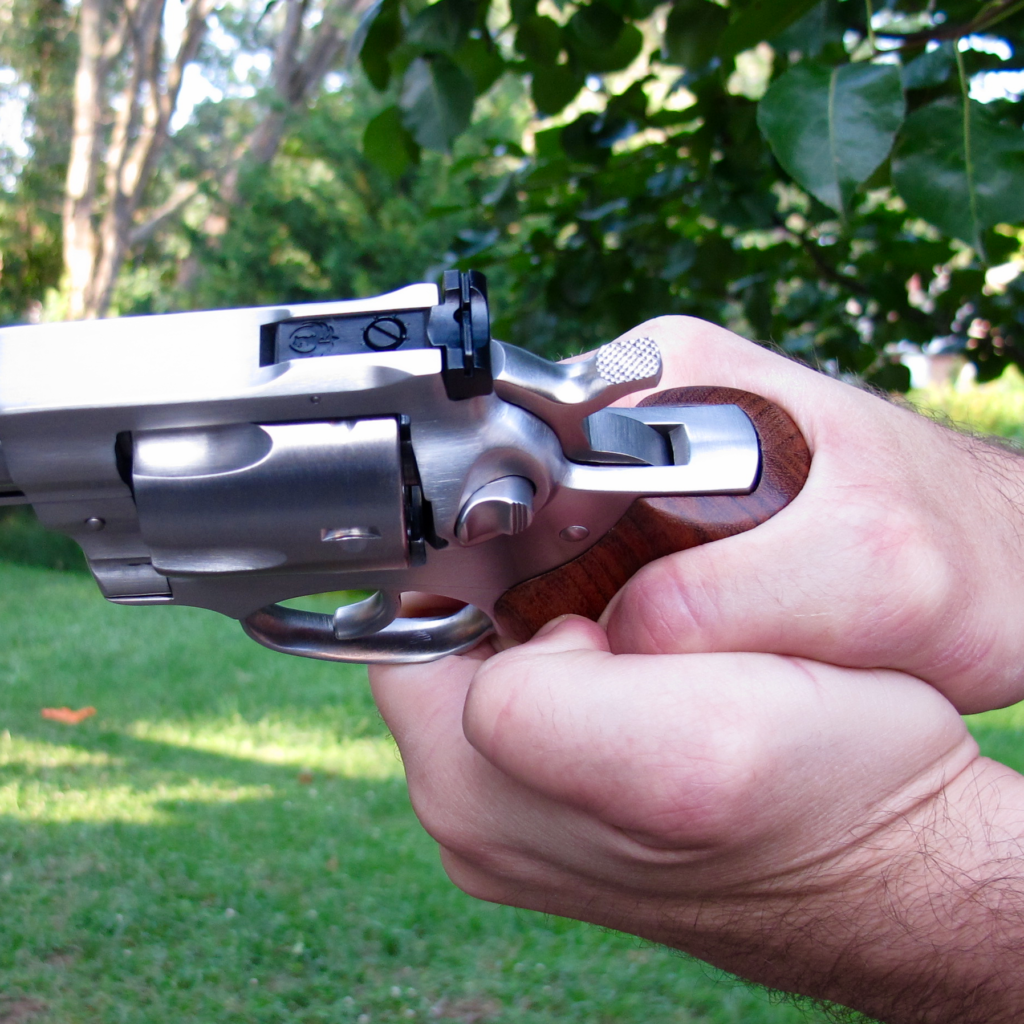
One potential problem with this revolver grasp is the thumbs interfering with the trigger finger. This is a problem I sometimes experience with J-Frame-sized guns. If you have too much finger in the trigger guard (caused or exacerbated by a too-small grip), the first phalanx of the trigger finger may hit the thumbs, arresting motion of the finger and trigger. This can usually be corrected by adjusting the position of the thumbs slightly. Again, this is usually only an problem with very small guns or in individuals with exceptionally large hands, like the massive pair of meat-hooks shown below.
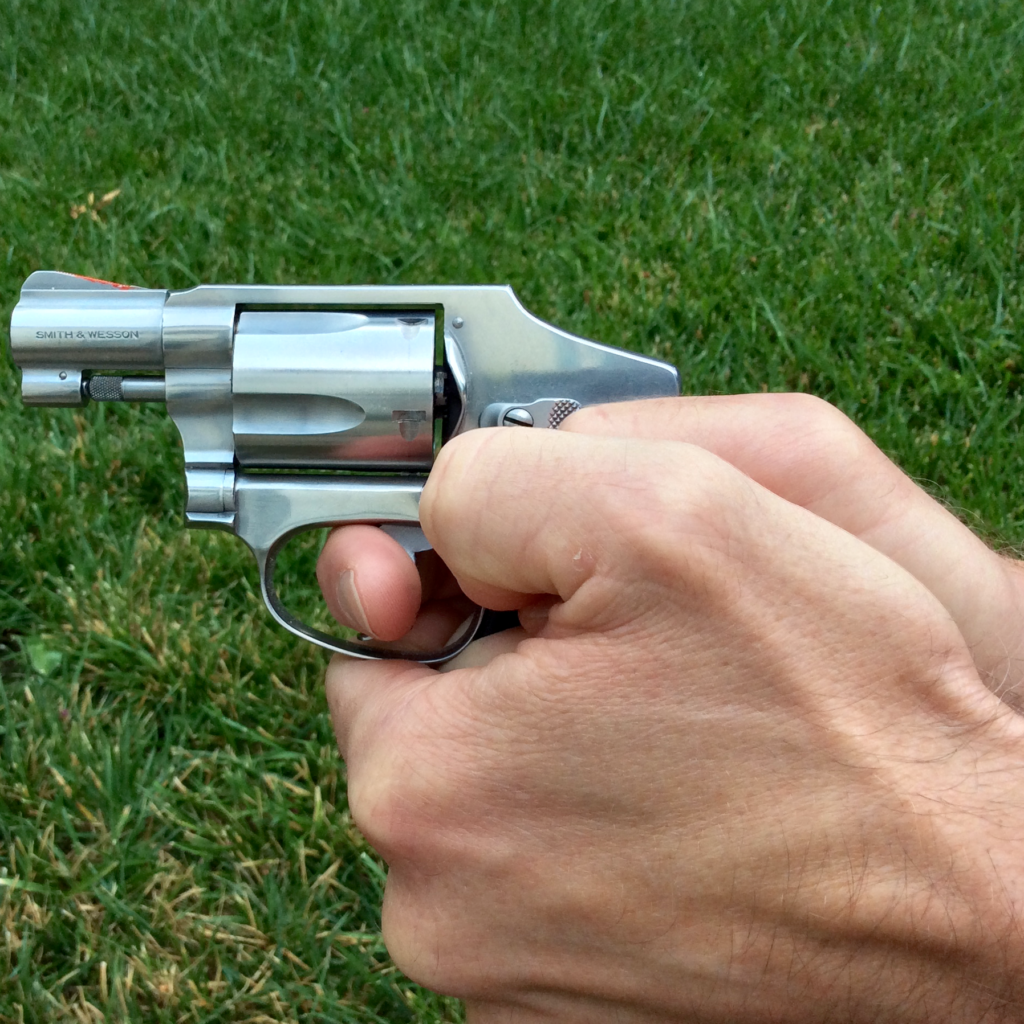
This is probably the most versatile technique of the two presented here. If you learn a thumbs-tucked revolver grasp it will also work (though not ideally in my opinion) with semi-autos, making it an okay option for people who regularly shoot both types of handguns.
Thumb-Wrapped Revolver Grasp
This alternate revolver grasp technique begins like the first: web of the hand high on the grip, thumb curled, and middle finger against the underside of the trigger guard. The hallmark of this technique, however, is the support hand thumb wrapping over the web of the strong-hand. This offers a very strong grasp of the revolver, and feels pretty good if the right revolver is in the right hands.
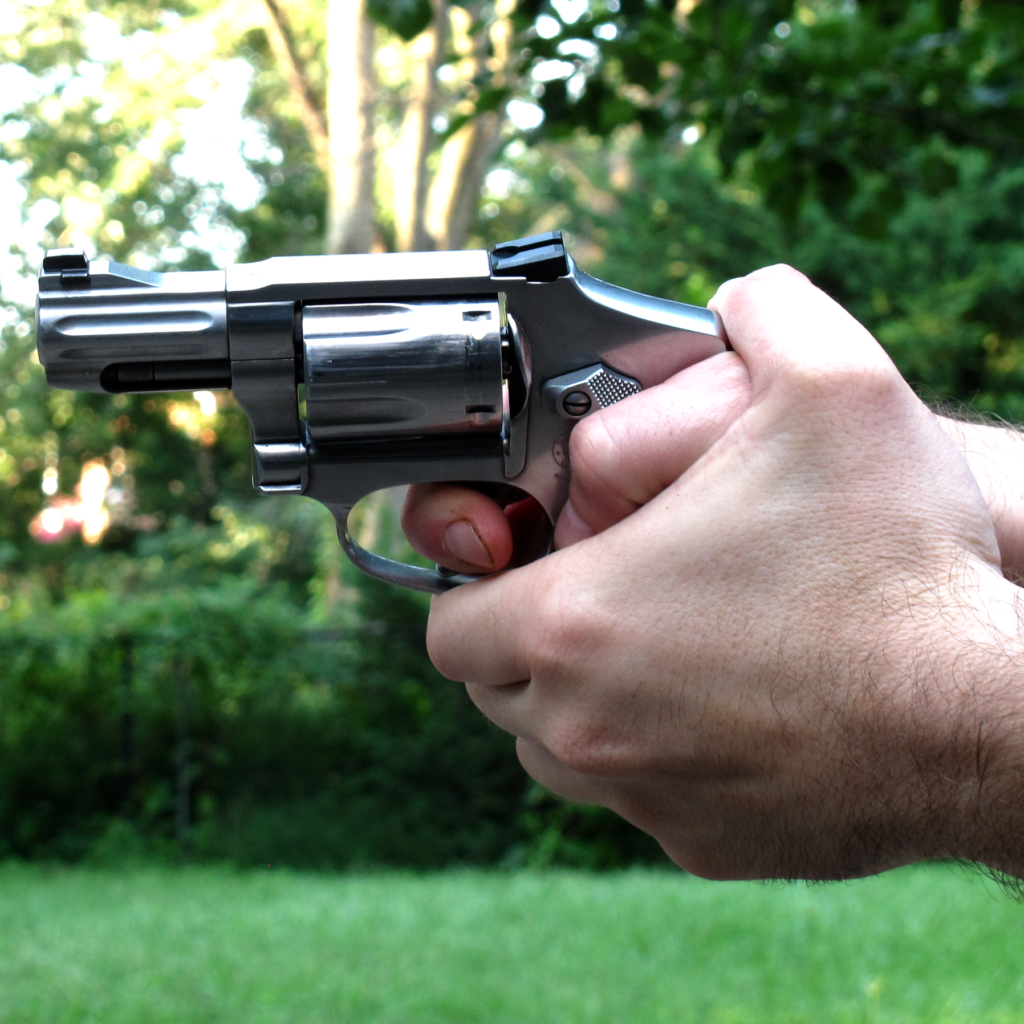
There are a couple of reasons you might not want to make this your primary revolver grasp technique. The first is if you regularly shoot semi-autos. This technique is something definitely not ideal for semi-auto handguns. If you regularly shoot and/or carry both you should pick one technique that works for, or is easily adaptable to, both.
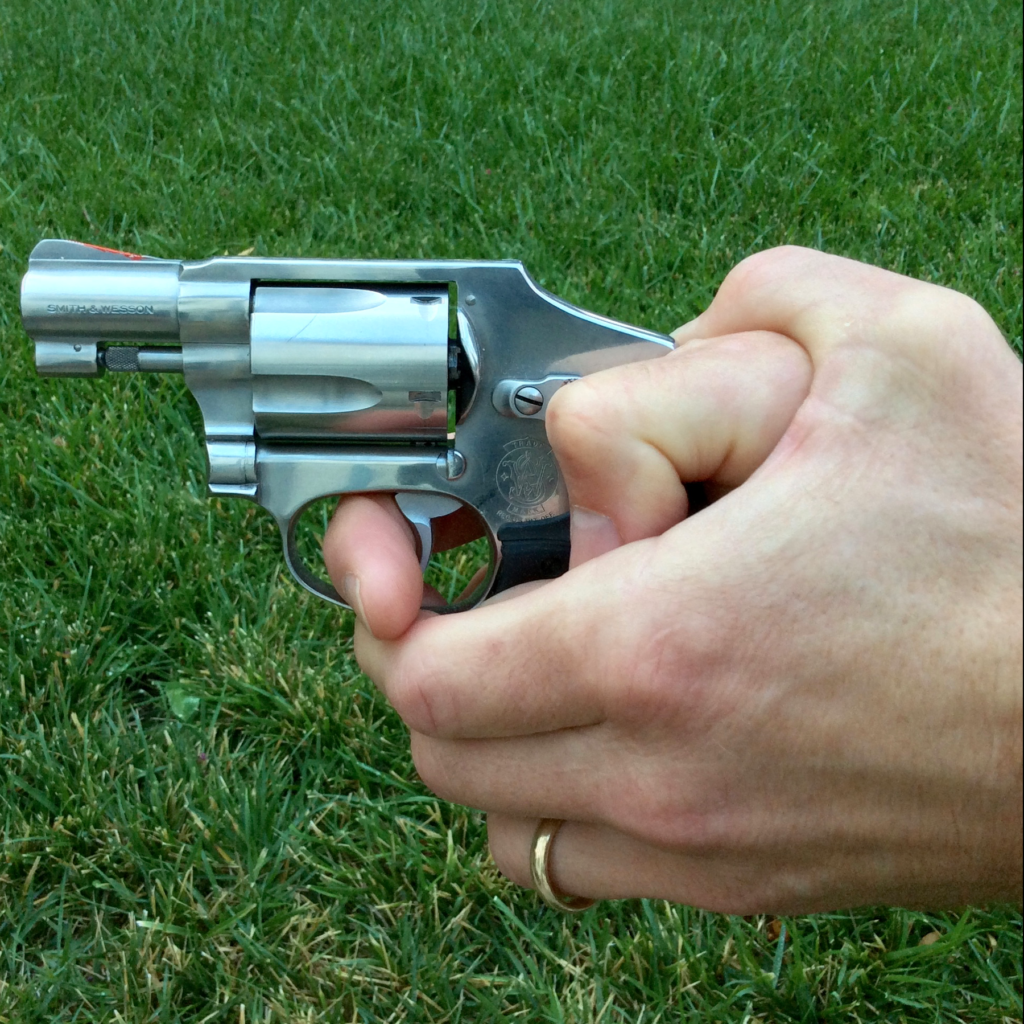
The second reason you may be disinclined to use the thumb-wrapped technique is if you shoot revolvers in a variety of sizes. This revolver grasp technique works great on small guns like the Ruger SP101 and LCR and S&W J-Frames, but not so much on bigger wheelguns. In the photo below I am trying to use the “thumb-wrapped” technique on a gun that is too large for my hands and the grasp might not look too bad, but it feels pretty miserable.
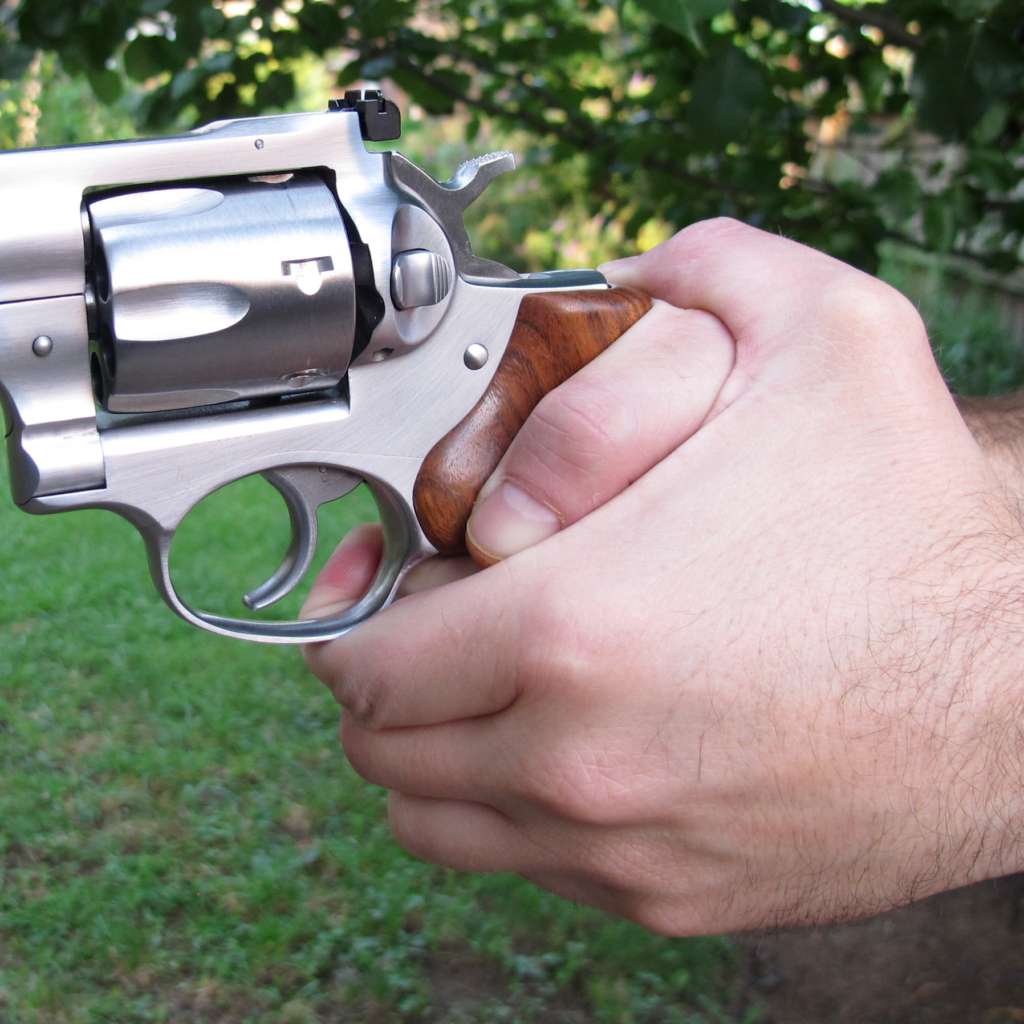
This technique is a bit more limited than the “thumbs-tucked” revolver grasp. It works better on small revolvers than big ones (depending on your hand size), and it doesn’t work well at all for semi-autos. So why in the world would you consider this revolver grasp technique? I believe it provides a sturdier grip overall if you have reduced hand strength. If this is an issue for you and you and only shoot revolvers, this might be the best option.
The Bottom Line
If you’re new to revolvers, I would recommend evaluating your situation. Do you regularly shoot semi-autos? Do you have reduced hand strength because of injury, illness, or age? Do you have exceptionally large or small hands? The answers to all of these questions are factors that should play into your decision, but your mind shouldn’t be made up until you’ve worked a bit with both. I would spend a dry-practice session or two with each. Next, I’d spend a live fire session with each of your revolvers and work both of the techniques against the clock. This should give you a pretty good idea which one is more effective for you.
Regardless of which you choose, though, I’d recommend choosing ONE and staying with it. If you’re constantly changing your technique you’ll have difficulty myelinating a single one. If you have to pull your gun under extreme stress and you haven’t automated a single technique, the grasp you get, might not be the one you want. Take some time to choose and don’t be afraid to try new things, but once you’ve chosen work the technique until it happens automatically on the draw…then work it a little more.
Some of you have noticed (and have written in about it) that I don’t use either of these techniques. I don’t, but that’s a story for another time…

Nice work, buddy!
FWIW, the thumb-wrapped grasp can even interfere a bit with an external hammer revolver, depending on the size of the gun and hand involved. If you choke up too high, you can prevent the DA hammer from coming back all the way.
One thing in favor of it though, is that it really opens up the area around the trigger, eliminating potential interference from the support hand thumb.
I’ve seen some single action revolver shooters do some good work with the thumb-wrapped grip, running the hammer quickly with their support side thumb.
Looking forward to the next installment!
Mike
Thank you for this information. I now know why my wife shoots our 2 wheel guns so much better than I do, as my primary weapon is a 1911. I’m going to try the first version of the grasp soon.
While my shooting is OK for defensive purposes, center of mass at 20 feet with both hands or just my dominant hand, my groups are never tight enough because my grasp is probably too loose and my shooting hand too low. My wife, with ladylike mitts, holds the guns properly and grasps them firmly.
My hat is off to you, sir – you’re a big man to admit that! I am a big 1911 fan, too and I totally know what you mean. The first few times I shot revolvers I couldn’t figure out how the heck to hold them because the feel is so radically different, and things are in different places. Please stop back by and let us know how this works out for you!
Justin
So today I went to the range and tried exactly what you recommended. It is also, as noted earlier, how my wife shoots a revolver. The guns in question were a Taurus 85 snubbie, a Smith & Wesson 64 4” barrel, and best of all a friend’s 6” barrel Colt Python.
The results were remarkable with all three. With a tighter grip and high hold, I suddenly began to shoot with confidence and got much tighter groups every time. Even the 85, a gun I have never shot well, scored. The Python lived up to its rep as deadly accurate with a moderate .357 load.
Bravo Sir!
Well, I sat and purposely waited to see if there were going to be any others who shoot/grip revolvers as I do. There are none,,, at least no comments. Drats,,, does this mean I am alone?!
I shoot any gun, be it semi or wheelies, thumbs forward. I do such to keep from influencing the gun to be pushed to the right, or downward by my thumbs. EVERYBODY has a different hand, and after years in the construction trades I have very powerful hands & thumbs. Yes that can be an advantage when it comes to “open hand skills”. BUT,,, it can play havoc with a shooting grip as well.
I actually spent a number of years training a group of guys who all shot revolvers by means of the thumbs forward grip. We nick-named our group The Black Thumb Gang because at the end of each session each shooter had a black tip on his thumb from thumbs forward/burning powder.
If I attempt to curl my thumbs as shown in the photos above I seem to lose palm contact with my left (support) hand. Hence the thumbs forward approach.
So I am alone here huh? Well, Grandma always told me I was “special”.
You aren’t alone at all! More to follow soon…
JC
Is your theory on revolver grasp strictly for handgun defense or general shooting(target shooting)?
I mean, lets face it, the most use ANY gun gets is sport shooting(plinking, targets, paper, sighting in, etc.). Having said that, if this is your grasp for general “hit the tin can” type shooting, I have a major issue with it. Putting a “death grip” on a revolver is detrimental to accurate shooting. The thumb, for instance, should NOT be wrapped around the grip, it should be touching the cylinder latch while the rest of the fingers are loosely holding the grip. While I mostly shoot .38 and .22lr for serious target work, I’ve also used this light grasp technique on .44 mags with pleasing results. If you can find a copy, read William Reichenbach’s book “Sixguns and Bulleyes” (1936). It is the best source for informative target shooting and written in a time when revolvers were king. His techniques were used by competitive shooters(military and civilian), one hand or two hand hold.
There are many ways to skin the cat, Rick. I think we can all agree that the technique needs to fit the task, and our individual differences will mandate changes. With your suggested technique, for example, my long thumb would probably open the cylinder latch on anything more powerful than a .22 if I rested it on the latch. We all need to find our own salvation, here, and figure out what works best for us for the job at hand. It sounds like you’ve got a system that’s working for you, and I’d say that’s great.
One thing I will say is that if your principal concern is developing a good technique for defensive shooting (which I think was the aim of the article) then it does behoove you to practice the technique to the point that it becomes the default. That means even if we’re “only target shooting,” it’s probably a good idea to practice your defensive technique more often than not, so that you don’t build negative habits with non-combative techniques that are used more often.
Know your goal, understand the task, proceed accordingly. Sounds like both you and Justin are on the same track, there.
Rick,
Can you elaborate on why you have a “major issue” with this technique, and don’t just offer yours as an alternative? Also, I don’t believe I indicated that anyone should use a “death grip” (I would have said “death grasp” 😉 ). I did, however, recommend holding the gun tightly as this promotes the sights coming back onto the target in a more timely manner and with less disruption of the original grasp, which in turn promotes the ability to provide rapid, accurate subsequent shots. I’m not sure your proposed technique optimizes this. Additionally, even if I’m not training and only shooting at tin cans, I want to do so as accurately as possible, so I’m going to grasp the gun tightly and recommend that others do so.
Thanks!
Justin
You appear to have unusually large hands. I typically wear large size gloves but they are too large for me, while mediums are too small. My wife’s hands are a bit smaller than mine. I have had all Smiths J, K, L and N frames. I sold the N. I have never paid any attention to my own grasp until recently. I’ve been mostly on the lookout for others trying to blow their fingers off with stupid things like holding the trigger guard front with their off hand finger …a thing learned from holding autos and never revolvers. I have never found success with the exaggerated high hold with full sized revolvers. It makes my trigger finger go off stright and results in the pull being at an angle. The most accurate DA shooting I do is by isolating the trigger finger’s movement for a smooth pull. This I cannot do with those high holds. In SA the high hold is a mess. Mainly I shoot deer with my revolver and usually in SA. Furthermore most grips are not made to be held that way on Smiths. On J-frames especially it is easy to block the hammer with web of your hand that way. I do not like 44 mag, but I’ve never had a problem contolling even full house 357 (like a 158 xtp going 1400 or a Lyman 358429 going 1300) with a slightly lower hold, so I do not know why the exaggerated high hold is advocated. You guys may want to try out those gruesone looking Chiappa Rhinos because they force the use of the high hold and take advantage of it.
It sounds like you’ve got a good system for yourself, which is the point of it all. There are so many variables—in hand size and strength, grip shape and size, frame shape and size, ammunition, etc.—that it’s impossible to prescribe a “one size fits all” solution. What works wonderfully for me, might be a disaster for you, and vice versa.
The high hold helps some people to control the recoil in guns that are being fired quickly with powerful ammunition, as in a defensive scenario. It’s a simple exercise in reducing the moment arm by raising the support closer to the bore axis. Since you’re focused on SA shooting, it’s probably not a preferred technique for your needs, but it can be helpful for other people whose circumstances or focus are different than yours.
I wish I’d read this excellent article sooner. I am used to a J frame with combat grips and use support hand thumb tucked. I picket up a nice used K frame, but the aftermarket rubber grips were too big. I bought a set of old style panel grips that looked and felt good, but were uncomfortable at the range–too much space behind the trigger guard. I’ve ordered a set of slim combat grips and plan to perfect my grasp as you suggest.
I also recently purchased a subcompact auto for warm weather concealment. I got tired after a few dozen rounds and instinctively crossed my thumb over and was rewarded with quite a slide bite. The good news is perfecting this is great fun at the range if, like me, you really like to shoot.
Best of luck with that Jim! The autopistols can be even more finicky about grasp—-particularly the smaller compacts. It’s easy to inadvertently hit controls like mag releases, safeties, and slide stops on those. You’ll probably find that you’ll need an entirely different technique for your autos than your revolvers. Perfecting the skills can be a lot of fun though!
Great article? Can you expand on WHY it’s important to have a grip that fills the space behind the trigger guard?
Also, I’m assuming this is not applicable to single action revolvers?
Hi Dan. Filling the area behind the trigger guard is preferred for DA work, because it allows the trigger finger to work the trigger in more of a straight line to the rear. You’re correct that this is not a concern for SA work, where having the gun sit deeper in your hand is preferred to improve access to the hammer spur.
Thanks so much for the reply! Is it a case of “more is better”? That is, is it better if the entire area is filled? Some revolvers (for example the current S&W 986) seem to have that area partially filled near the top but not as much near the bottom.
Dan, it’s really dependant on the shape and size of your hand. The objective of filling the sinus area (that empty space behind the trigger guard, and in front of the frame) is to give your trigger finger its best leverage, and allow it to draw the trigger straight to the rear. That might take a little more fill for some hands than for others. Mr. Sausage Fingers will probably need less than Mr. Chicken Fingers.😁
Much appreciated. Thanks so much.