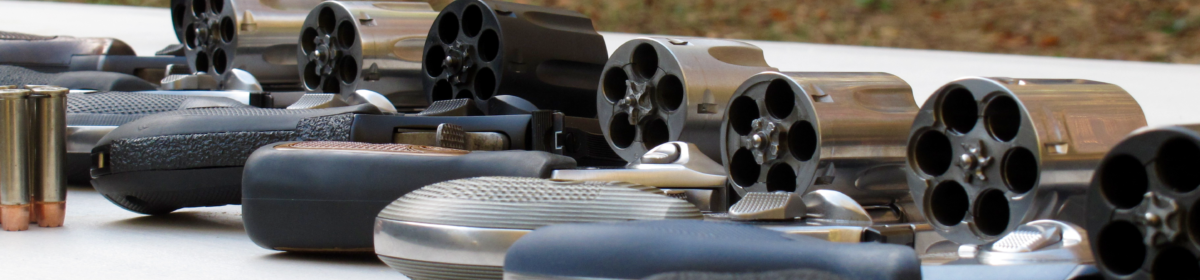
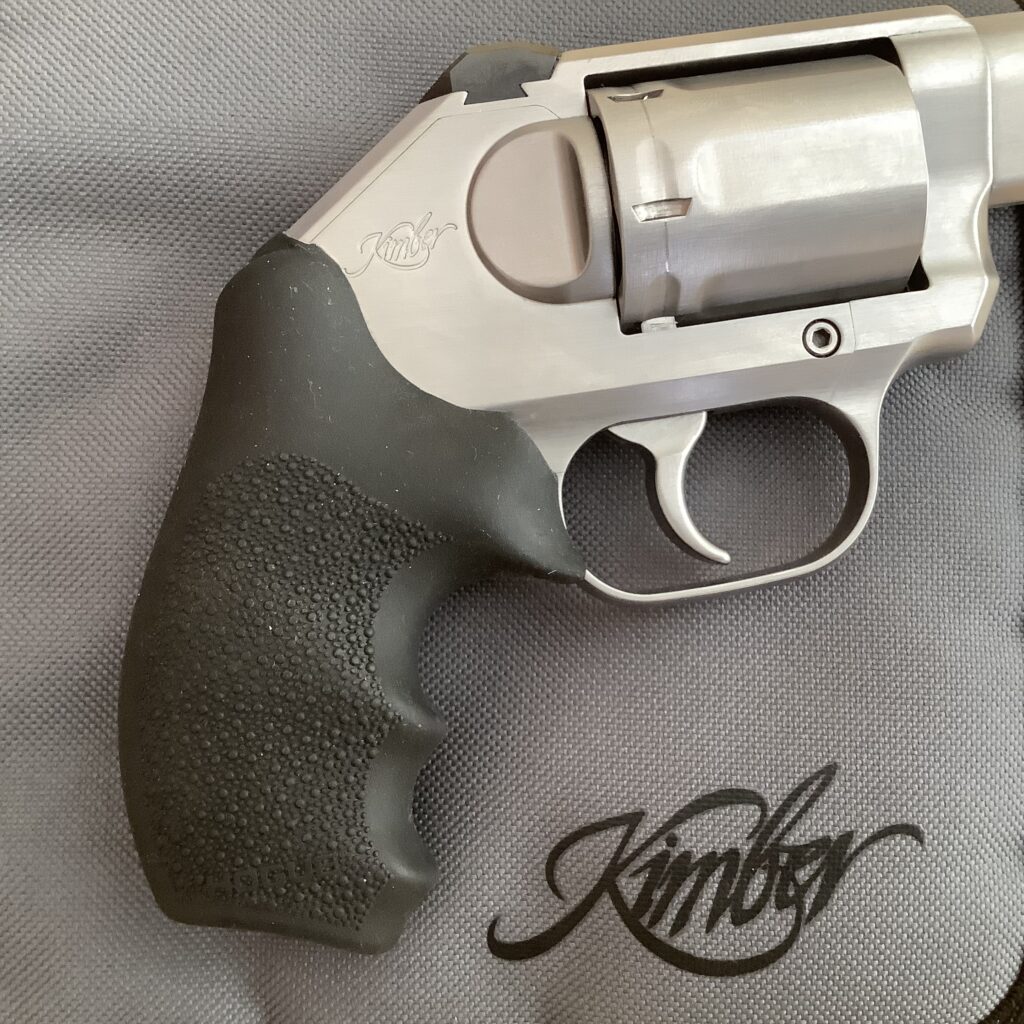
I got my hands on the brand-new Kimber K6s revolver at the 2016 SHOT Show, and was immediately impressed with the package. They managed to combine a good trigger, great sights, and a six-round cylinder in a package that was hardly larger than a five-shot J-Frame—what was not to like?
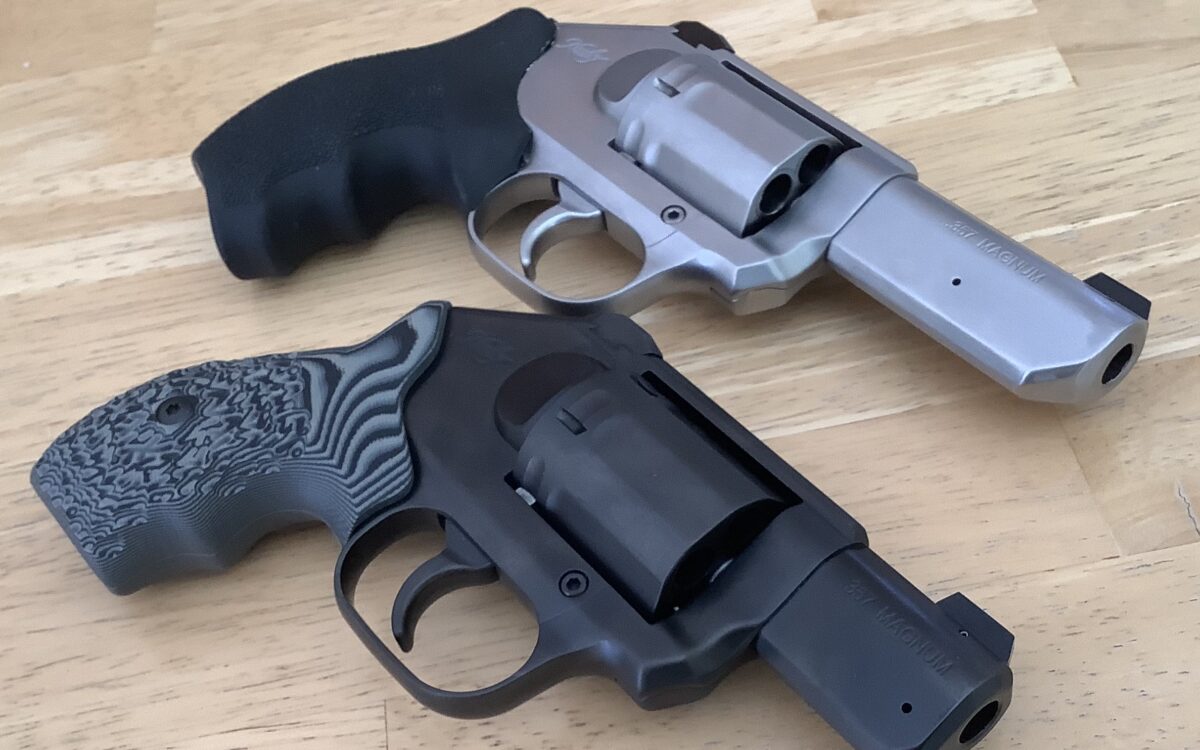
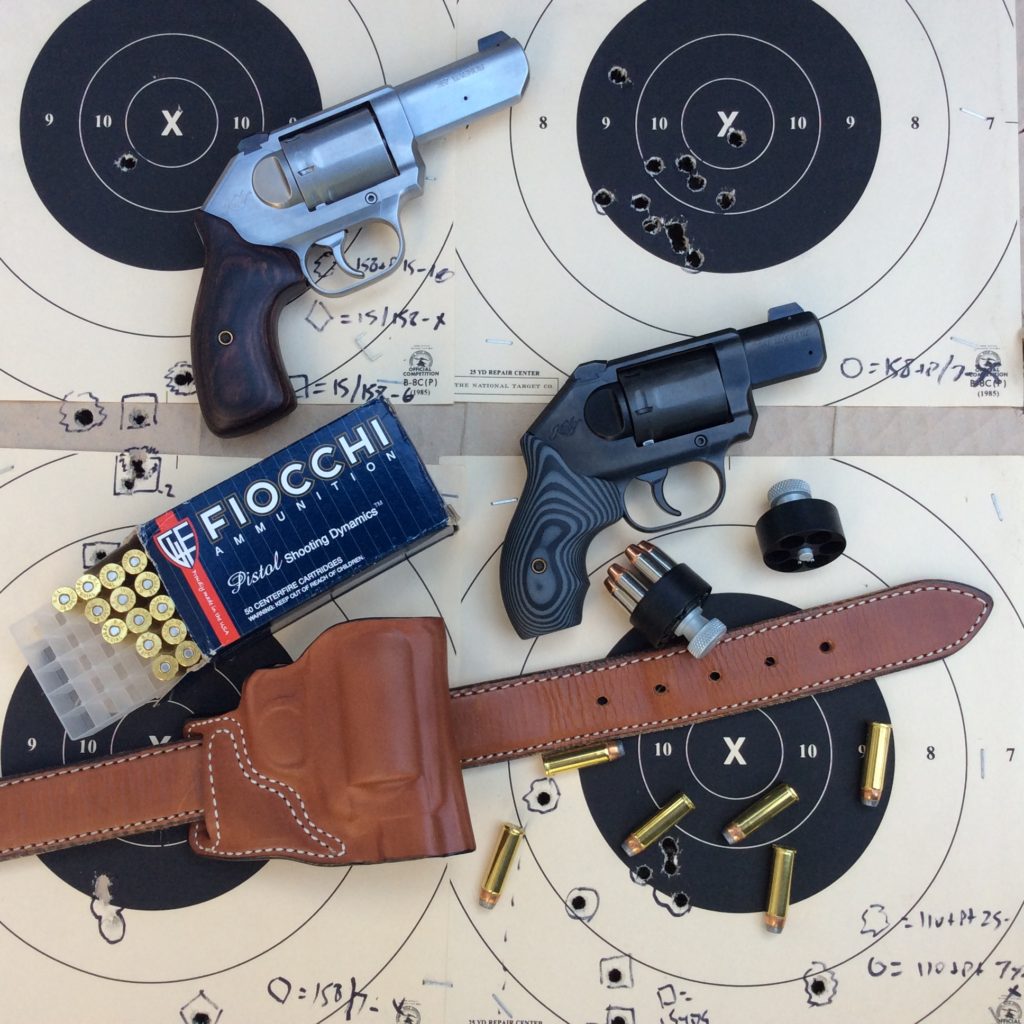
Kimber’s success with the original, two-inch stainless version of the K6s soon led to additional variants that premiered at the 2018 SHOT Show. I was excited by the new guns, and arranged for RevolverGuy to obtain some samples for further test and evaluation. Soon, Justin had a three-inch stainless version on the way to put through its paces. Not wanting to be left out of the fun, I purchased a brace of the guns, consisting of a three-inch stainless model, and a two-inch DC model, with its dark gray DLC coating and attractive G10 grips.
We shot the guns hard, and provided the best coverage of the gun to date, including a detailed review of the three-inch stainless, a comprehensive field review that covered both models, and an unparalleled, in-depth study of the gun’s development and design features. In the process, we delivered vital feedback to Kimber that led to a redesign of the gun’s firing pin, and we notified you, the reader, when that change had been fully incorporated into production.
So, we’ve been there from the beginning, and we’ve been exceptionally thorough in our examination of the gun.
We know it well.
Grins and Gripes
You’ve all been along for that ride, so you know that after the exciting rollout at SHOT Show was over, and we started spending some serious time with the gun, we got a better understanding of its strengths and weaknesses.
With respect to the former, we were quite pleased with the quality of the action (a really nice trigger pull, for a mass-production gun), the sixth round in the cylinder, the shape and operation of the cylinder release, the relief under the extractor to enhance reliability, the overall size and weight, the fit and finish, and the high-visibility sights, to name just some of the highlights. There was certainly a lot to like about the gun.
However, there were some areas that needed attention, as well. We mentioned the firing pin already, but the poor sight regulation was a big problem, the grips could stand improvement, and there were some other minor beefs we had with the otherwise praiseworthy gun. We also weren’t happy with the lack of industry support for the gun, at the time.
A season for all things
The editorial calendar marches on, though, and other projects took precedence over further tinkering with the K6s, so the two I purchased went into the safe and got ignored for a while. However, the gun’s positive attributes eventually drew me back to it, and I decided it was time to spend a little effort getting the guns where I wanted them . . . or at least a little closer.
This, then, is a report on some of the changes and improvements I’ve recently made to my K6s revolvers and gear. I have to admit, off the bat, that this is still a bit of a work in progress, but I’m much happier with the Kimbers now than I used to be, and I hope you’ll find the update interesting.
Here’s the rub
The Kimber with the long tube was the first gun Justin worked with, and he spoke so highly of it that I wanted to try one, myself. I’d liked the shorter, two-inch gun that I fired at SHOT Show very much, and was eager to see how a gun with the three-inch barrel length, that I liked so much, would handle.

I liked the gun quite a bit, despite its rather non-traditional looks, but I couldn’t get through more than about 50 – 75 rounds before the gun would freeze up, due to cylinder rub. The barrel-cylinder (B-C) gap was so tight on my sample that when the gun began to heat up, and the stainless steel expanded, the cylinder would drag on the forcing cone, turning a roughly-10 pound pull (factory specs are 9.5 to 11.5 pounds) into something that felt 2 or 3 times that, and my shooting session would be over.
The rub marks in the carbon soot on the cylinder face told the tale—the cylinder was rubbing on the top edge of the barrel extension, at 12 O’ Clock. Interestingly, it appeared that only two or three of the chambers were affected, indicating that the cylinder may not have been spinning square to the frame, either.
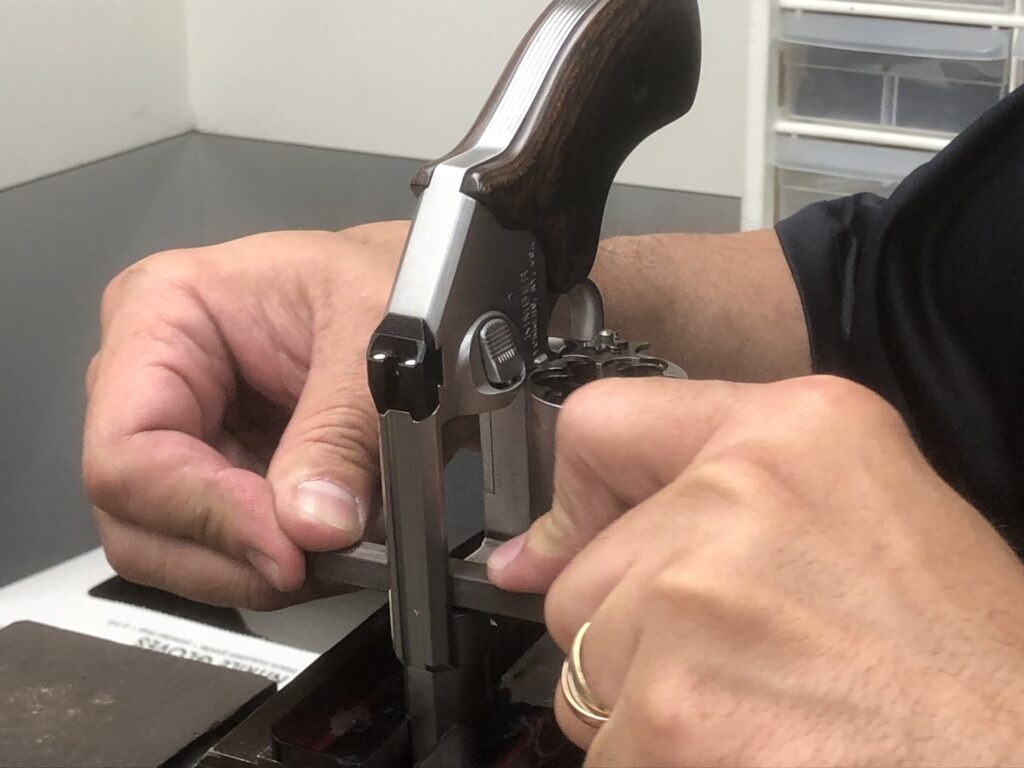
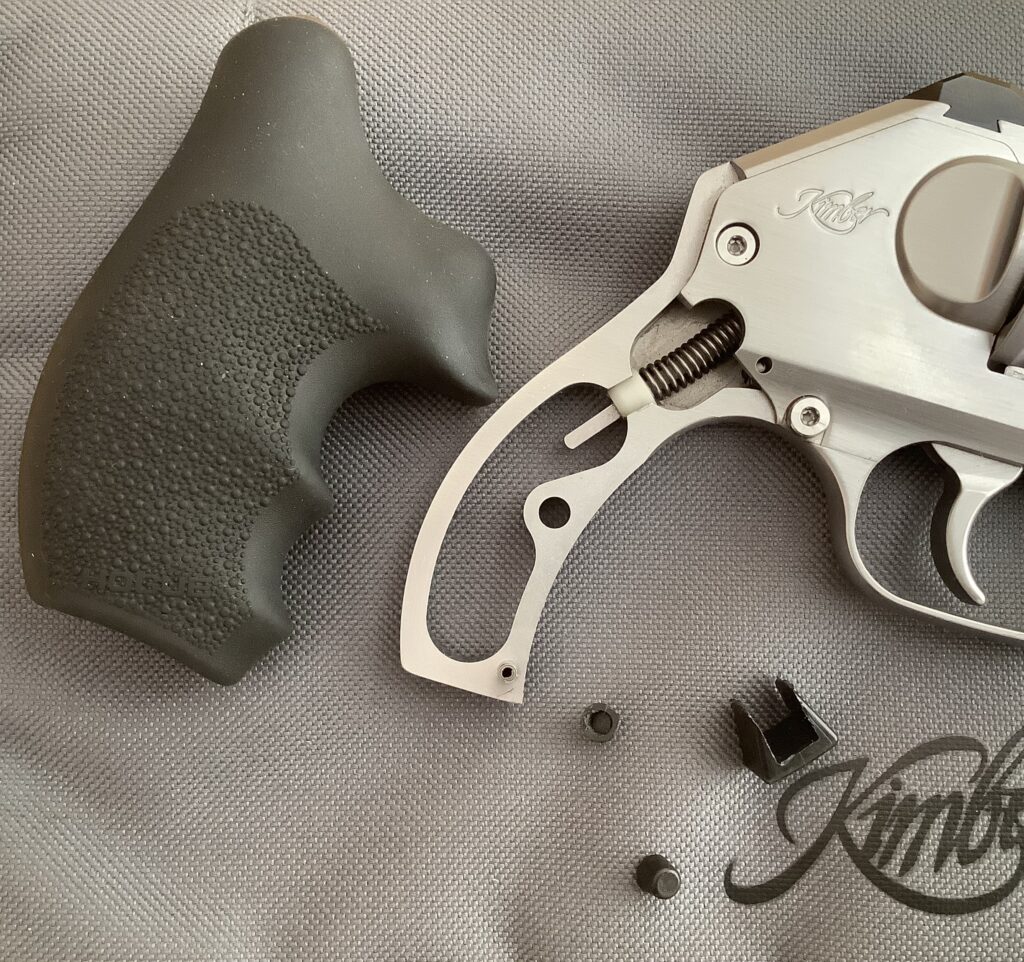
When pro-armorer Dean Caputo examined the gun, he couldn’t pass a four-thousandths (“4 thou”) “No-Go” feeler gage through the B-C gap on any of the chambers. We estimated that some of the chambers were less than three thou, while others hovered around three-to-four thou, which was much too tight for reliable operation. He did some careful work to relieve the B-C gap until it passed the four thou gage on each of the chambers (being conservative is good here, because you can’t add the metal back, once you take it off!), and asked me to shoot it and report back.
While it was improved, the gap was unfortunately still too tight, and the gun would bind up rather quickly as it heated. Since we live about 400 miles from each other, I couldn’t get the gun back to Dean in a timely fashion for him to take a little more off the barrel extension. I know he would have corrected it, but I just didn’t have the time to make the round trip, so I eventually took it to my local gunsmith, who finished correcting the B-C gap. The gap now rests somewhere between four and six thou on the six chambers, which is the sweet spot that enhances reliability without venting off too much extra gas. Thankfully, the gun now does a much better job of shrugging off the expansion issues which tend to plague the stainless guns more than the carbon steel guns (due to the thermal properties of stainless), and runs beyond a single box of cartridges.
Sights
With that fixed, it was time to correct one of the biggest gripes I had about the K6s revolver family, in general, which was the terrible regulation of the sights.
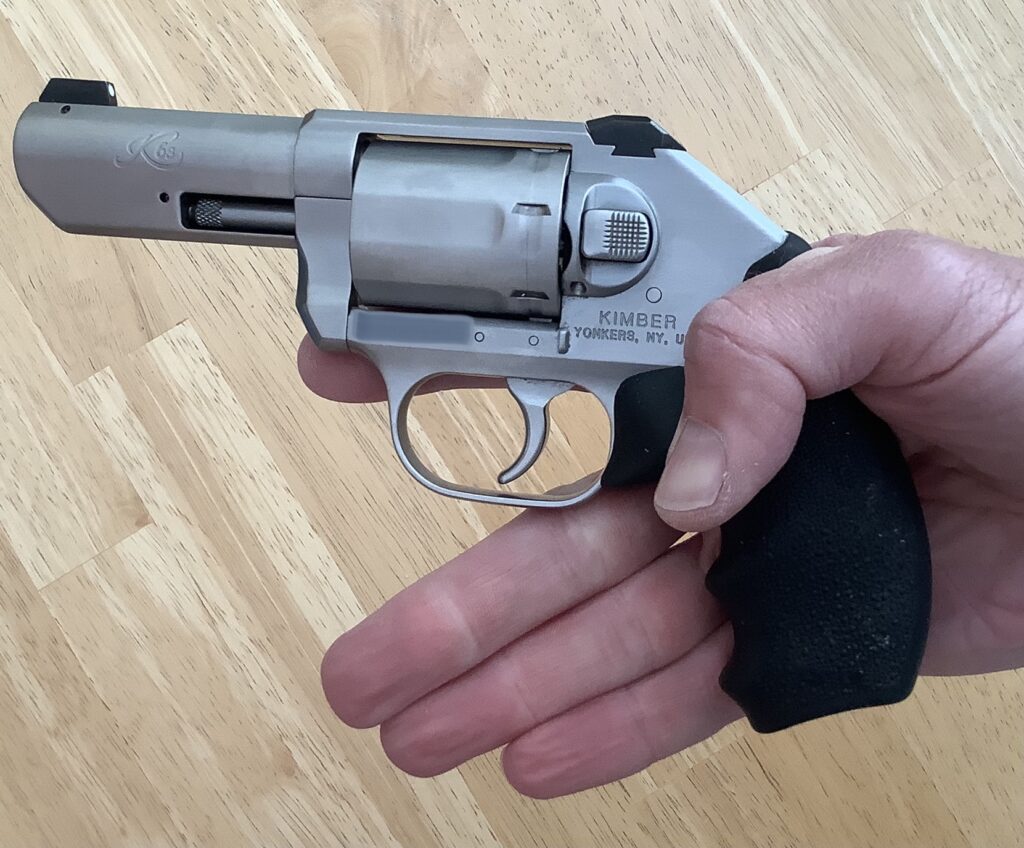
For those unfamiliar with the platform, the sights on the K6s are simultaneously one of the best, and one of the most frustrating, features on the gun.
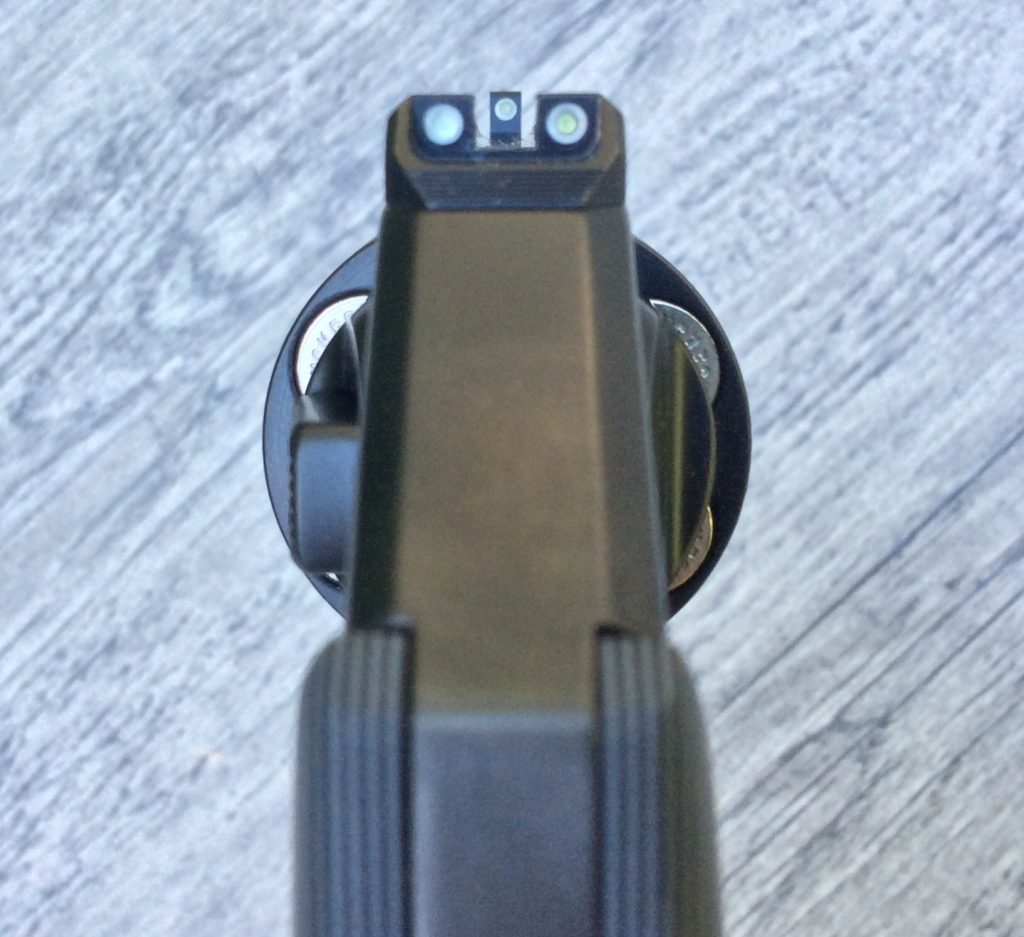
The Kimber’s high-visibility sights offer the best sight picture you’ll find on a fixed-sight snub, as it comes from the factory. They’re big, they let enough light in, and they have good contrast. They’re the first thing I noticed about the gun, when I brought it up on target for the first time—they made me stop, before I even pulled the trigger, and exclaim to RevolverGuy Steve Tracy, “man, these are EXCELLENT sights!”
I’m not a fan of 3-Dot sight patterns, like those used on the K6s, but despite this, they’re really super. These sights look like something you’d find on a service-size auto, not your typical snub.
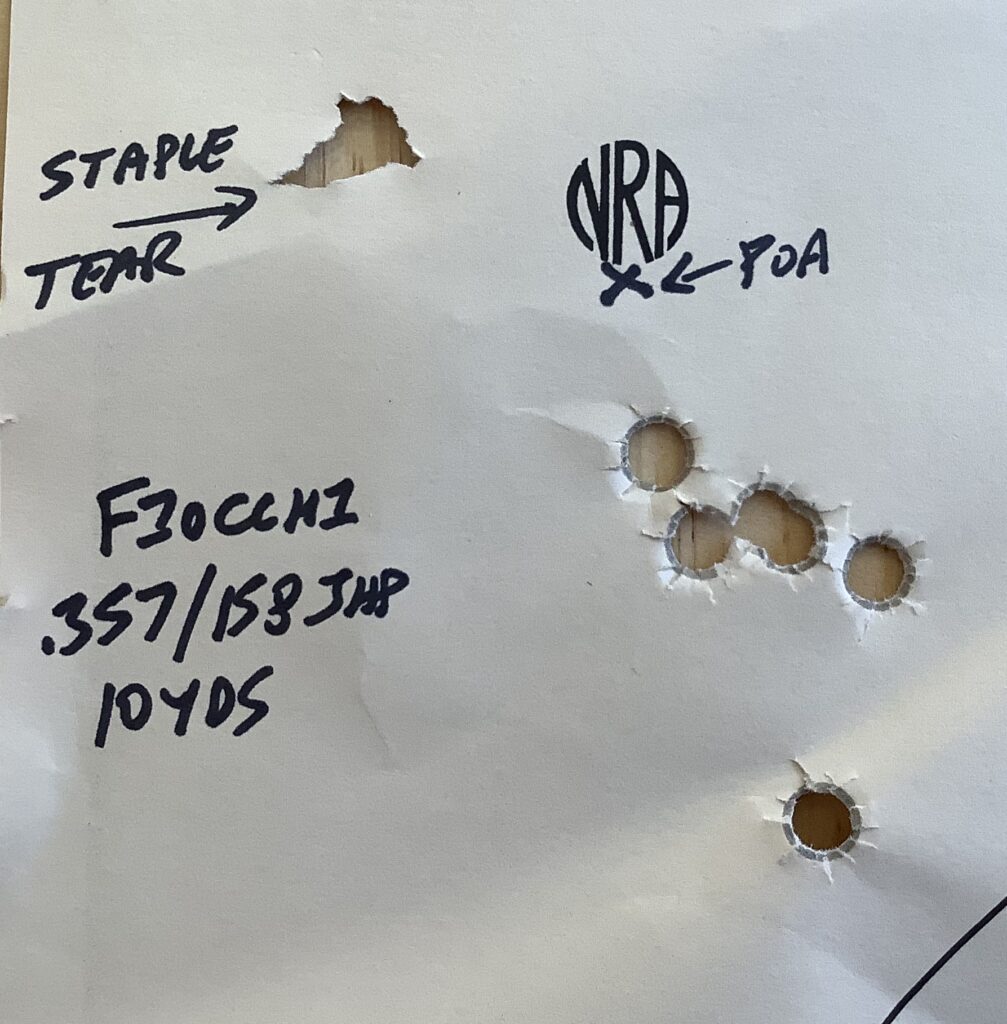
Alas, they’re poorly regulated. For inexplicable reasons, Kimber elected to regulate the sights for full-power, Buffalo Bore, 158 grain .357 Magnum loads at a distance of 15 yards, and that’s a combination that virtually nobody will shoot in the K6s . . . at least not routinely! Buffalo Bore rarely loads anything mildly, so the guy who does all the test firing in the Kimber facility must have arms like Popeye!
A 158 grain .357 load is powerful medicine in a gun this size, and the K6s really deserves to be regulated with a less energetic, softer-kicking load, because that’s where most K6s shooters are going to live. Some diehards might shoot a lot of full-house Magnums in the little gun, but most folks will be shooting .38 Special in these snubs, for comfort, control and economy. Yet Kimber has held firmly to their 158/ .357 standard, despite our impassioned pleas, so the guns shoot quite low with just about any .38 Special load–anywhere from two-to-five inches below point of aim at 15 yards. The only practical way to fix this is to reduce the height of the front sight, so I packed up some ammo and some supplies, and headed off to the range.
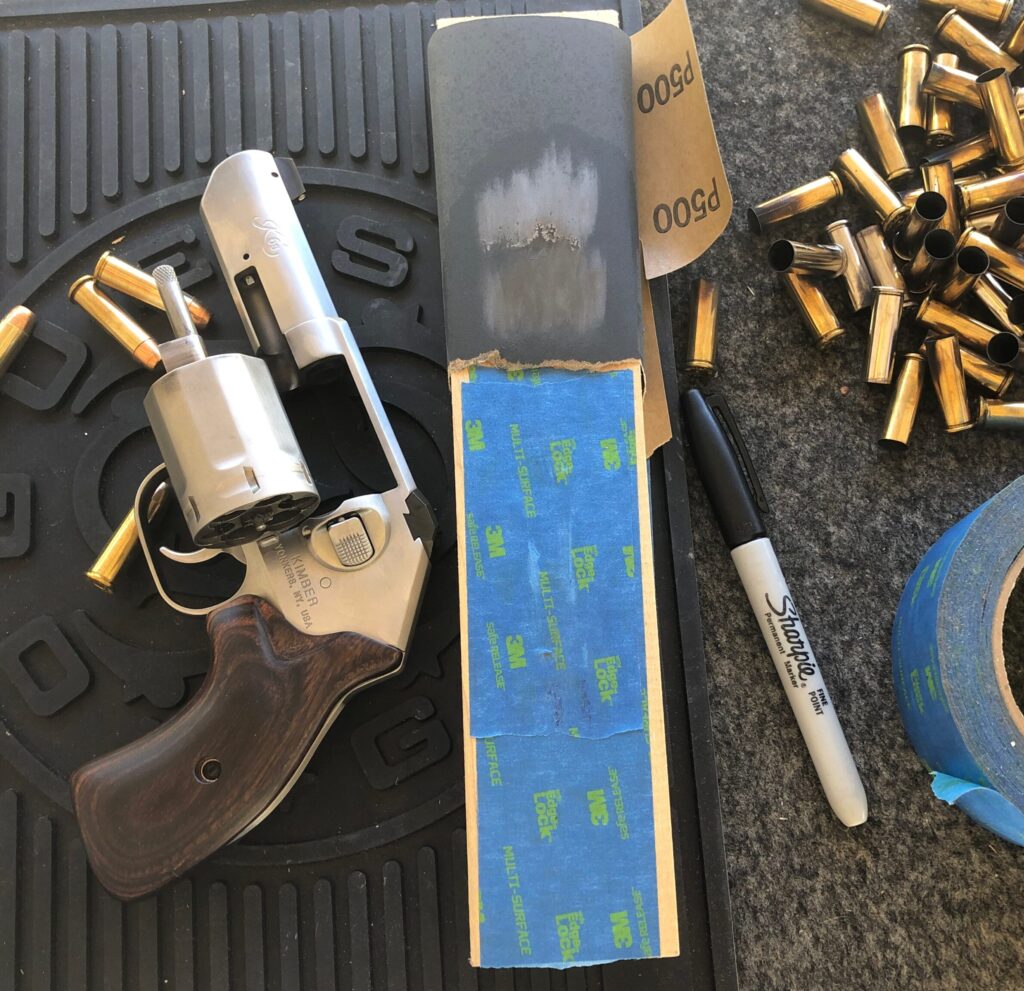
Using a method detailed by Justin in a previous article, I lowered the front sight on both the three-inch stainless K6s and the DC version, to adjust the point of impact upwards for the standard pressure and +P, 130 grain, .38 Special loads that I’m most likely to fire in these guns. Some 500-grit sandpaper was wrapped tightly around a piece of wood plank, the rear sight was taped up to protect it, and the gun was inverted so that it was resting on its sights. Using some WD-40 to lubricate the sandpaper, I carefully rubbed the front sight off in small increments, making sure to keep the gun square to the plank, and checked point of impact frequently.
It took a more work than I expected to grind down the front sights far enough that the point of impact raised to the desired spot. I chose to use .38 Special +P, 130 grain, Winchester Ranger Bonded as my baseline load, and cross-checked my work with .38 Special, 130 grain, Winchester “White Box” FMJ, to help stretch out my ammo supply, and see where the target ammo would print, compared to my duty load (awfully close to the +P JHP, as it turned out).
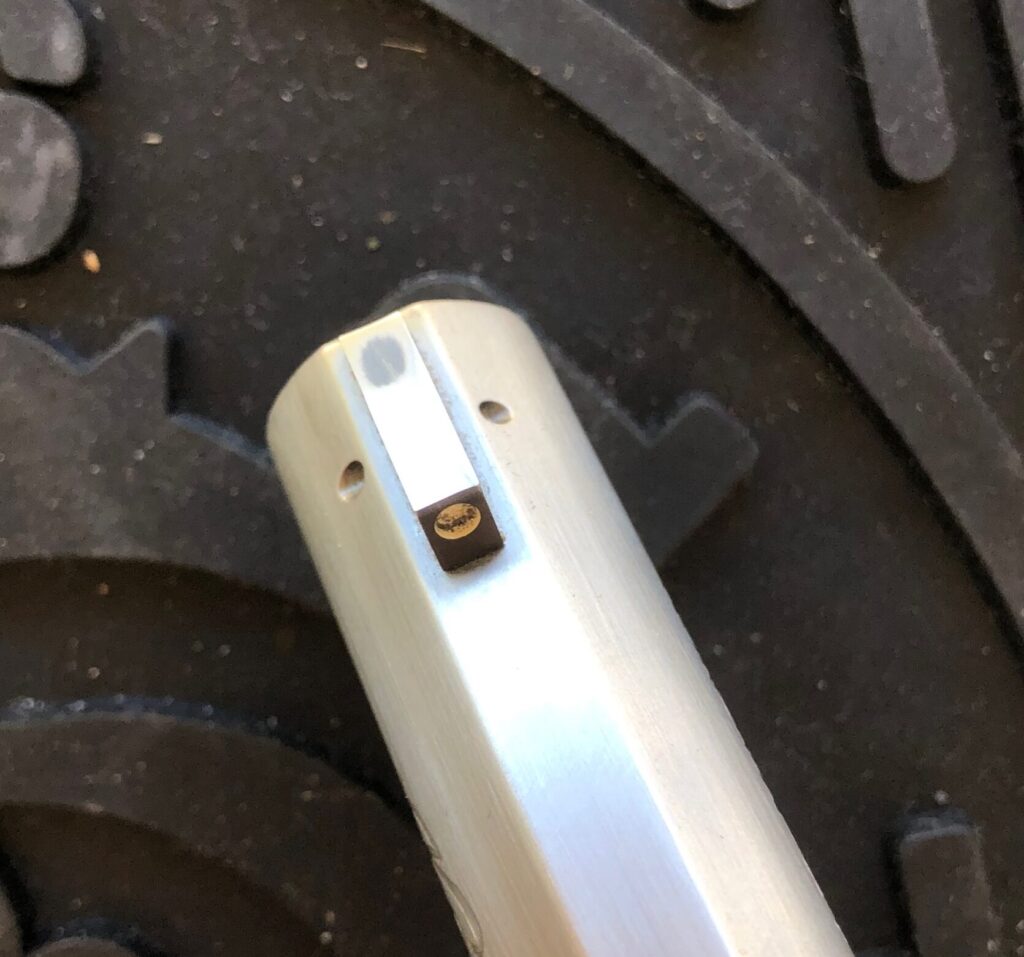
One complication with the K6s DC was the Tritium night sight in the front blade, which prevented me from fine-tuning the zero on the gun as carefully as I would have liked. I was starting to get close to the plastic, white outline that surrounded the globe in the sight, and I wanted to leave sufficient material above it so I wouldn’t compromise the structural integrity of the sight. I got pretty darned close to what I wanted, and I’m satisfied with the result, but the night sight was definitely a restriction to the effort.
A skilled machinist might have removed the sight blade and removed material from the bottom, then re-drilled the tenon for the sight pin, but that was beyond my capability, and there was also a risk that the new pin hole wouldn’t have been reinforced at the bottom, if only a slight amount of material was removed from the base. You could weld up the old pin hole before re-drilling the new one, I suppose, but that’s a whole lot of work, and my method of taking it off the top gave me a good enough result that it was worth skipping all the extra drama and expense.
I “polished” the top of the sight blades with some 1000-grit sandpaper, and had my gunsmith apply a little cold blue to refinish them, while he had them for the other work (I had him touch up the rub marks on the top of the rears, too, since the tape didn’t completely protect them from my efforts). I had considered smoothing the sharp edges and corners that remained after the correction, but elected to keep them as-is, for a few reasons. First, I wasn’t sure that I could do the bevels symmetrically, and second, it might serve as a useful “retention feature,” in the event I wound up wrestling someone for control of the gun. All the holsters I’d use for the set of K6s revolvers have sight tracks that would keep the front sights from dragging on the inside, so I wasn’t worried about them tearing things up in the holster.
For now, I used a black Sharpie marker to blot out the rear white dots on the three-inch gun, and I left the front alone, leaving the white dot in place. In the long run, I think I’ll try to fill the recess in the front sight with some epoxy, sand it smooth, then paint the face of the blade orange (over a white base coat), as I do on all my other guns. This would give me the plain black rear and orange front that I like so much. I’ll leave the three-dot Tritium pattern alone on the DC version, outside of possibly dimming the rear globes a tad, with a Sharpie.
Getting a grip
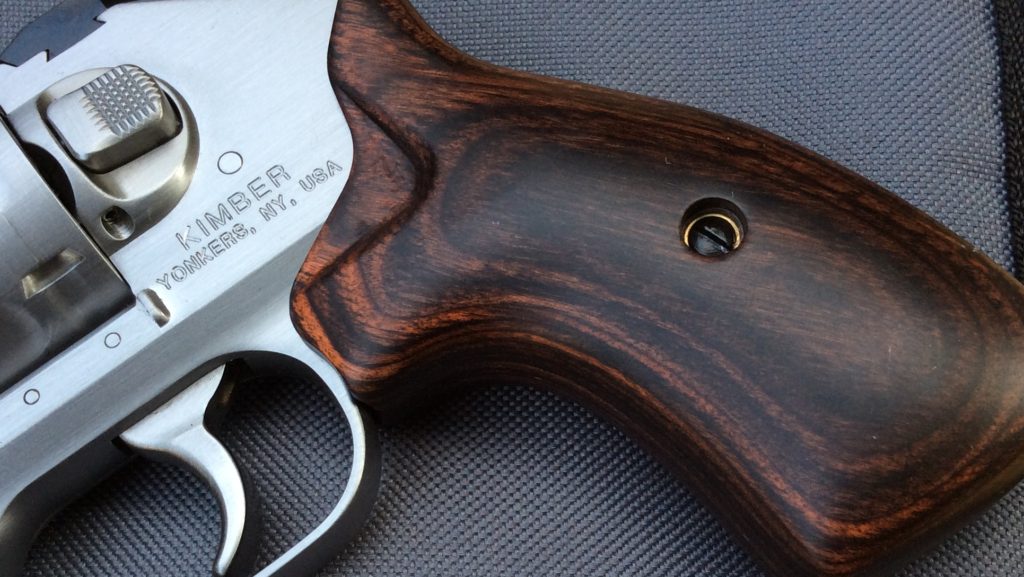
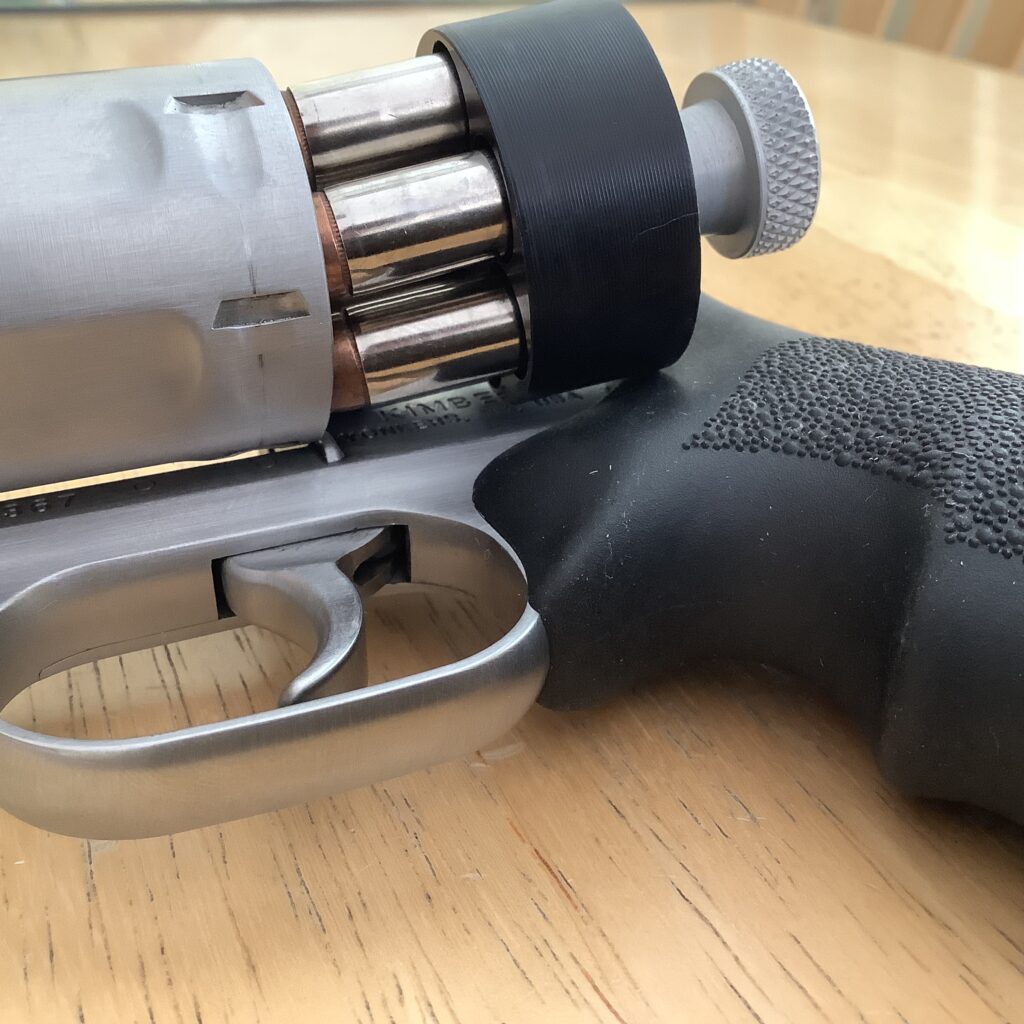
The OEM walnut grip on the three-inch stainless model is attractive and pretty comfortable, but isn’t properly relieved for speedloaders, as it comes from the factory. I fixed that myself, as regular readers know, and also corrected the same issue on the factory G10 boot grips that came on the DC model (which I think Altamont supplies to Kimber).
I’ve been fairly content with the grips after fixing the speedloader issue, but I’ve got a big hand and wanted a slightly bigger grip for the three-inch stainless. Unfortunately, even though the K6s has been selling well for over five years now, the industry still hasn’t stepped up to support this gun with the same vigor as other makes and models, so there aren’t a lot of production grip choices available. Altamont offers their very attractive Boot and Altai designs for the K6s, but the Boot was too small for what I had in mind on the three-inch gun, and the Altai was a little too expensive to experiment with, without getting a chance to try one out, first.
Fortunately, at the 2020 SHOT Show, I was able to wrap my mitts around Hogue’s new overmolded rubber version of their Bantam grip, and liked it. The grip covered the backstrap, which increased the trigger reach a bit, and provided some cushion against recoil for harder-kicking loads. It also had comfortable swells on each side, so it filled my larger hand well.
 The Bantams allow me to get a two and a half-finger grip on the gun.

The pinky extension at the front allowed a near-full grip on the gun, which I appreciated for the extra control it seemed to provide.
At SHOT Show, the folks at Hogue said they’d send a sample for T&E, but despite several attempts to close the loop with them in the year that followed, nothing ever came of it. I tried again this summer, in preparation for this article, but it just didn’t happen. I suppose they’re busy trying to keep up with demand from the Great Gun Rush of 2020-2021.
I was about to roll the dice and purchase one of these grips when RevolverGuy Dean Caputo came to the rescue, and sent an extra one he had. At the range, I found they were an excellent upgrade to the factory wood stocks. The soft, overmolded rubber did an excellent job of taming recoil, to the point that shooting Fiocchi 158 grain Magnum JHP loads out of the gun wasn’t the painful exercise it was with the factory wood grips. The rather prominent pinky swell was a little bothersome when I was handling the gun in dry fire, but I didn’t notice it at all in live fire.
Unfortunately, the speedloader relief on the Bantams was inadequate for .357 Magnum-length cartridges, and even the shorter .38 Specials wouldn’t feed without interference from my DS-size, HKS loader (prior experience showed the D-Series loader was the closest match to the Kimber cylinder, fitting it much better than the K-Frame loaders). With the .38s, after releasing the payload, there wasn’t enough room for me to withdraw the loader body, so the cartridges would properly seat into the chambers. The loader body would hang up on the grip on the left side, and I couldn’t withdraw it cleanly. I’m going to have to relieve the forward edge of the rubber grip a little, to guarantee speedloader reliability with my preferred Special loads, and the longer, Magnum cartridges that I’ll occasionally shoot in the gun.
Reloading issues aside, the gun shoots well with the Bantams installed. With them in place, it’s easy to think of the three-inch K6s as a compact, service gun that bridges the gap between a true snub and a service gun. With the Bantams, the three-inch K6s just handles like a bigger gun than it is, despite the fact that the grip doesn’t extend much beyond the bottom of the grip frame—less than a half-inch, probably, not much longer than a Boot grip.
One thing about the Bantams is that they’re a bit of a pain to remove. To install them, the frame pin at the bottom of the gun’s frame slides down a curved track on the inside of both sides of the grip, and eventually snaps into a recess at the bottom of the grip, to secure them in place. To remove the grip, you have to spread the base wide enough to get the frame pin out of the recess (but not too much, or you’ll break the plastic skeleton of the grip), then slide the grip off. Hogue provides a tool to help spread the grip apart, but it’s not something you’d want to do every time you clean the gun.
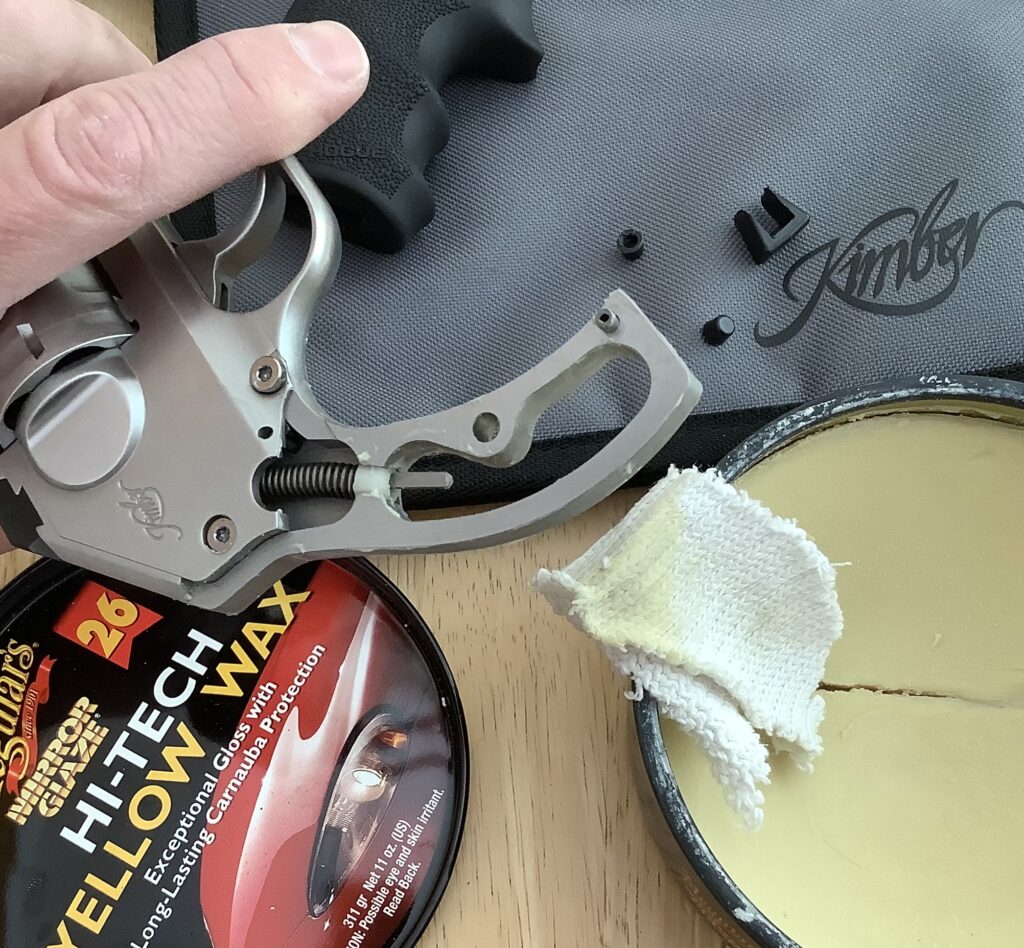
Knowing this, I decided to apply a coat of paste car wax to the Kimber’s frame before I installed the grips, for some added corrosion protection. Hopefully that will help to forestall any rust building up under the grips. I do know that it made them slide on pretty easy!
The OEM wood grips look better, but I think these Hogue grips are staying on the longer K6s. I need to fix the speedloader relief, but I’m very happy with them otherwise.
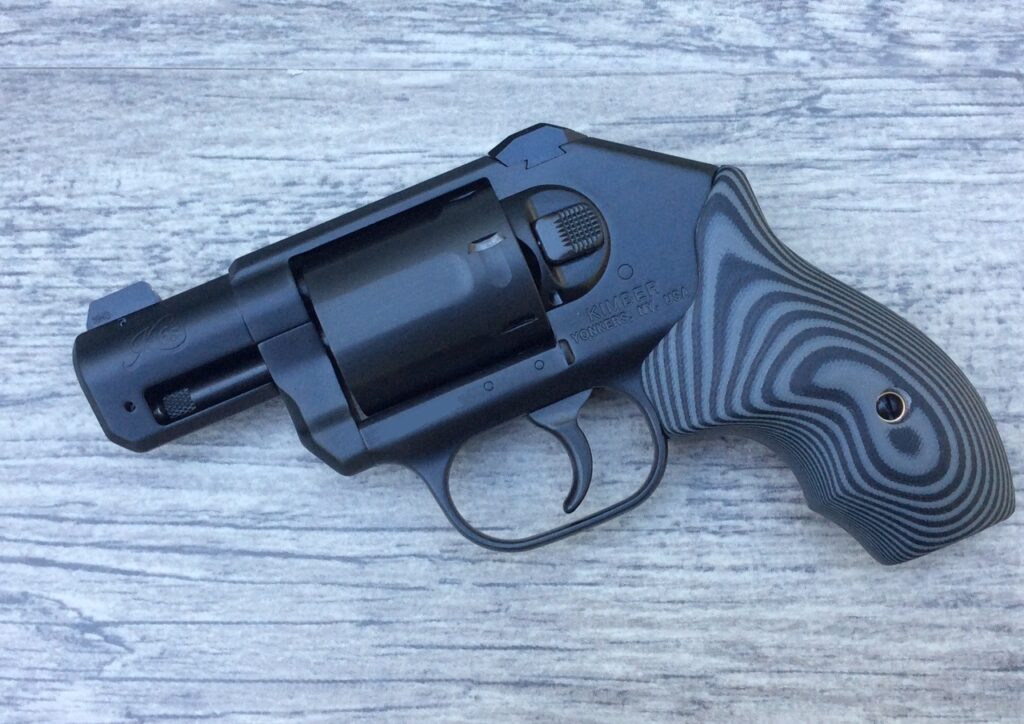
Grips for the DC
Although I was pretty happy with the factory G10 grips on the shorter DC model, they were pretty slippery and I thought it might be worthwhile to look for an option with just a little more traction. This would keep the gun from twisting in my hand under recoil, and prevent me from losing traction when my hands were wet. I wanted to stay with the abbreviated “boot” grip format (h/t Craig Spegel for inventing the term and popularizing the style) for this two-inch gun, which would make it more suitable for a pocket or ankle holster.
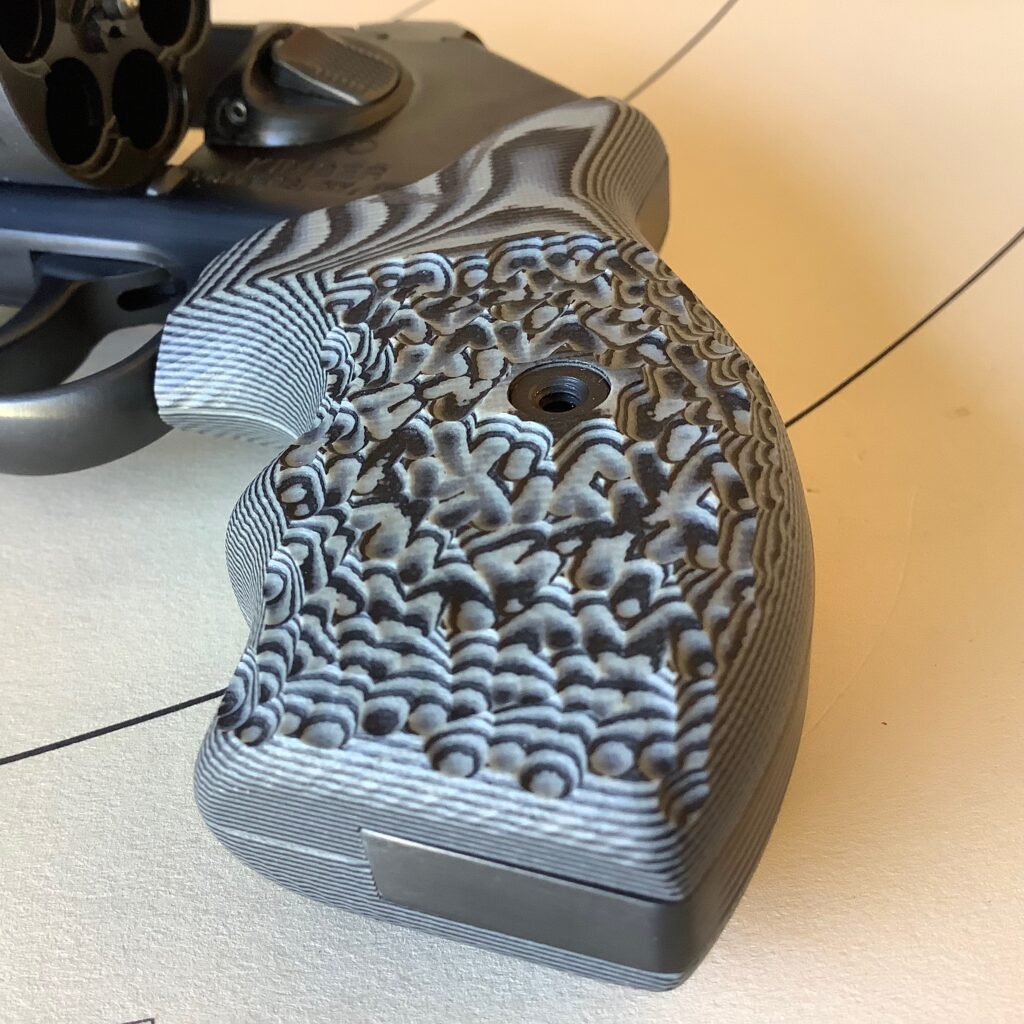
Justin had previously experimented with the VZ Grips version of the boot grip on his K6s, and he sent me the grips to evaluate after he was finished with them. Their Stipple G10 grips for the K6s have a very aggressive texture on the sides of the panels that really anchor the gun in the hand, but they’re just too aggressive to be comfortable on a carry gun that will be anywhere near your skin. The Stipple pattern has a lot of sharp points that make it feel like you’re trying to grip a pineapple, when the gun is in your bare hand. Even when you carry the gun with some clothing between the grips and your skin (i.e., in your pocket, or over a t-shirt) the sharp points on the stippled grips will be uncomfortable and irritating.
The VZ Grips “Twister” pattern grips for the K6s are a much better option for carry, with their deep ribs and milder grip texture, but I had the Stipple pattern grips in hand already, and I liked the overall feel of them, with the exception of the texture, so I headed out to the workbench with some sandpaper.
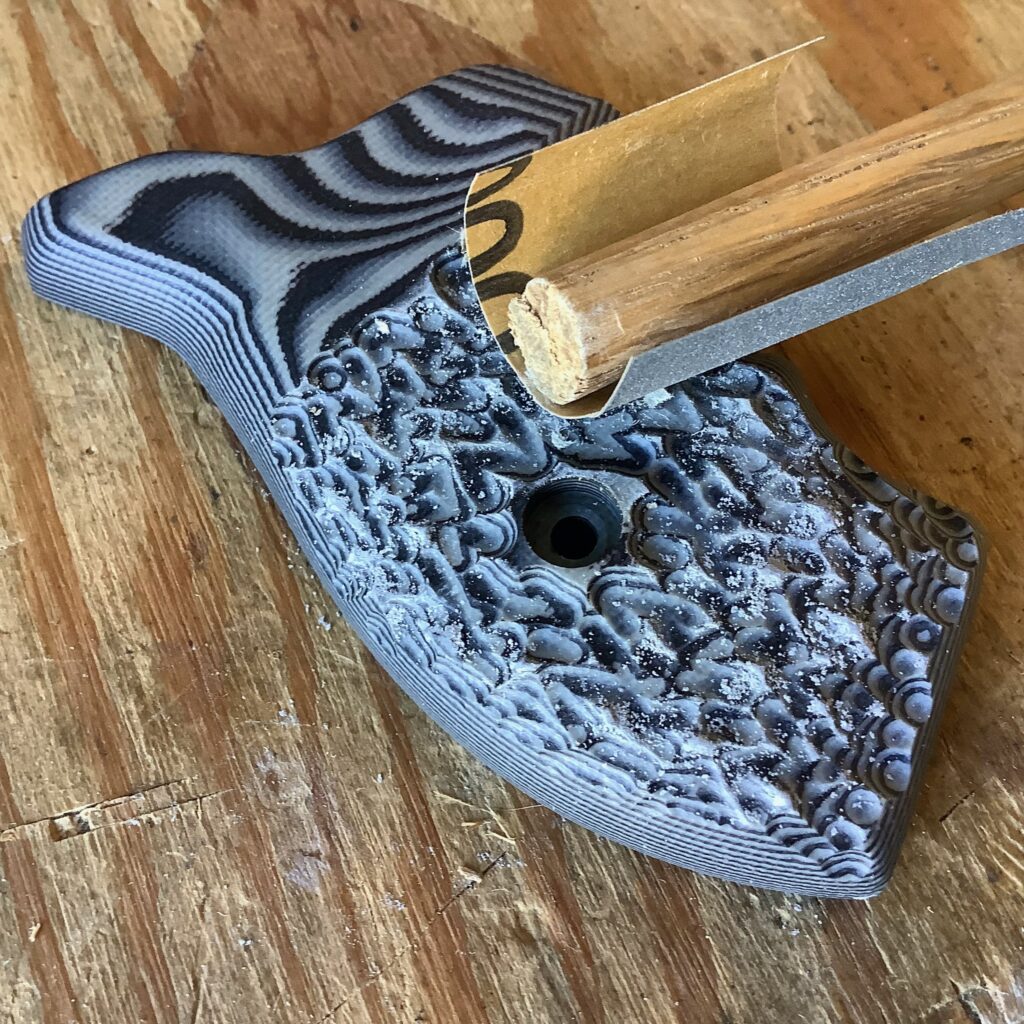
I knocked off the high points on the stippling pattern with some 500-grit paper wrapped around a section of wooden dowel, and while I was at it, I improved the speedloader relief on the left panel, because it didn’t offer enough clearance for the HKS speedloaders that I use with this gun (nobody seems to get this right in the industry, and I can’t explain why—it’s just one of those things I’ve come to grudgingly accept).

The overall effort may not win any awards, but the result was a set of boot grips with better purchase than the smooth, OEM grips, and I think they’ll do nicely, for now.
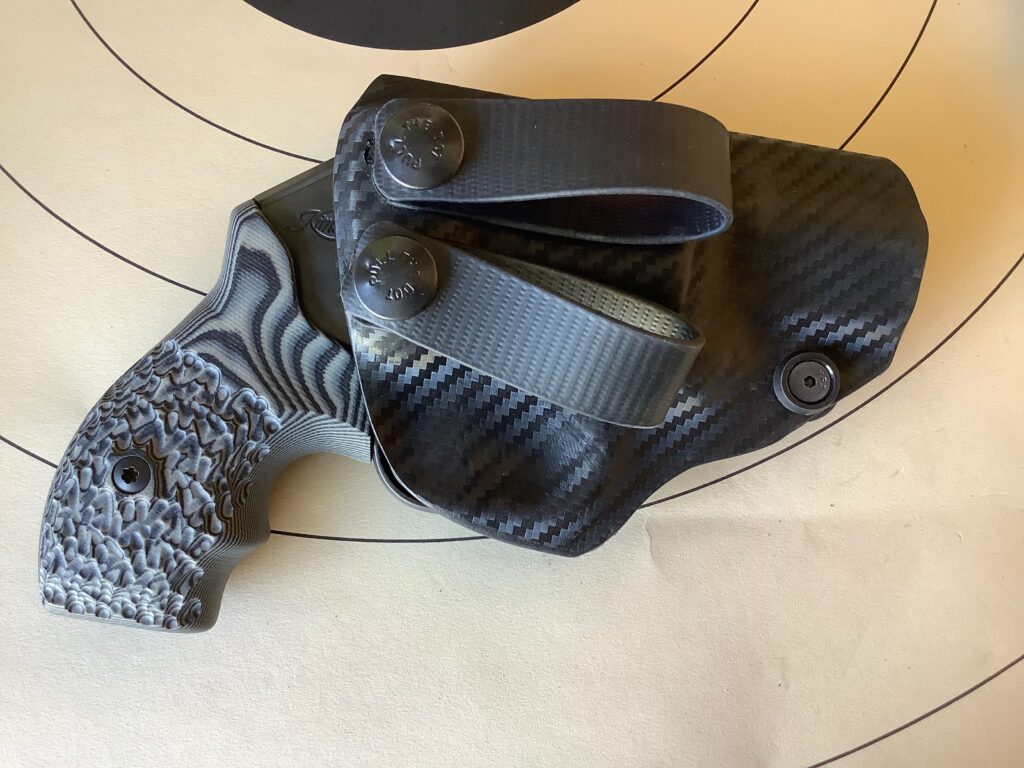
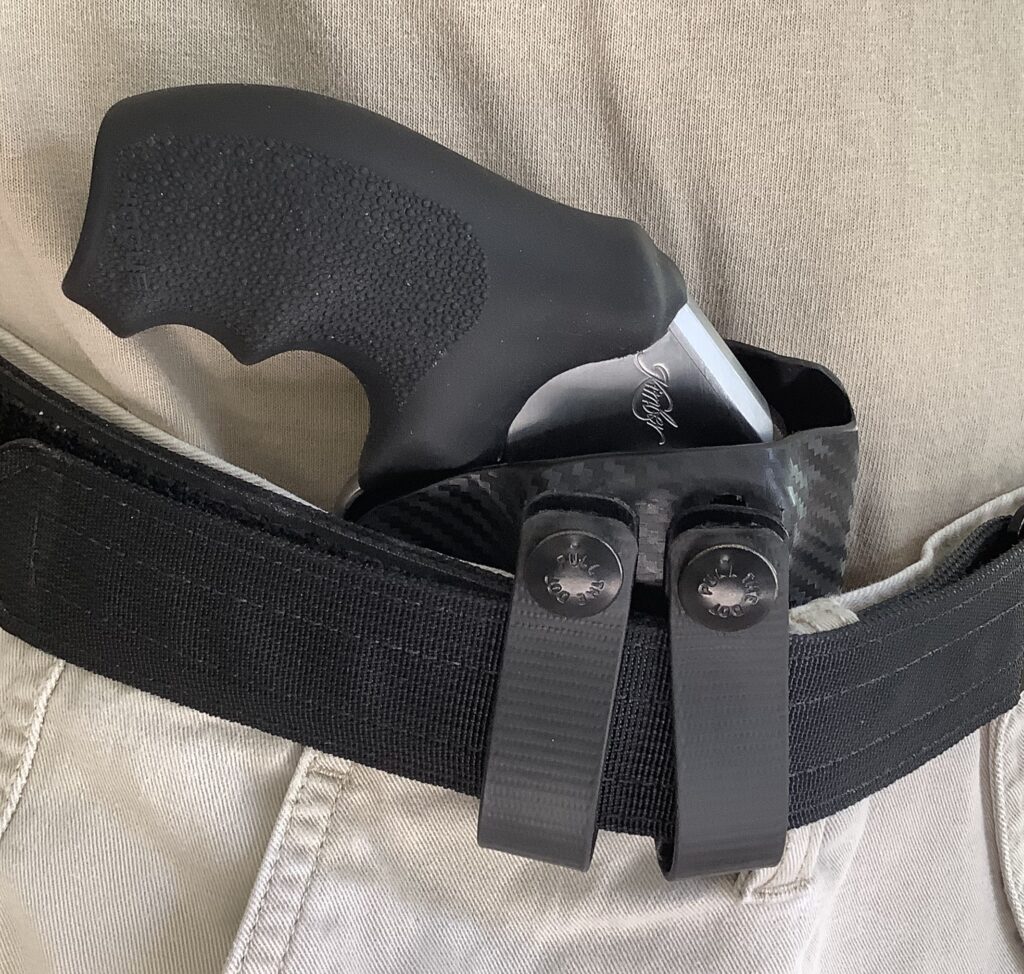
Now, a Holster
The great folks at DeSantis Gunhide were early adopters of the K6s, and offered several fits for them right away, to include their Flex-Tuk IWB holster, Speed Scabbard OWB holster, and the L-Gat Slide OWB holster that we reviewed here in these pages. However, I’ve been a dedicated Appendix IWB (AIWB) carrier for a long time, and wanted something more conducive to that mode of carry.
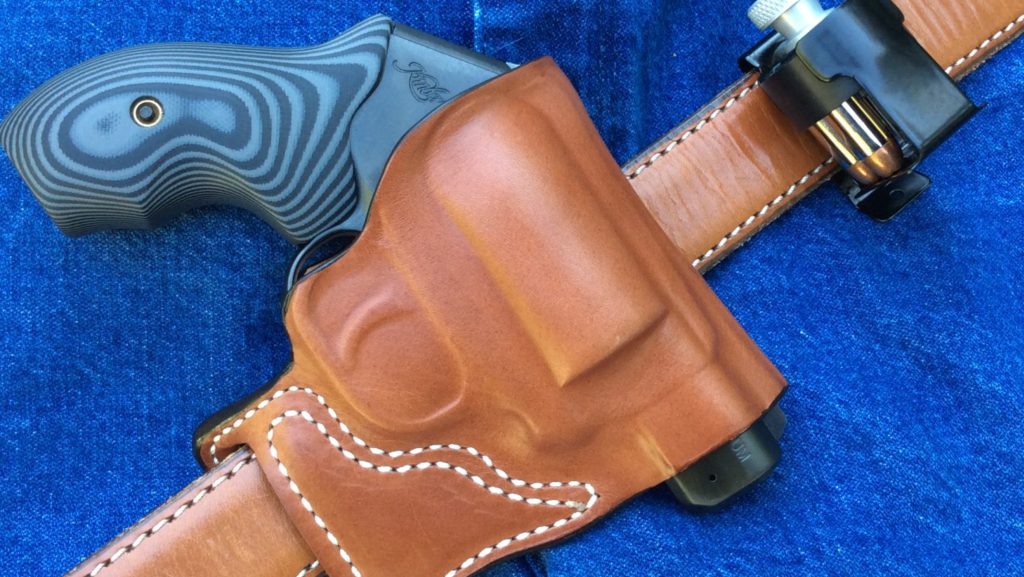
I could have placed an order with RevolverGuy favorites Dale Fricke or Sam Andrews, but since I was already making a good mess in the garage with all my grip sanding, I thought I’d add some Kydex dust to the mix, too.
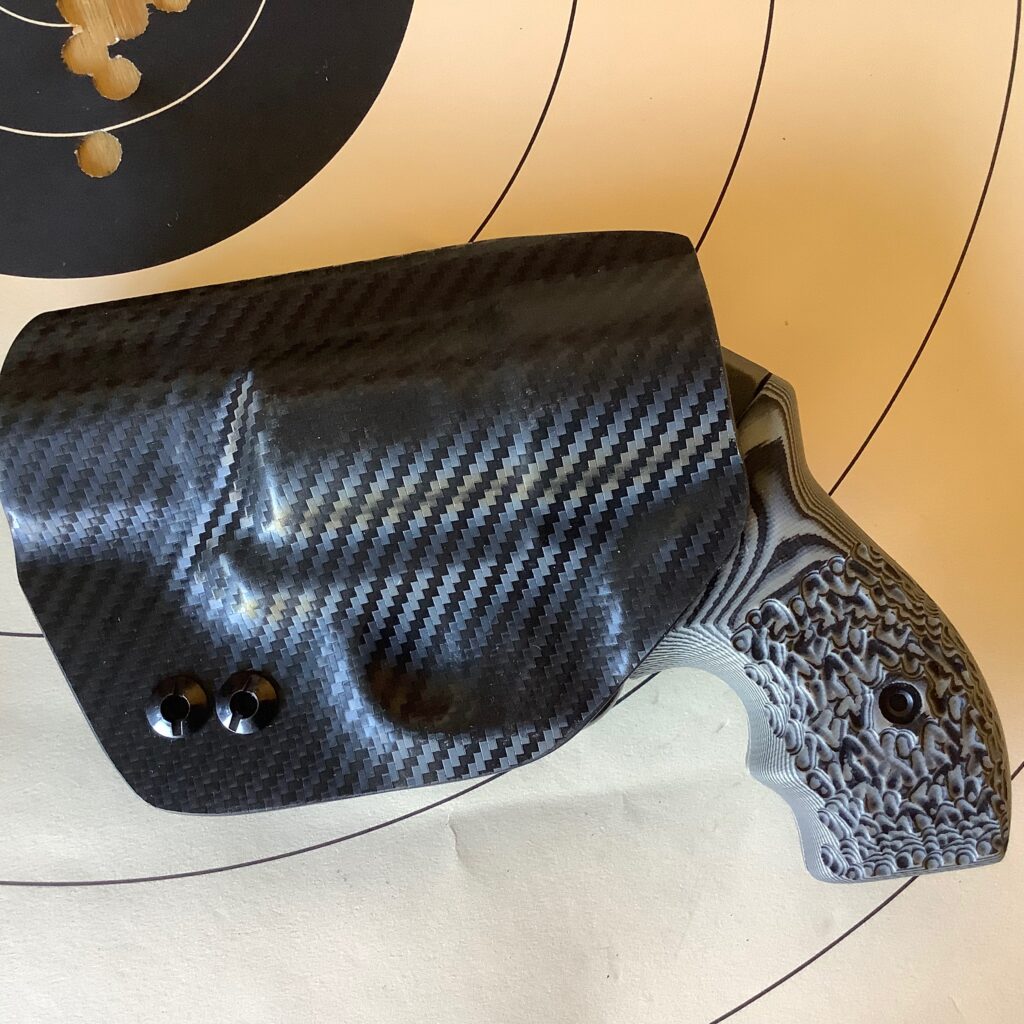
After searching through some boxes, I located a Kydex AIWB holster for the K6s that had been sent to us for review, but didn’t make the cut. The maker had a successful business crafting Kydex holsters for bottom-feeders, and wanted to try his hand at making a fit for the then-new K6s, but I found it uncomfortable and felt that the sweat guard interfered with getting a proper grip on the butt of the Kimber. I offered the maker a chance to make some corrections and send us an updated version for review, but he elected not to do that, so we passed on the review and the sample went into the graveyard of holsters in my garage.
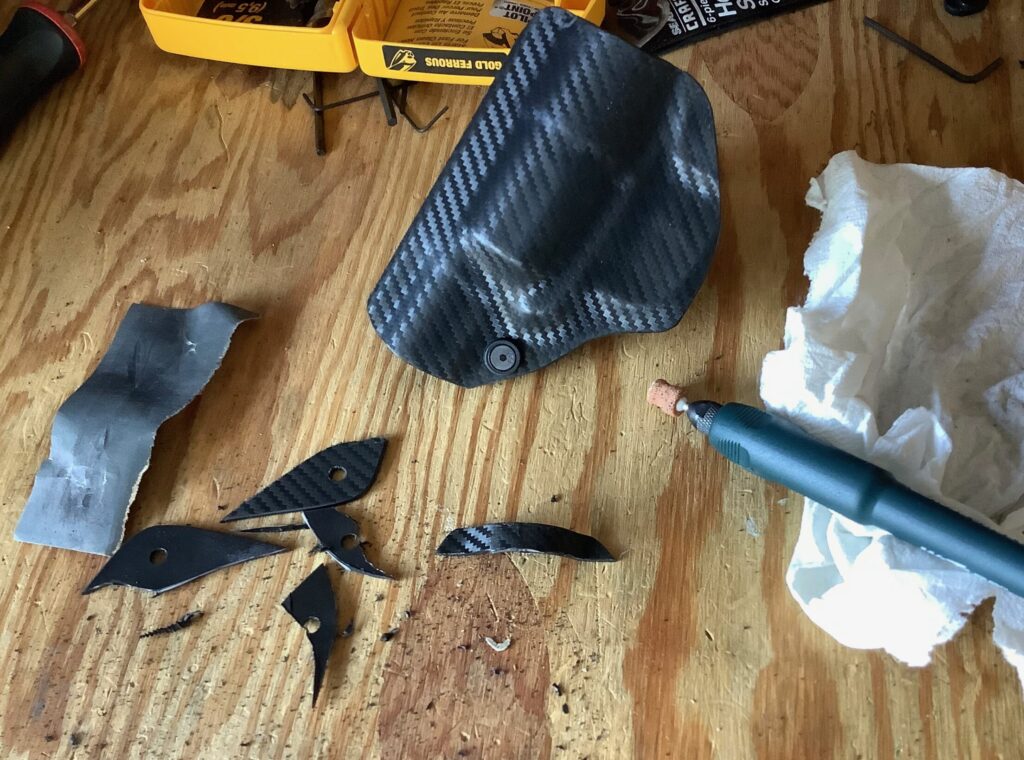
I thought I might be able to salvage it though, with some judicious removal of the offending material and the relocation of the tension screw, so in my best DIY fashion, I got out my pencil, a utility knife, and some sandpaper, and I got to work.
The first step was to trim the extra skirt material at the bottom of the holster. The original holster body was rather square at the bottom, and there was a bunch of unnecessary material in the lower, aft corner of the holster. I think this was the result of the maker trying to use one body design that would work with multiple attachments, as it appeared that the extra material was designed to provide a mounting point for a long, “tuckable,” strut and clip.
This was unnecessary for a holster equipped with dual belt loops though, and the extra material would bear on the inguinal ligament area, in the “crease” where the upper thigh meets the pelvis, every time the knee was lifted. You couldn’t sit, run, squat or even walk without the corner of the holster painfully digging into your upper thigh, so that area had to be trimmed back, as a first step.
I drew a rough border with the pencil, and got to work with the utility knife, making sure to keep the top and bottom halves as symmetrical as I could. After cutting away the excess, I radiused the curves and smoothed the edges with a rotary tool and some sandpaper.

Since the tension screw for the holster was originally located in the area I cut away, it had to be relocated. When I got to this step, I feared I might not have left enough margin, but I was able to find a spot where there was enough material to drill a new hole through both sides of the body for the relocated screw. It may not be located in the perfect spot, but it seems to work plenty well enough for this job. The maker had done a nice job of moulding the pocket of the holster to the contours of the K6s, so between that and the relocated tension screw, the retention qualities of the holster are right where I want them.
The rise on the sweat guard was a little high, and interfered with my ability to get a good grip on the gun, while it was in the holster. Some trimming, sanding and buffing lowered the guard and relieved the area aft of the trigger sufficiently, that I could establish a good grip in preparation for the draw. Since there’s no safety levers or other sharp controls on the port side of the K6s, it didn’t need a high guard anyhow, and what I left behind is enough to shield the cylinder release from being inadvertently activated.
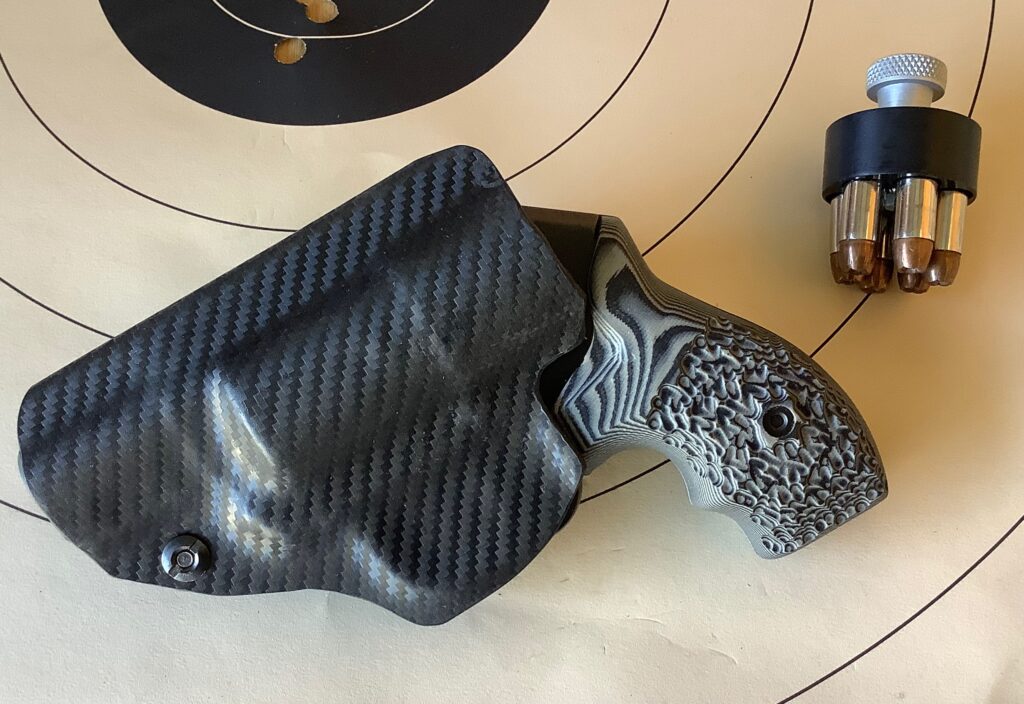
After these modifications, the holster was much more comfortable and useful for AIWB carry. I may eventually get Dale or Sam to craft me an appropriate rig for the K6s if I start to carry it a lot, but my “workbench special” will get me off to a good start with both the two and three-inch guns for the time being.
Good to go?
So, that’s where things stand with my brace of Kimbers for now. There’ll be a few more tweaks that I’ll make in the future (like filling and painting that front sight on the stainless gun, and fixing the speedloader relief on the Bantams), but I think I’ve got a 90% solution in place at the moment.
 What I really need to do the most, is put some time in with the guns, and improve my skill with these tools. A lot of dry fire, and a little live fire, will do more to improve my performance than any equipment changes will—software, not hardware, is my salvation now.
Time for me to get busy. In the meantime, you guys and gals be safe out there!
I’m assuming that the 3″ gun sticks out of the holster. Do you run into any issues with the front sight catching on the bottom of the holster when you draw? Maybe it’s because I haven’t played with kydex, but I would be worried about that.
Nope, works just fine, without any drag. There’s a generous sight channel molded in, and the cylinder keeps things centered long enough, during the initial part of the draw, that it keeps the front sight aligned with the sight channel. The front sight has entered the bottom of the holster by the time the cylinder has cleared the top.
No complaints on my K6S, an early-issue 2” gun. One of the first 6,000 made, which I picked up like-new for $200 under retail. The first owner must have seen how low it shot and took it back to the shop from whom I purchased it, with the box, paperwork, everything. I sent in the registration and as far as Kimber is concerned, I am the original owner.
Only used for five copperheads on our farm this year, in or near our stock. Several others in years past. I have carried it with two-legged-trouble loads on and off. It pocket-carries like a dream with the right belt.
I had to file down the front sight considerably for .38+p rounds. That was the only issue. Round count after 4 years is about 1k. I should ask Kimber about the firing pin, I reckon.
Wheelgunner, the Customer Service folks won’t even understand what you’re talking about, from what I hear. If it isn’t broken, I wouldn’t even bother with it.
If it breaks, I will get it fixed. I don’t shoot hot loads in it, anyway.
Best out-of-the-box trigger on a DAO gun I have shot.
But, Kimbers make Webley revolvers look pretty. Somebody at Kimber OKed the styling?
Haha! That 3” is pretty homely. The shorter one looks better.
Agreed – the ugly is less ugly with a shorter profile.
For sights, I’m considering adding material to the rear, rather than filing down the front… I’ll let you know if that works. I used gray Sharpie on the rear dots, just to subdue them a bit. Jury is still out on that. I also don’t like three dots and have always been concerned about what I call “dot confusion”.. On my Sig P365XL I sprayed the rear with a very thin coat of flat black and the results are perfect! Daytime I see a black rear and front dot. In the dark the rear sights glow but very faintly. My eye has no trouble finding the front. As to grips, VZ makes beautiful grips, but Hogue now makes a G10 with a pinkie rest and the texturing is a little less aggressive- as is the pricing. I’m still looking for a good AIWB holster myself. Cheers.
Those Hogue G10s look great, and I was hoping to get the chance to test some, but the effort has been a bust, so far. If you get some, please tell us what you think of them!
You must have Tritium rear dots for them to glow through the thin paint layer on your P365? Or are they fiber optics?
Yes they come with tritium. Not that Sig would settle for less, I guess. I found a set of Hogues on Amazon (what the heck- maybe he’ll leave for space permanently) and I’m fairly pleased… like I said, there’s a more full grip and reasonable texture. It’s a series of machine guided melted in holes, not as pretty as VZ grip texture, but painless certainly. I’ll try to send you some pics, if my phone and skills are up to it!
The Hogue grips are fantastic. I sanded down the texturing a little, since it was leaving hexagon-shaped creases in my hand after a cylinder. The shape of the grip and security when wet or dirty is outstanding.
Great article and very much my experience with Kimber revolvers. My solution fwiw: the best grips that I found for the 3” K6s DAO are the Control Core by Crimson Trace. I’ve tried ALL of them. Much better handing when loaded with 357. I hold mine at 12 o’clock and dotted the front sight with neon green testers paint … works exactly how I like it. The Kimber speed loaders work fine for me though I just slip the speed strip into my coin pocket. Kramer horsehide with a metal clip, IWB at 3-4 o’clock. Slim package, quick access, dead on. I practice often and carry everyday, going on 3 years with the same pistol. That’s the upside if everything works out.
Sounds like you have a great system and are well-practiced with it! Thanks for the point out to the Crimson Trace grips—I hadn’t been keeping pace with their K6s offerings. Are yours the ones made with G10 and rubber overmold? Or one of the wood grips with rubber overmold? I didn’t know they were making these hybrids, but they look great. Very interesting.
The Control Core by Crimson Trace are Kimber branded, SKU: 4100159
No laser. Available on the Kimber store website. They seem all rubber, have a honeycomb cell pattern interior, good exterior texture, and cover the backstrap. Nice angle, great recoil management, single-handed 357 not an issue. I do carry defensive 38s but wouldn’t hesitate to switch up. These grips don’t work on DASA models.
Thank you! I was unaware of those!
I kinda want one of these, but think the Colt King Cobra 3″ is more my speed.
The new King is a very nice gun! It would be an excellent alternative.
I really enjoyed the write-up. The K6 is on my wish list; it is just a matter of time.
Thanks! Glad you enjoyed it!
Thanks for the Kimber info as always, Mike. I bought a 2″ K6 a few years back after leaning heavily on the articles you and Justin wrote about them. Like some of the commenters have pointed out, the K6 is a significant investment. I purchased one clear eyed based on the intel this blog provided. The sight regulation is definitely an issue I wish Kimber would fix. The Hogue G10 “3 finger scallop” grips on mine are properly relieved (thankfully) for speedloader use. Oddly, it will run with most of my K frame HKS loaders but will not accept HKS DS sized loaders. I have carried this gun more than any other in the last two years because of its J frame dimensions with the extra round in the cylinder. Like Ruger’s LCR .327, The K6’s capacity gives me comfort carrying it as a primary. I hope Kimber is listening to you and will correct the minor flaws in this excellent design.
Zeta6’s K-clip works well in my 2” K6s.
https://zetasix.com/product/k-clip/
Your Kimber snub review is exactly what a revolver review should be, but rarely is. I’ve often wondered if they ever let ccw carriers try these guns before they introduce them? Apparently not!
Thanks, Mike, for such a superb effort!
Evan Marshall
Thank you Evan! That means a whole lot to me, coming from you! Much appreciated!
It is a little frustrating when obvious problems make it to the market. You’d think there would be some better real-world testing, before they program all the machinery to crank them out.
Poor sight regulation, cylinder gap too tight, and the firing pin initially was too fragile.
Given Kimber’s shaky record on their 1911s, I had my doubts on their ability to make a revolver.
A darn shame. It’s a revolver I really wanted to like.
Hi Mike, Thanks for pointing to this report. You have some great ideas. I haven’t even gotten mine to the range yet so I’ll have to see how the sights work for me. Also need to try to find one of the holsters you mention in stock somewhere. Thanks again. Bill R.
You bet, Bill. Those holster makers are all custom makers. I haven’t kept pace with the catalog, but perhaps DeSantis or Galco has a polymer holster for the K6s that would already be in stock? They definitely have some nice leather options.
Not sure why you’re having sight issues. I recently bought the 2” K6s dasa, and can hit anything I aim at with 38, 38+p, or 357 magnums from any reasonable self defense range. I have no problems shooting full power 357’s, even though I’m recoil sensitive. Probably the lightest shooting 357 snub nose on the market.
After purchasing a K6S DAO 2 inch, I was impressed with the overall engineering and design as well as the six rounds and .357 magnum capability. Almost immediately I purchased the K6S DASA target model with a four inch barrel and have been impressed with it except the target grips were too small and brutal with .357 magnum. Several months ago, I purchased from Kimber a set of their DASA grips which I could not make fit on the DASA model. The grips stayed on my bench from this past August until this February when I tried them. I noticed that one of the end caps was missing. My telephone conversation with Kimber Customer Service was disappointing. Kimber could not believe I would not open the grips within 30 days of receipt and told me that they could not cover them since more than 30 days had passed. My Kimber revolvers will be traded off as soon as possible in favor of Smith J and K frames.
Ralph, I can understand the disappointment, but I wouldn’t let your experience with the Kimber replacement grips sour you on two guns that you like, otherwise. Go talk to Hogue or Altamont or VZ Grips or someone else about grips for those guns you like so much, and chalk up the experience as a lesson. It’s a pretty long stretch from August to February . . . I know life gets crazy sometimes, and other priorities can prevent you from attending to things, but next time, check the package sooner!
I would trade my K6sx in a heartbeat. Don’t like the grip selection at all. I haven’t shot it that much but already feel the recoil with standard 38 more than my J frame 442 with plus p. It’s in the safe and will stay there until I can make a trade for another J frame but maybe the Ultimate Carry version.
John, I’ve found the Kimbers don’t feel as good in my hand as the Centennials, and talked about it in my article on Pointing and Bore Axis. The subtle differences between those guns seem to have significant effect on how we perceive the recoil and “pointability” of the guns.
Not sure how sanding down the front sight from the top is going to lower your point of aim when the dot is in the same exact place… otherwise thanks for the info.
Hi K, it’s because I wasn’t trying to lower the group, I was trying to raise it. Lowering the front sight height allows you to raise the point of impact for the same point of aim. Also, I don’t use the dot to aim. I look at the top of the front sight to set the elevation. For me, the dot is only useful as a coarse index for rapid, close range shots, where elevation differences are minor.
K,
I wondered the same thing. I recently purchase the 2” double action only model. First time to the range I was more accurate with it than any other snub nose I have shot. Could put the round right where I wanted aligning site dots even with fast shots. (I was shooting cheap standard 38 special in 125 gr). That said, I mostly shot at 7, 10 and 15 yards. Not likely anyway though you would need a 2” revolver for self defense past 15 yards….. possibly, but not likely. It is a great revolver! Also, best detailed review I have read this far.
Glad you liked the review Mark, and I’m glad you’re enjoying your Kimber. I hope it continues to shoot well for you.
Mike, I just found your site after coming from the range shooting my 4 inch DASA and groups are low. I shoot mostly hand load 148WC 38s for practice and sometimes 357 mags. I just got the K6 2inch in Feb, and also have low groups with practice rounds. I Carry the 2inch with Hornaday +p hollows. My question would be filing the sites to bring the aimpoint up, and train and practice using the top of the front, would you risk shooting high in a SHTF situation with carry loads? Thanks for the great info, and I have your site bookmarked.
Hi Fritz, glad you found us. My recommendation would be to use your carry load as the basis for any sight adjustments you make, then either find a practice load that hits close, or just accept there will always be a slight difference when you practice. In my case, my preferred carry load is a 130 grain, +P load, and I get almost identical results with standard velocity, 130 grain FMJ practice loads, so adjusting my sights for the carry load still allowed me to use the same holds when practicing with my training ammo.
You didn’t mention what Hornady load you’re using for carry, but they have a wide range of bullet weights available (90, 110, 125, 158) and they will all shoot to very different points of aim in your gun. Because Kimber uses 158 grain bullets (at .357 Magnum velocities) to regulate the sights at the factory, your gun will probably hit closest to point of aim if you choose the .38 Special 158 grain XTP JHP from Hornady as your carry load—you may not even need to adjust the sights. However, if you’re carrying the lightweight bullets, like the 110 grain Critical Defense JHP, then you’ll definitely need to make an adjustment if you want your rounds to hit at the same elevation as your sights.
So, figure out which carry load you want to use, then adjust your sights to it. That way, in an emergency, you can aim exactly where you want the bullet to go. If it hits a little bit off in practice, because your practice loads are different, just accept that and go on your way. Hope that helps.
I am wondering if the tightly packed cylinder, with its thin walls had any thing to do with it binding up? It would seem that there is less material in this cylinder to act as a heat sink than is the case with a more traditionally sized 6 shot .357 revolver. Likewise I suspect the similarly sized SP101 cylinder is better able to handle the heat because of its lower capacity and thicker cylinder walls.
Interesting theory, Steven, but this one had an overly-tight B/C gap when it was cool, so I know that was the main culprit. It may not have heated up as quickly, with more material to act as a heat sink, but I think the B/C gap was the real killer.
I have the K6S 2 inch and my preferred carry is the Hornady critical defense 110 +p. My K6s came with 3-dot sights, factory sighted for 158 grain 357, so it of course shot about 5 inches low using my cary load at 30 feet. I didn’t want to grind down that front sigh and have to repaint/reposition the dot (I actually like the 3-dot) so I decided to buy the fiber optic sight set (sku 4000153) on a hunch that that red FO front sight was shorter than the 3-dot. Lo and behold it was, about 1.5 mm. And that’s all it took. My POA/POI is about dead on at 30 feet with the Hornady. I thought it might be a little funky getting used to white-red-white, but I think it’s actually an improvement (or I’m just getting better;). And, of course, my K6s now shoots high with 357, but who really wants to shoot that out of this little thing anyway. The 4 inch version with a Hogue mono grip is where it’s at if you want to comfortably shoot 357 out of a K6s.
Jenks I really appreciate that bit of info. That’s very good to know. Glad your gun is now properly regulated!
Mike,
Thanks for this review–I know you created this a while ago, but I ran into exactly the same low grouping as you. I have two DASA’s (one for me and one for my wife) and they both have the same issue. I threw a laser boresite on them and found the bore and sights are misaligned by over a full degree-about 2.5 inches low at 10 feet. This is confirmed by using a straightedge on the top of the rear and front sights and the misalignment is visibly noticeable. I’ve discussed this with Kimber multiple times in hopes they would re-engineer the front sight to be lower, but they won’t admit there’s an issue and have no desire to fix it. I ended up doing the same thing you did–took off approx 1/16 in of the front sight and it’s better, but still shoots low.
I used to have a very positive view of Kimber as a manufacturer, but not anymore. The fact that they are still producing the same combat and night sights with a know problem is concerning–and it’s not just a small error, we’re talking several inches low at 7 yards (and, btw, it has nothing to do with the ammo–I tried factory magnum loads at 158g, 128g, and about 5 other reload configurations and there’s no difference inside of 7 yards).
David
Thanks David.
Shortly after it was introduced, I lobbied the lead engineer on the Kimber K6s team to have a second look at the sight regulation, using more reasonable loads than the Buffalo Bore 158 grain .357 Magnum loads they were using. He told me they did, and determined it wasn’t worth the effort to correct the discrepancy.
He was wrong about that, but it was his baby, not mine. You don’t want to fix it? OK, I’ll just warn everybody about it.
It actually does have something to do with the ammo. Kimber regulates the guns at 15 yards with that Buffalo Bore load. You won’t see a significant difference at 7 yards and closer with those other weights, or with 158s that aren’t loaded as fast as those BBs. You really need to push to 15 yards (and beyond) to really see the contrast.
It’s really a shame. The guns have so much going for them, and it would be an easy fix. They’re just being foolish, lazy, prideful, or all the above.